
Connect
Remote Desktop
Sign in to Windows servers and PCs over RDP in their own window, with shared clipboard, file copy, full screen, and an AI that can do tasks on the remote desktop for you.
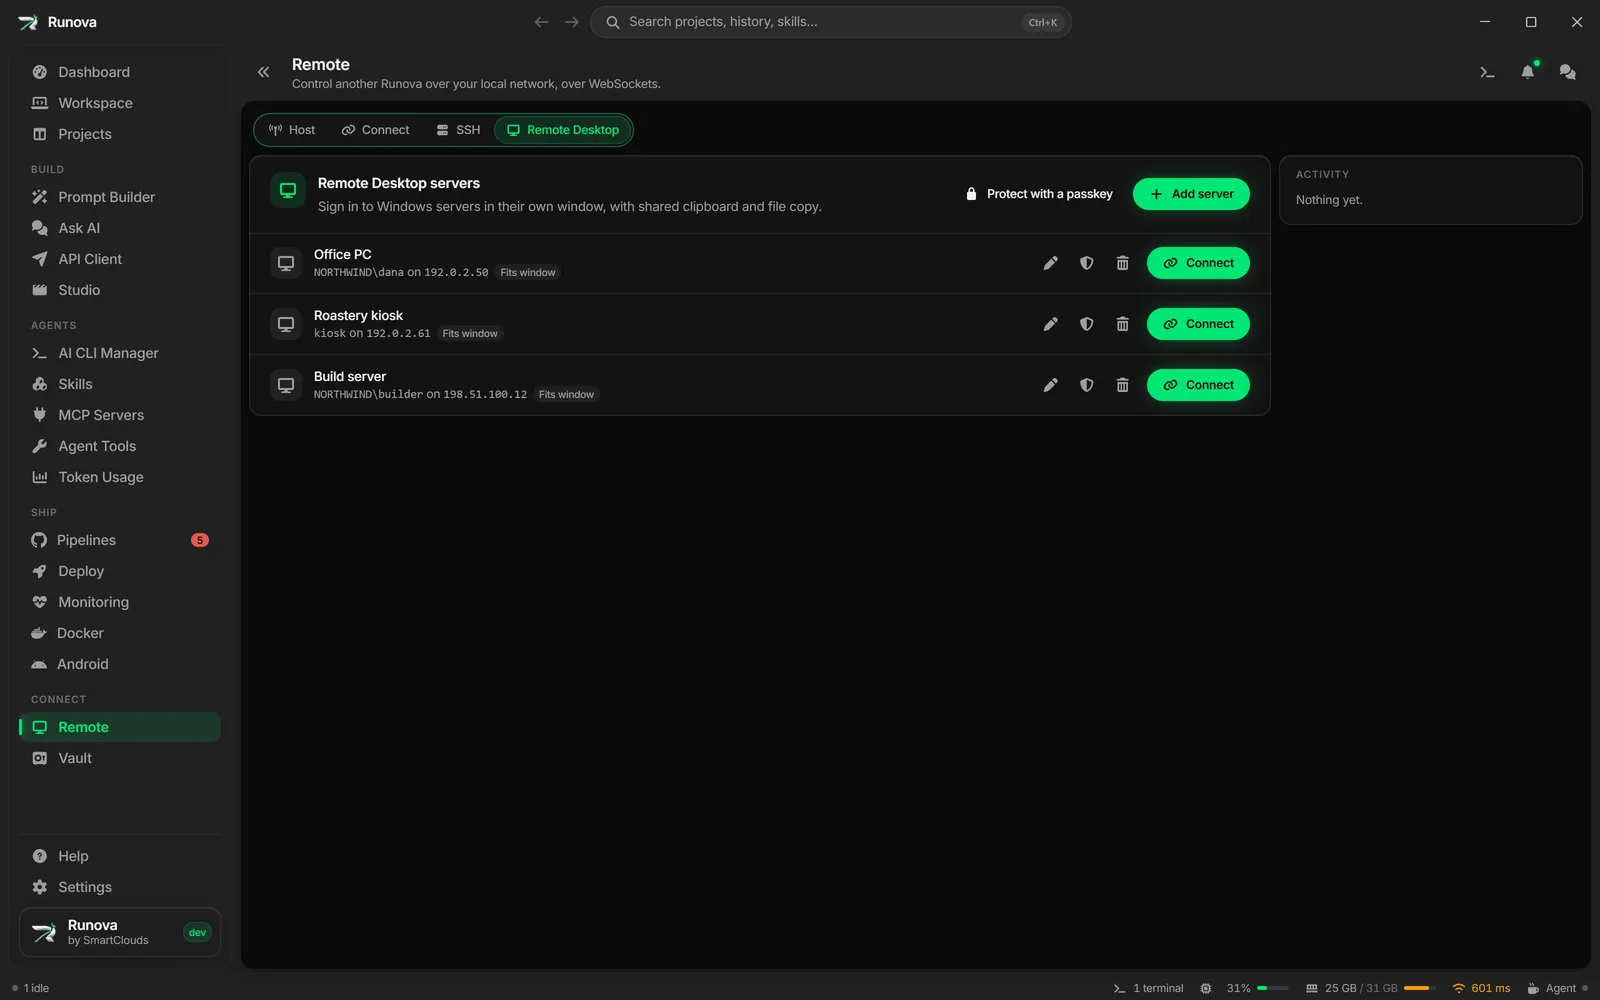
Remote Desktop lets you sign in to a Windows Server or Windows PC that has Remote Desktop (RDP) turned on. Each connection opens in its own window, like the Windows Remote Desktop Connection app. You can share the clipboard, copy files in both directions, go full screen, and even ask an AI to carry out a task on the remote desktop by looking at the screen and using the mouse and keyboard.
You manage the list of servers from the Remote page. You can have several sessions open at once, one window per server.
Where to find it
Click Remote in the sidebar under Connect, then open the Remote Desktop tab. You can also open the command palette and type Remote.
Add a server
- On the Remote Desktop tab, click Add server (in the card header, or in the empty state “No Remote Desktop servers yet”).
- Enter Nickname (for example “File server”), Computer (an IP address or a name such as
server.example.com) and Port (default 3389). - Enter Username (for example
Administrator) and, if needed, Domain (optional). You can also typeDOMAIN\useroruser@domainstraight into the username, and then the domain box is disabled. - Enter Password.
- Optionally click Display and sharing to adjust the options below.
- Click Add server, or press
Ctrl+Enter(Cmd+Enteron macOS).
To change a server, click the pencil on its row. Leave the password blank to keep the saved one. To delete it, click the trash can and confirm Remove.
Each row shows the account, the computer (and port if it is not 3389), the resolution and when you last connected.
Display and sharing options
| Option | What it does |
|---|---|
| Resolution | Fit the window (follows resizing) or a fixed size: 1920 × 1080, 1600 × 900, 1366 × 768, 1280 × 720 or 1024 × 768. |
| Open as | How the session window opens. Window is a smaller window you can move and resize, Maximized fills the screen but keeps the Windows taskbar visible, and Full screen covers the whole screen. |
| Share clipboard | Copy text and images here and paste them on the server, and the other way around. |
| Copy files | Copy files here and paste them on the server with Ctrl+V, and save files copied on the server. It needs clipboard sharing turned on. |
| Network Level Authentication | Signs in before the session starts. Windows Server requires it unless an admin turned it off. If Runova and the server cannot agree on security, try switching this. |
The defaults are: fit the window, windowed, clipboard on, file copy on, Network Level Authentication on.
Connect
Click Connect on a server row. A new window opens and shows “Connecting to (name)…” while it signs in. If you set an optional servers passkey (see Remote) and it is locked, Runova asks you to unlock it first, then connects.
If the connection fails
The window shows what went wrong in plain words, a short list under What you can try, and the buttons Close and Reconnect. The technical reason is folded under Technical details, with a copy button for a bug report. Common ones:
- “Can’t find the server” or “The server didn’t answer”. Check the address, the port and that the server is on.
- “The server refused the connection”. Check that Remote Desktop is on, the port is right (3389 unless changed) and the firewall allows it.
- “Sign-in failed”. Edit the server and check the username, password and domain.
- “This account can’t sign in”. On the server, add the account to the Remote Desktop Users group.
- “Security settings don’t match”. Edit the server and switch Network Level Authentication under Display and sharing.
- “Couldn’t set up a secure connection”. The server’s TLS settings may not match what Runova supports. If the server was just reinstalled, restart Remote Desktop Services on it.
- “The server’s certificate can’t be used”. See below.
- “Couldn’t connect through the proxy”. A proxy is on in Settings > Network and it could not be reached, turned down the username and password, or would not open the connection. Many HTTP proxies only allow port 443, and Remote Desktop uses 3389, so a SOCKS5 proxy is usually the better fit. To connect to a server without the proxy, add its address to Skip the proxy for.
When a proxy is on in Settings > Network, Remote Desktop goes through it too, both for sessions and for Get the certificate again. Servers on the Skip the proxy for list, and any your PAC script sends direct, connect straight. <local> only covers plain names and this computer, so add LAN ranges (for example 192.168.0.0/16) yourself if those servers should skip the proxy.
If the session ends later, the window says “Disconnected” with the reason and the same two buttons. Reconnect starts again with a fresh sign-in.
The server’s certificate can’t be used
Windows makes its own certificate for Remote Desktop, and by default it only allows an older kind of encryption (RSA key exchange). Runova tries the normal, stronger encryption first. If the certificate refuses it, Runova connects again with the older kind. You see this message only when the server turns that down as well. On the server, turn the RSA cipher suites back on in its TLS settings, or give Remote Desktop a certificate that allows digital signatures.
Certificate changed
The first time you connect, Runova remembers the server’s certificate. If it changes, Runova refuses and shows “The server’s certificate changed” with who it was issued to and by, its expiry, and the saved and current fingerprints. A change is normal after reinstalling the server or renewing its certificate. If neither happened, someone could be intercepting the connection. Choose Don’t connect or Trust and connect.
If you choose Don’t connect, the failed screen has a Review certificate button that brings the question back.
Get the certificate again, or forget it
You can deal with a server’s certificate without opening a session. Click the shield on its row to open Certificate for (name):
- Saved certificate shows who it was issued to and by, when it expires and its fingerprint, or says nothing is saved yet.
- Get certificate from server connects to the server, without signing in, and shows the certificate it presents now. If it is the saved one, it says so. If it is different, as after a reinstall, it shows the new one with Trust this certificate. If nothing was saved yet, it offers Save this certificate. Only the certificate you were just shown can be saved.
- Forget saved certificate removes the saved one, after you confirm. The next connection accepts whatever certificate the server shows and saves it, without asking.
Changing a server’s computer name or port also forgets its saved certificate, since it belongs to the old address.
The session window
In a normal window, a bar at the top shows the server name, a status badge (Connected, Connecting…, Failed or Disconnected) and these buttons:
| Button | What it does |
|---|---|
| Ask AI | Starts an AI task on this desktop (see below). Disabled while the AI is already working. |
| Ctrl+Alt+Del | Sends Ctrl+Alt+Del to the server. |
| Send files | Opens a file picker to send files to the server. Shown when file copy is on. |
| Save files | Saves files you copied on the server into a folder you pick. Shows a count when files are waiting. Shown when file copy is on. |
| 1:1 / Fit | Switches between actual size and scaling to fit the window. Shown when the server uses a fixed resolution. |
| Transfers | Opens the list of file transfers with progress. Click Clear finished to tidy it. |
| Full screen icon | Enters or leaves full screen. |
Window controls (minimize, maximize, close) are at the right. Closing the window ends the session.
Connection quality
Once connected, the status badge is followed by four small signal bars and the current download and upload speed. The bars show how quickly the server reacts to what you do, which is what makes a connection feel fast or slow:
| Bars | Quality | The server answers in about |
|---|---|---|
| 4 | Excellent | 75 ms or less |
| 3 | Good | 150 ms or less |
| 2 | Fair | 300 ms or less |
| 1 | Poor | more than 300 ms |
Point at the readout for the exact figure and the speeds. Until you type or click and the server answers, the tooltip says “Connection quality: measuring” and the bars are grey. A remote desktop only sends something when the screen changes, so Runova times how long the server takes to react to your keys and clicks instead of pinging it, and uses the middle of the recent samples. The speeds are averaged over a couple of seconds, and they are hidden when the window is narrow. In full screen the top bar is hidden, so the readout is too.
Full screen
Press Ctrl+Alt+Break to switch between full screen and a window, as in the Windows client. In full screen, move the mouse to the top edge of the screen and the connection bar slides down with the same buttons plus Minimize and Disconnect and close. It hides again a moment after you move away. Set Open as to Full screen for a server to always begin that way.
Resolution
With Fit the window, the remote desktop resizes when you resize the window. With a fixed resolution, the server keeps that size and you can use 1:1 or Fit to choose between actual pixels and scaling the picture to the window.
Clipboard
With Share clipboard on, text and images you copy on one side can be pasted on the other.
Copy files
File copy works through the clipboard, so Share clipboard and Copy files must both be on.
Send files to the server
Choose one of these:
- Click Send files and pick the files, then press
Ctrl+Vin a folder on the server. - Copy files on your computer, then press
Ctrl+Vin a folder on the server. - Drag files into the session window, then press
Ctrl+Vin a folder on the server.
A note at the top says “Ready on the server. Press Ctrl+V in a folder there to paste it.” If the files you copied add up to too much for the clipboard, Runova tells you and asks you to drag them into the window instead.
Get files from the server
On Windows, files you copy on the server land on your clipboard:
- On the server, select files and copy them (
Ctrl+C). - Wait a moment while Runova brings them over. The tooltip on Save files says when they are on your clipboard.
- Press
Ctrl+Vin a folder on your computer.
Copies of up to 256 MB are brought over this way. For anything bigger a note says so, and on macOS and Linux nothing is placed on the clipboard. In both cases use the Save files button instead:
- On the server, select files and copy them (
Ctrl+C). - In the session window, the Save files button shows how many are waiting. Click it.
- Pick a folder. The files are saved there, and a note says “Saved to (folder)” with an Open folder button. If some failed, it says how many.
The files brought over for the clipboard are kept in a temporary folder, so a paste still works after the session window is closed. They are deleted the next time Runova starts.
Ask AI on the remote desktop
The Ask AI button starts an AI that looks at the remote screen and works the mouse and keyboard one step at a time. It can click, double-click, right-click, move, drag, scroll, type text, press key combinations and wait. You can take over whenever you like.
Warning: Screenshots of the remote desktop are sent to the AI you pick, so it can see what it is doing. Only use it on desktops where that is acceptable.
Start a task
- Connect to a server and wait for Connected.
- Click Ask AI. In the dialog “Ask AI to do something on this desktop”, describe the task, for example “Open Notepad and write a shopping list”.
- Choose the CLI that will decide each step. Only installed agent CLIs that can look at a screenshot are listed. If none is installed, the AI provider in Settings is used instead, and its model has to be one that can see images (see AI providers).
- Optionally pick a Model and an Effort level. They are only available for CLIs that support them. CLI default keeps the CLI’s own setting.
- Choose how much control to give the AI:
- Approve each action. Nothing happens on the desktop until you click Approve.
- Auto, guard risky ones. Asks before shortcuts like
Win+RorAlt+F4and before typing text. - Fully autonomous. Runs the whole task unattended. Just watch the desktop.
- Click Start (or press
Ctrl+Enter). Your last choices are remembered next time.
While the AI works
- The remote screen is covered by a see-through layer so a stray click or key press cannot get in the way. A bar at the bottom says “The AI is using this desktop” with a Take over button, which stops the task and gives the desktop back to you.
- A status row under the title bar shows the current step (“Step 3: looking at the screen…”, or the action it is performing).
- When an action needs your approval, the row asks “Step N: do (action)?” with a note about why it is risky when there is one, and Approve and Skip buttons. A crosshair on the screen shows where a click would land.
- If the AI needs information from you, the row shows its question with a text box and Send.
- If the task pauses because of an error or because it reached the limit of 40 steps or 30 minutes, the row shows the reason and a Continue button. Stop ends it.
- Stop (while it runs) ends the task. When it finishes, the row shows “Task complete.” or the result, and the X dismisses it.
History
The History button on the status row opens a list of every task the AI ran in this session, with each action, how it went and what you answered. You can copy a transcript. History is kept until Runova closes, for up to 20 tasks per session.
Tips
- If clipboard or file copy do not work, check that Share clipboard and Copy files are on for that server (use the pencil to edit it).
- If sign-in works in the Windows Remote Desktop app but not here, try turning Network Level Authentication off or on for that server.
- The keyboard shortcut for full screen is
Ctrl+Alt+Break. It is caught before the remote screen sees it.