
Settings
Settings
A tour of every tab and card in Settings, from the theme and startup page to default agents, shortcuts, AI keys, Telegram, proxy, backups and updates.
Read about this part of Runova on the Everything else page.
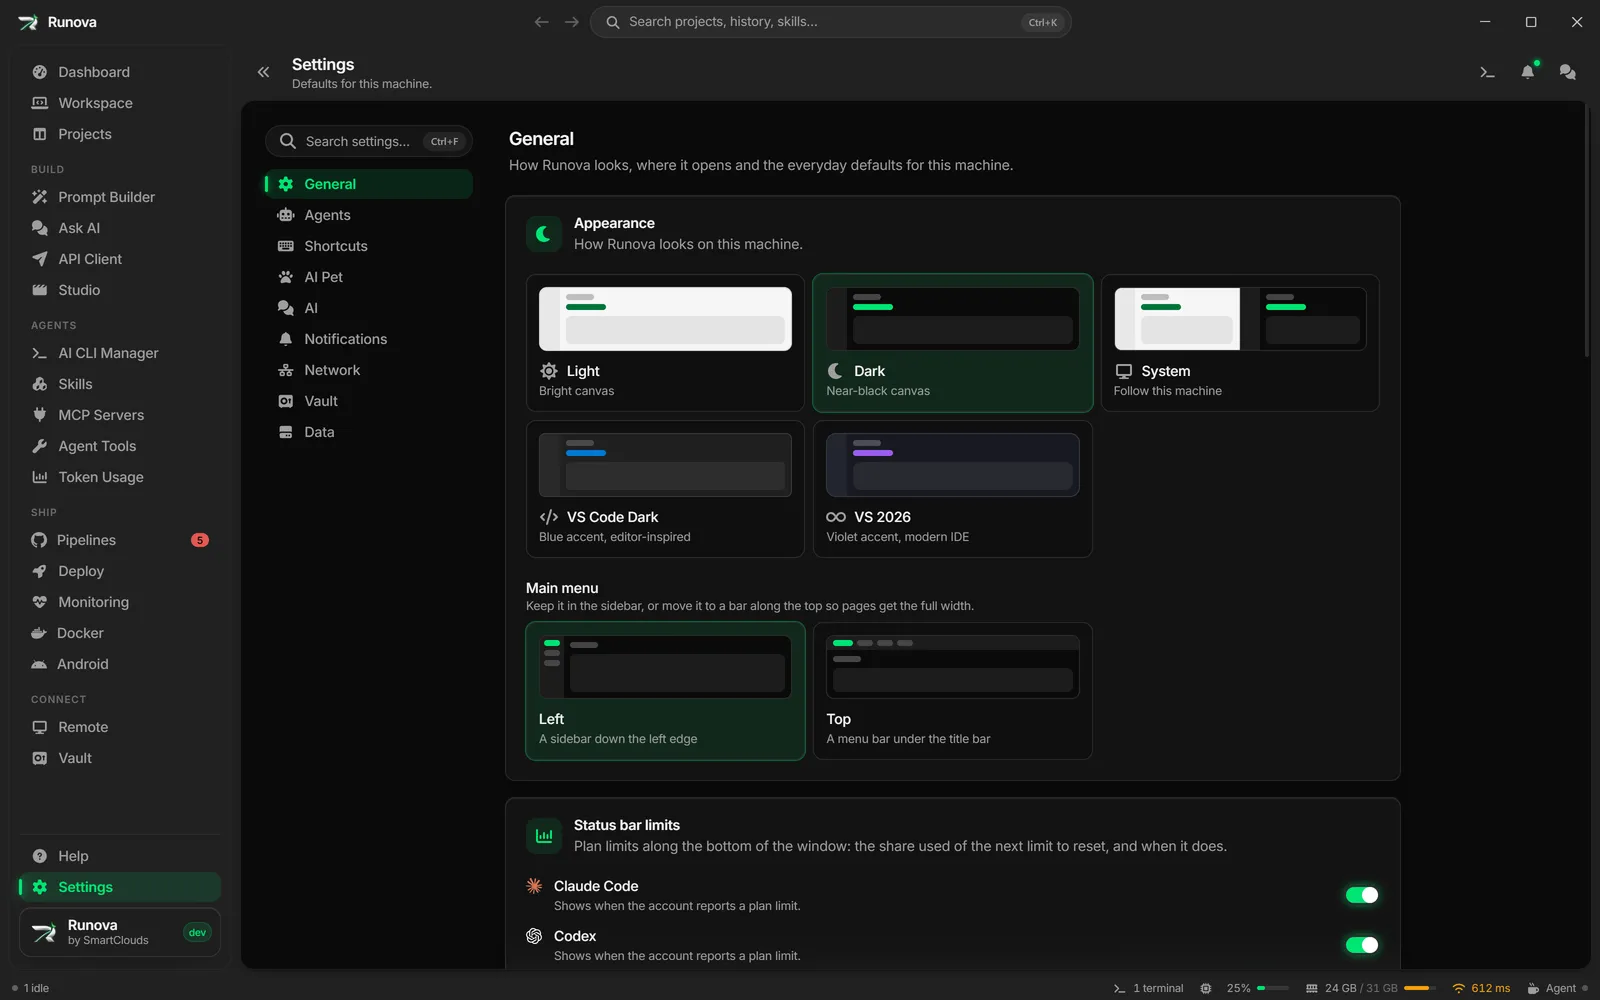
Settings holds the defaults for this machine: how Runova looks, which agent CLI starts by default, your keyboard shortcuts, AI provider keys, notifications, the network and your backups. The page is split into nine tabs, and every card inside a tab is described below. Most cards save the moment you change them. A few hold your edits until you press Save changes, and this article says which.
Where to find it
Click Settings in the main menu (it sits at the bottom of the sidebar, or at the right end of the top menu bar). You can also open the command palette (Ctrl+K) and type Settings. The page opens on the General tab, and each tab has its own address, for example /settings?tab=agents. The tab names are General, Agents, Shortcuts, AI Pet, AI, Notifications, Network, Vault and Data.
Search and saving
Search settings
The search box at the top of the category list filters every card on every tab. Press Ctrl+F (Cmd+F on macOS) to jump into it and Esc to clear it. While you search, no single tab is open: matching cards are grouped under their tab name, and the number beside each tab in the list says how many of its cards match. Try words like theme, API key, Telegram, backup or proxy. If nothing matches you see “No settings match” with a Clear search button.
Which cards save right away
Some cards write your change as soon as you make it. Others keep a draft until you save.
| Saves immediately | Waits for Save changes |
|---|---|
| Appearance and Main menu, Status bar limits, the switches in the top card of General, Android SDK, everything on Agents, Shortcuts, AI Pet, Help search, Writing check, Vault, the Network ping method | Projects folder, Providers, Voice input, Translation retries, Telegram bot, Proxy, Network ping targets |
When something is waiting to be saved, its card shows an Unsaved badge, its tab gets a dot, the page subtitle reads “You have unsaved changes.” and a bar appears at the bottom with Discard and Save changes. You can also press Ctrl+S (Cmd+S on macOS) to save everything at once. Discard throws away every draft on the page.
General
The General tab covers how Runova looks, where it opens and the everyday defaults for this machine.
Appearance
Pick a theme by clicking one of the five preview tiles: Light (bright canvas), Dark (near-black canvas), System (follow this machine), VS Code Dark (blue accent, editor-inspired) and VS 2026 (violet accent, modern IDE). The change applies instantly.
Below the themes, Main menu chooses where the navigation lives. Left puts it in a sidebar down the left edge. Top moves it to a menu bar under the title bar so pages get the full width. The menu moves as soon as you click.
Status bar limits
Status bar limits has a switch for each of Claude Code, Codex and Cursor. A switch that is on (the default) lets that provider show its plan limits in the status bar at the bottom of the window. Turn one off to take its item out of the bar. A provider only shows up when its account reports a limit, so Codex signed in with an API key, or an unlimited Cursor plan, stays out of the bar either way. If a provider’s limits fail to load, its item stays in the bar, dimmed with a warning icon, until they can be read again. See Token Usage.
Startup page
Startup page decides where Runova opens. Last opened page (the default) brings back the page and project you were on, whether you closed the app, it restarted for an update or the computer shut down. You can instead pin one page from the list (Dashboard, Token Usage, Prompt Builder, Projects, Workspace, API Client, Pipelines, Deploy, Skills, MCP Servers, Agent Tools, Docker, Android, AI CLI Manager, Ask AI, Remote, Vault or Settings). The list has its own search box.
Keep terminals running
When Keep terminals running is on (the default), terminal sessions carry on in the background after you quit Runova and come back with their output the next time you open it. Restarting to install an update always keeps them. If you turn it off, quitting stops the sessions. When you close the app with sessions open, Runova asks “Close Runova?” first and tells you what will happen to them.
Docker containers when a run stops
Stopping a project’s run does not stop the Docker containers it brought up. Docker containers when a run stops decides what happens to them. Ask me (the default) opens a dialog listing the project’s running containers after the run stops, so you can choose which to stop. Always stop them stops them without asking, and Never stop them leaves them alone and does not even check Docker. Ticking Remember my choice in the dialog sets this for you. See Docker.
Idle Docker containers and emulators
Idle Docker containers and emulators is how many minutes a running container or emulator can sit unused before the Dashboard lists it as idle. The default is 20, and any number from 1 to 1,440 (a day) works. Press Enter or click out of the box to save it, and a number outside that range is moved to the nearest one. The Dashboard’s Idle Docker and Emulators card has the same box under its gear button. See Dashboard.
Idle resource alerts
Idle resource alerts (on by default) sends a system notification the first time a container or emulator goes idle, and again only after it has been busy and gone idle once more. Clicking it opens the Dashboard, where you can stop it. Turning it off does not change which things are listed as idle. See Dashboard.
Workspace notifications
Workspace notifications (on by default) sends a system notification when an agent in a Workspace tab finishes or asks you something while you are looking at another tab, another page or another app. See Notifications and Telegram for what the notification says and where a click takes you.
Terminal AI notifications
Terminal AI notifications (on by default) sends a system notification when an AI task in a terminal asks you a question or waits for you to approve a command, while that terminal is hidden or you are in another app. It covers AI tasks started from SSH terminals and Remote Desktop sessions. Details are in Notifications and Telegram.
Check for CLI and tool updates
Check for CLI and tool updates (on by default) checks every installed CLI and tool for a newer version once a day and adds an entry to Recent messages (the bell in the header) when it finds one. It does not install anything. To update a CLI, open AI CLI Manager.
Workspace terminal background
Workspace terminal background is off by default, so a Workspace terminal pane looks the way its CLI would in any ordinary terminal (for example Claude Code’s own gray). Turn it on to paint a fixed color behind the terminal instead. A color swatch appears under the switch, and the text color adjusts to stay readable on it.
Projects folder
Projects folder is where folder pickers open instead of the system default. Type a path or click Browse…, then save. Clear the field and save to go back to “wherever the system last left off”. This card waits for Save changes.
Skill repositories
Skill repositories shows how many repositories are configured. Adding and syncing sources happens on the Skills page, so the Manage button just takes you there. See Skills.
Blueprint presets
Blueprint presets are reusable snippets for a project’s Blueprint. In the Blueprint wizard, clicking a preset chip appends its text to that step.
- Pick a Step from the list: Idea, Architecture, Backend, Frontend, CI/CD or Quality. A badge shows how many presets that step has.
- Under New preset, type the chip text (up to 60 characters) and the text that gets appended when the chip is clicked.
- Click Add preset. To change one, click the pencil on its row, edit it and click Save changes (or Cancel). The trash button removes a preset after you confirm. Blueprints that already used it keep their text.
Android SDK
Android SDK says where the Android page looks for adb, the emulator and the command-line tools. The card shows the folder it found and how: set here, from ANDROID_HOME, from ANDROID_SDK_ROOT, or found in the usual install folder. If nothing is found, click Browse and pick the folder that holds platform-tools and emulator. Clear goes back to automatic detection. The switch Stop emulators when Runova quits is off by default, because an emulator is a window you can close yourself and it takes a while to boot again. See Android.
Agents
The Agents tab covers which CLI starts, how each one launches and how agents work with git. Everything here saves as you change it.
Default CLI
Default CLI is the agent Runova uses when a feature needs an AI provider without asking you. Pick one from the list, or clear it to have none. When one is selected a Background task arguments box appears for that CLI. Those flags are used only when Runova runs the CLI in the background (commit messages, tag suggestions, version bumps and skill audits), never for terminals. Press Enter or click away to save them. Every CLI has the same box in AI CLI Manager.
Launch defaults
Launch defaults sets the model, effort and permission mode each agent starts with in a Workspace tab or terminal. Each installed agent that has launch flags gets a row. Click a row to open it, then choose:
- Model: pick from the list or type a model name and choose Use “name”. Grok and Cursor list the models Runova knows, and still accept a typed name.
- Effort: Not set, Low, Med, High, XHigh or Max, limited to what the chosen model supports.
- Mode: cards such as Not set or the CLI’s own permission modes. Modes that let the agent edit files and run commands without asking are marked with a warning triangle and a red-tinted note.
A preview line shows exactly what the terminal will type, and Reset clears the row. Anything left on Not set adds no flag and the CLI picks for itself. Hold Alt while clicking a launcher to start an agent without these defaults. To start one tab on a different model or effort without changing the defaults, use the model list on the agent’s row in the + menu. Agents that are not installed are tucked behind Show N not installed.
Agent order
Agent order is the order agents are listed in when you start one in the Workspace (the + menu and the tiles in an empty pane). Drag a row, or use its up and down arrows. Installed agents get number keys 1 to 9 in this order, shown on each row, and the number keys launch them (see Keyboard shortcuts). Default order resets the list.
Commit messages
Commit messages controls how the sparkle button in the Workspace changes panel writes a commit message.
- Written by: the CLI that writes it. Left empty it uses the project’s CLI, then your default CLI.
- Longest summary line: a slider from 40 to 120 characters.
- Style: Conventional Commits, Plain summary, Summary and bullet points or My own instructions.
- Extra instructions (optional), or Your instructions when the style is custom. This saves after you stop typing for a moment.
- Allow a body: lets the message include a short explanation under the summary line. It is hidden for the bullet-point style, which always has one.
Worktrees
Worktrees holds the app-wide preferences for git worktrees. New worktrees go either Next to the repository or In one folder that you pick (use Change folder to switch). Files to copy lists patterns, one per line, for untracked local files that new worktrees start with (the default is .env and .env.*). Delete the branch when removing a merged worktree is off by default, and a branch with commits that exist nowhere else is always kept. A project can override the copied files and add a setup command on its own Git tab. See Worktrees.
Review commands
Review commands are the comments offered in the Workspace Pull request tab to ask a review bot to look at a pull request. The defaults are @claude review, /gemini review, @coderabbitai review and @codex review. Type a new one in the box and click Add (or press Enter), remove one with the x on its chip, or click Reset to defaults.
Shortcuts
Keyboard shortcuts
The Shortcuts tab has one card, Keyboard shortcuts, where you rebind the app, Workspace, prompt builder, commit box and Vault shortcuts. Click the + next to a command, press the new keys, and use the reset arrow to restore one command or Restore defaults for all of them. Changes apply right away. The full list of defaults, the binding rules and the keys that cannot be changed are in Keyboard shortcuts.
AI Pet
The AI Pet tab controls the desktop companion, a character that lives on your screen. This tab saves as you change it. The full guide, including what the pet does when you click it, is in Widgets and the desktop pet.
My AI Pet
My AI Pet has the main switch Show my AI pet. Click the pet for a token report, double-click it to bring up Runova, right-click it for quick options and drag it to place it. If you hid it from its right-click menu, this card says until when and offers Show now. Below it are more cards: Character (pick one of the built-in characters or Add your pet with a PNG, GIF or WebP up to 8 MB, then name it and flip its walking direction), Motion (wander, climb, parachute, 3D rope), Action speed, Alerts (pipeline failures and passes, internet quality, CLI needs input) and Size (display size 50% to 160% and click area 40% to 100%).
AI
The AI tab has API keys, local models, voice input, the Help search model and writing checks.
Providers
Providers starts with Prompt Builder writes with, a row of tiles (OpenAI, Gemini, Ollama, Default CLI) that picks what writes your prompts, each with a line saying whether it is ready. Below it, Connections has a tab per provider: the OpenAI key and model, the Gemini key and model, and the Ollama server URL and model, with context length and keep-alive under Advanced. Ollama has a Test connection button that shows Connected with the version, or Not reachable. This card waits for Save changes. The step-by-step setup is in AI providers.
Voice input
Voice input sets the local Whisper model and the spoken language for dictation in Prompt Builder. Model is Tiny (fastest, about 75 MB), Base (balanced, about 145 MB, the default), Small (about 490 MB) or Large v3 Turbo (most accurate, about 760 MB, needed for Persian). The model downloads once and stays cached. Spoken language is one of English, Persian, Spanish, French, German, Arabic, Chinese, Russian, Hindi or Turkish. There is no auto-detect, because the local model cannot tell languages apart and would treat everything as English. When the model is too small for the language (for example Persian on Base), a note says so and Use this model switches to one that works. This card waits for Save changes. See Writing, voice and translation.
Help search
Help search sets the embedding model the Ask the guide chat uses to find the right articles, with a row each for OpenAI, Gemini and Ollama. Each row starts on a default model and has a model list (type any name to use your own), a progress bar, and an Update index or Rebuild index button, with Stop while indexing runs. Picking a model saves it at once and indexes the help again with it. The row says Add an API key above first until an OpenAI or Gemini key is saved. A multilingual model helps when you ask the guide in a language other than English. This card saves as you change it. The steps are in Help center.
Writing check
Writing check gives grammar, spelling and style checks in every text box, powered by LanguageTool. It has switches for Check my writing, Underline as I type and Include style suggestions, a Language and a Native language, and a choice of where checks run: LanguageTool online (no setup, text is sent to api.languagetool.org) or Local server (offline, needs the LanguageTool download and Java 17 or newer). A Muted rules list lets you unmute rules you silenced. This card saves as you change it. See Writing, voice and translation.
Translation retries
Translation retries is the number of extra attempts Prompt Builder makes if a translate request fails. Enter a number from 0 to 10 (the default is 3). This card waits for Save changes.
Notifications
Pipeline failures
The Pipeline failures card at the top of the Notifications tab chooses how a failed GitHub Actions run reaches you. It has three switches, and each one saves as soon as you flip it.
- Show failed pipelines in notifications (on by default). A failed or timed out run flashes a message in the corner, is kept in Recent messages and puts an unread count on Pipelines. Turn it off to keep failures out of all three. Passed runs are not affected.
- Show failed pipelines on my AI Pet (off by default). The pet says which workflow failed. This is the same switch as Tell me when a pipeline fails on the AI Pet tab, and it stays greyed out until My AI Pet is turned on.
- When I click a failure chooses where the message, its row in Recent messages and the pet’s bubble take you.
- Project workspace opens that project’s Workspace with the Pipelines section of the Git panel unfolded, next to the code and terminals.
- Pipelines page (the default) opens the failed run on the all-projects Pipelines page and highlights it.
- Just dismiss it makes a click do nothing. The message has no Open button and the pet’s bubble no longer says “Click to open it in Runova”.
You can still open Pipelines yourself from the sidebar at any time. See Pipelines.
News
The News card controls the technology news on the Dashboard, and each change saves right away. Show news (on by default) turns the Dashboard’s News card on or off, and while it is off Runova does not check for news at all. Categories to show keeps whole categories out of the card. Notify me about security fixes at sets the lowest severity of a security fix, for a tool on this computer, that sends you a notification (High by default, or Never). See News.
Telegram bot
The Notifications tab has the Telegram bot card, used by project notification hooks, scheduled task updates and usage reset alerts. A badge shows Ready once both a token and a chat ID are filled in, otherwise Not configured.
- Create a bot with @BotFather on Telegram and paste its token into Bot token.
- Send your bot any message on Telegram, then click Detect from last message to fill in Chat ID.
- Optionally fill in Scheduled tasks chat/group ID so scheduled prompts post to a different chat.
- Click Send test, and Save changes when it works.
This card waits for Save changes. See Notifications and Telegram and Scheduled tasks.
Network
Proxy
Proxy controls how Runova reaches the internet: the AI providers, skill and package registries, Telegram, update checks, Remote Desktop connections, and the CLIs and git commands it runs for you. Choose No proxy, System proxy (follow this machine, PAC scripts included) or Manual proxy (HTTP, HTTPS, SOCKS5 or SOCKS4 with host, port, optional username and password, and a Skip the proxy for list). Test connection checks the setup, and Save applies it. Terminals that are already open keep the old setting until you reopen them. This card waits for a save.
Network ping targets
Network ping targets decides how connection quality is measured for the status bar, the dashboard Network Status graph and the pet’s internet alerts. Pick a Method: Ping command (uses the system ping, fails where ICMP is blocked), URL request (times an HTTPS request, works behind most firewalls) or Auto (ping first, switch to URLs if nothing answers). Under Hosts to ping add addresses (the default is 1.1.1.1) and press Enter after each one. Under URLs to request add web addresses (the default is https://www.gstatic.com/generate_204, with Reset to default) and set Request every from 1 to 300 seconds. This card waits for Save changes.
Vault
Auto-lock and clipboard
The Vault tab controls when the Vault locks itself and how long copied secrets stay on the clipboard. It saves as you change it.
- Lock after: 1, 5, 15 (default), 30 or 60 minutes, or Never.
- Clear copied values after: 10, 20, 30 (default), 60 or 90 seconds, or Never. The clipboard is only cleared if it still holds what the Vault copied.
- Lock when this computer locks or sleeps: locks as soon as you step away.
- Change master password (only while the Vault is unlocked) re-encrypts the Vault with a fresh key.
- Reset vault sets the current vault file aside and starts an empty one. You have to type RESET to confirm. Without the master password, nothing in the Vault can be opened.
See Vault.
Data
Backup & restore
The Backup & restore card exports your Runova data to a file and restores it from one. Switches choose Compress as .zip, Include project environments (asks for a password) and Include the Vault. Export backup writes the file, and Restore from backup… replaces what is on this machine. The details, including what is and is not in a backup, are in Backup and restore.
About
About shows the app name with its version number (or “dev build” when you run from source) and the update state. The button changes with the state: Check for updates, Download, Resume download, Pause and Show while downloading, and Restart now once the update is downloaded. Checks run automatically every hour. Downloads never start on their own, and they resume if your connection drops. See Troubleshooting if an update fails.
Tips
- Use the search box instead of hunting through tabs: it searches every tab at once.
- If a change did not stick, look for the Unsaved badge and the Save changes bar at the bottom of the page.
- Press
F1anywhere to open the Help page, which has its own search and the Ask the guide chat.