
Connect
Remote
Control another Runova over your network, connect to servers over SSH, and open Windows Remote Desktop sessions.
Read about this part of Runova on the Connect page.
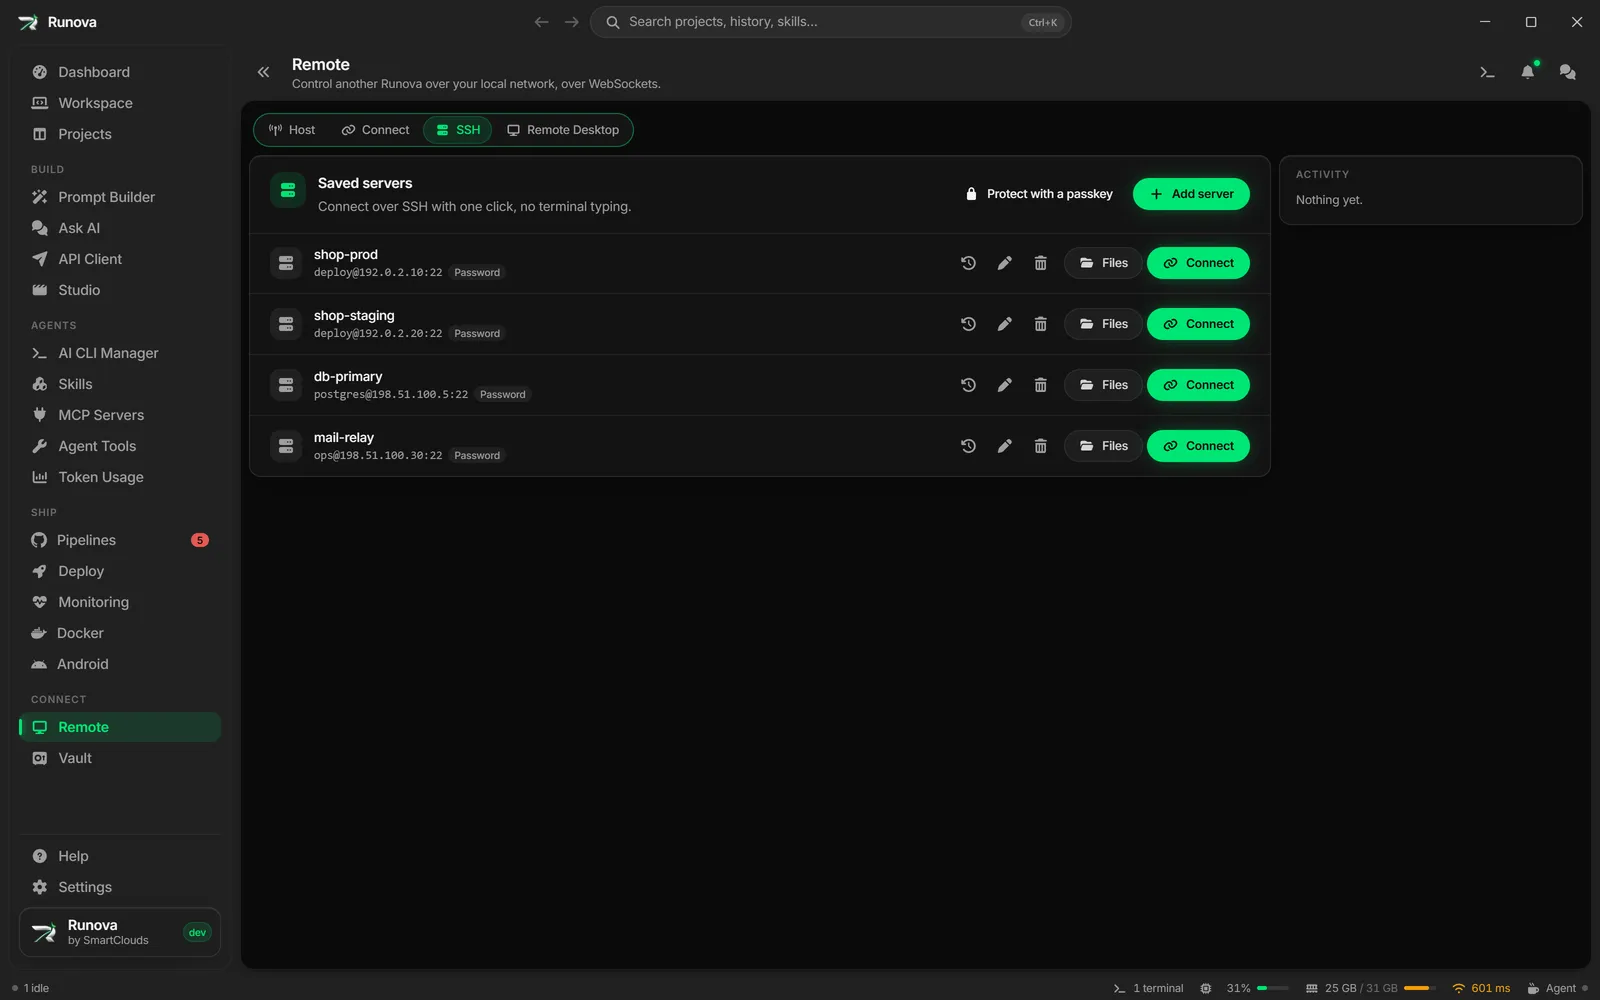
The Remote page is where you reach other computers. It has four tabs: Host (let another Runova control this computer), Connect (control another Runova), SSH (saved servers you open in a terminal tab) and Remote Desktop (saved Windows machines you open in their own window).
Two sets of tools live here. The first is a remote control that works between Runova installs on the same network. The second is a saved server list for SSH and Remote Desktop.
Where to find it
Click Remote in the sidebar under Connect, or open the command palette and type Remote. Pick a tab at the top: Host, Connect, SSH or Remote Desktop. The page remembers the tab you used last and opens on it next time. The first time, it opens on Host.
Below the tabs, two shared cards can appear on any tab: File transfers (progress of files being sent or received, shown once a transfer starts) and Activity (a running log of what happened, such as pairing attempts and connections, with timestamps).
Host: let another device control this computer
Use the Host tab on the computer you want to be controlled. The card Allow this machine to be controlled starts a small server on one of your network addresses.
Start hosting
- Open the Host tab.
- In Network address, pick the IP address to host on. The first one (a local network address when there is one) is selected for you. The list shows each address with its network name.
- Check Port. The default is 7900 and it must be between 1024 and 65535.
- Click Start hosting. A green badge shows “Listening on (address):(port)”. Click Stop hosting to shut it down. You cannot change the address or port while hosting. Controllers see your primary screen.
Note: Keyboard and mouse control of the host is only available when the host runs Windows. On other systems, a yellow note says controllers can see the screen but cannot drive it. Screen viewing, clipboard and file transfer still work.
Create a pairing code
Once hosting, a Pairing code card appears.
- Click Generate pairing code. A QR code and a text code (starting with
RUNOVA1:) appear. - Give the code to the other device: copy the text with Copy code and paste it on the other computer.
- Click New code whenever you need a fresh one.
Each code works once and expires after 5 minutes. Generating a new code cancels the old one. A device that paired successfully is remembered by the host, so it can reconnect later without a new code. Stopping and starting hosting does not forget paired devices.
Connected controllers
The Connected controllers card lists each device that is connected, with its name and address. When at least one device is connected you also get:
- Send clipboard. Sends this computer’s clipboard text to the connected device.
- Send file. Opens a file picker and sends the file to the connected device.
- A quality badge next to the Start/Stop button (Excellent, Good, Fair or Poor) with the current speed and round trip time in milliseconds.
While someone is connected, Runova keeps the host’s display from going to sleep.
Connect: control another Runova
Use the Connect tab on the computer you are sitting at.
Pair with a new device
- On the other computer, start hosting and generate a pairing code (see above).
- In the Pair a new device card, paste the code into Pairing code.
- Click Connect to control the machine. A remote window opens with the other screen. Or click Connect (files only) to skip the control session and just browse and transfer files (see Remote files).
If the code is empty, a toast says “Paste a pairing code first.” Errors such as an expired code show under the box. After the first successful connection, the computer is saved.
Saved servers
Computers you have paired before are listed in Saved servers, with their address and when you last connected. Reconnect with one click, no code needed.
- Connect. Opens the remote control window.
- Browse files. Connects for files only, then opens the file manager.
- Pencil or the name. Click the name to rename it. Press
Enterto save orEscapeto cancel. - Forget (trash icon). Removes the saved computer after you confirm. You can pair again later with a fresh code.
While connected
When a connection is active, the Connect tab shows a status card with the device name and a Connected or Connecting… badge.
- Show remote window brings the control window to the front (or Open file manager for a files-only connection).
- Disconnect ends the connection.
The remote control window
Controlling another computer happens in its own window, separate from the main app. It has:
- A header with the device name, a connection badge (Connected, Connecting…, Failed or Disconnected) and the remote screen size.
- Clipboard (send your clipboard text to the other computer) and Send file.
- A quality badge (Excellent, Good, Fair or Poor) with speed, round trip time and frames per second, plus a small bandwidth graph.
- The remote screen itself. Click it to focus it. Your mouse, scroll wheel and keyboard are sent to the other computer. Text you copy on the remote side that it sends back is placed on your clipboard.
- A red error bar if the connection failed. Closing the window ends the session.
The picture is sent as video when possible, and falls back to image tiles if the video connection cannot be set up. The quality is adjusted automatically to your network.
SSH: saved servers
The SSH tab keeps a list of servers you connect to over SSH. Clicking Connect opens a new SSH tab in the terminal drawer at the bottom of the app, already logged in.
Add a server
- Click Add server (in the card header or in the empty state “No servers yet”).
- Fill in Nickname (for example “Production box”), Host, Port (default 22) and Username.
- Pick the sign-in method with the switch Password or Private key.
- Password: type it in Password.
- Private key: set Private key file (type a path such as
~/.ssh/id_ed25519or use Browse) and, only if the key itself is protected, Key passphrase.
- Click Add server, or press
Ctrl+Enter(Cmd+Enteron macOS) to save.
To change a server later, click the pencil on its row. Leave the password or passphrase blank to keep the saved one. Switching between password and key drops the old secret.
Each row shows user@host:port, the sign-in method and when you last connected. The buttons on a row are:
| Button | What it does |
|---|---|
| AI history on this server (clock icon) | Opens a side sheet with the agent CLI conversations stored on that server. |
| Connect | Opens an SSH terminal tab for the server. |
| Files | Opens the server in the SFTP file manager, to upload, download and edit files (see SSH files). |
| Edit this server | Opens the edit form. |
| Remove this server | Removes it after you confirm. You can add it again with the same details. |
Reorder servers
Hover a row and drag it by the grip icon that appears among the icons on its right (Drag to reorder) to put it above or below another one. The rows in between slide out of the way, and the new order is saved, so the list looks the same next time. The Remote Desktop tab works the same way.
The servers passkey
By default, saved passwords and key passphrases are protected by your operating system’s keychain. You can add a passkey on top of that, which is shared by saved SSH servers, saved Remote Desktop servers and project environment secrets.
- Protect with a passkey sets one. You type it twice. If you forget it, those secrets cannot be recovered.
- With a passkey set, the vault starts locked each session. Unlock vault asks for the passkey, and a green Vault unlocked badge shows when it is open. Connecting to a server, or reading its history, asks you to unlock first.
- The key icon changes the passkey. The lock icon removes it, after which secrets go back to keychain-only protection.
Note: This passkey is separate from the master password of the Vault page. The Vault is a password manager. The passkey only protects saved server passwords and project environment secrets.
Host key prompts
The first time you connect to a server, Runova saves its host key fingerprint. If the key later changes, Runova stops and shows a dialog titled “(name)’s identity changed” with the Trusted before and Presented now fingerprints. A changed key is normal after a reinstall, but it can also mean someone is intercepting the connection. Compare it with your hosting provider (on the server, ssh-keygen -lf /etc/ssh/ssh_host_ed25519_key.pub prints the fingerprint). Then choose:
- Don’t connect (the default, safe choice).
- Trust the new key to save it and connect.
Saved password at sudo and su prompts
When a server signs in with a saved password and the shell then asks for a password, such as a sudo or su prompt, an Enter saved password button appears at the bottom right of the terminal. Click it and Runova types the saved password and presses Enter for you, then hands the keyboard back to the terminal. The password stays inside Runova and is never shown on screen. If it cannot be read, a message tells you to type it in the terminal yourself.
The button only shows while the prompt is waiting, and it comes back at the next prompt. It does not appear for servers that sign in with a private key, and not while an AI task is running in that tab, since the AI answers its own prompts.
AI history on a server
The clock button opens a sheet named after the server. It lists the conversations every supported agent CLI has stored on that machine, grouped by folder and day. Search them, filter by tool, show or hide background runs, and click one to resume it in a new SSH tab (Runova changes into that folder and runs the tool’s resume command). The server is asked only when you open the sheet or click Refresh. If a tool is not installed on the server, a warning chip says so.
Ask AI in an SSH terminal
Inside an SSH terminal tab, the terminal bar has a robot button that lets an AI work on the server for you in one of three modes: Approve each command, Auto, guard risky ones or Fully autonomous. See Workspace terminals and agents.
Talking to the AI while it works
You do not have to wait for the AI to ask you something. While a task is running, the bar above the terminal has a Message button. Click it, type what you want to change (“only look at /var/log”, “leave the config alone”, “also check memory”) and press Enter to send. Shift+Enter adds a new line and Esc closes the box. Anything you typed stays in the box if you close it or if the AI stops to ask you a question.
When the AI reads your message depends on what it is doing at that moment:
- While it is thinking. It drops the answer it was working on and starts again with your message.
- While a command is waiting for your approval. That command is skipped, and the AI plans its next step with your message.
- While a command is running. The command finishes first, then the AI reads your message. A Message queued badge shows in the bar until it has.
- While the task is paused on an error. The message waits until you click Continue.
Your messages are kept for the rest of the task and show up in History next to your answers. They count as new instructions, so they win over the original request if the two disagree. Once a task has finished or been stopped there is nobody to message, but you can continue it (see below).
Writing to the AI: voice, Persian and Write it for me
Every box where you write to the AI (the task in the robot dialog, a message, an answer to its question, and the box in History) has the same tools as Build Prompt:
- Dictate (the microphone) adds what you say after what is typed. The chip next to it picks the language it listens for.
- English shows once the box has Persian in it, and translates the text to English.
- Write it for me has the AI provider from Settings turn a rough note into a clear instruction. For an answer, it answers the AI’s question.
- Undo puts back what you wrote, until you edit the result.
Esc cancels a translation, a rewrite or a recording before it closes anything. The translate and generate shortcuts from Build Prompt work here too.
When the AI asks a question
The bar says Waiting for your answer, and a panel opens under it with the whole question and a box to answer it. A long question folds after a few lines behind Show more. Any line in the bar that is cut off shows all of itself when you hover over it or tab to it.
You can also answer from History. Its bottom bar acts on the task you are looking at: answer its question, run or skip a proposed command, message it, or continue or stop it when it is paused.
Running a task again or continuing it
The robot dialog lists the last few tasks on this server (or in this terminal, for a local one):
- Run again puts the prompt back in the box, with the CLI, model, effort and mode it ran with. If that CLI is not installed any more, the dialog says which one it uses instead.
- Continue starts a new task that knows what the earlier one did: its commands and their output, your answers and messages, and how it ended. Type what to do next. The Continuing chip above the box shows which task it carries on, and the cross on it starts a fresh task instead.
In History, an ended task has a box for what to do next. Sending it continues the task in the same terminal, the way it ran. Run again and More options open the robot dialog on it, so you can change how it runs first. A continued task starts with a link back to the task it continued. From a server’s history sheet, these open the robot dialog in an SSH tab on that server, using one already open when there is one.
Tasks run on a saved server are kept after Runova closes, up to 50 per server. Tasks in a local terminal are kept until Runova closes. The trash button next to Ask AI tasks in a server’s history sheet clears its finished tasks, and removing the server clears them too.
Remote Desktop: saved Windows servers
The Remote Desktop tab keeps saved Windows servers and PCs. Connect opens the session in its own window. Adding a server, the session window, file copying and Ask AI are covered in Remote Desktop.
Tips
- Remote control is for computers you own or are allowed to control. Only the person at the host can create a pairing code, and only for 5 minutes.
- If a connection feels slow, check the quality badge. Fair or Poor usually means a weak Wi-Fi link.
- A computer you paired once stays paired after you restart Runova, so you do not need a new code each time.