
Agents
AI CLI Manager
See which AI coding CLIs (Claude Code, Codex, Gemini CLI, Cursor and more) are installed, install or update them, and choose your default CLI, launch defaults and agent order.
Read about this part of Runova on the Agents page.
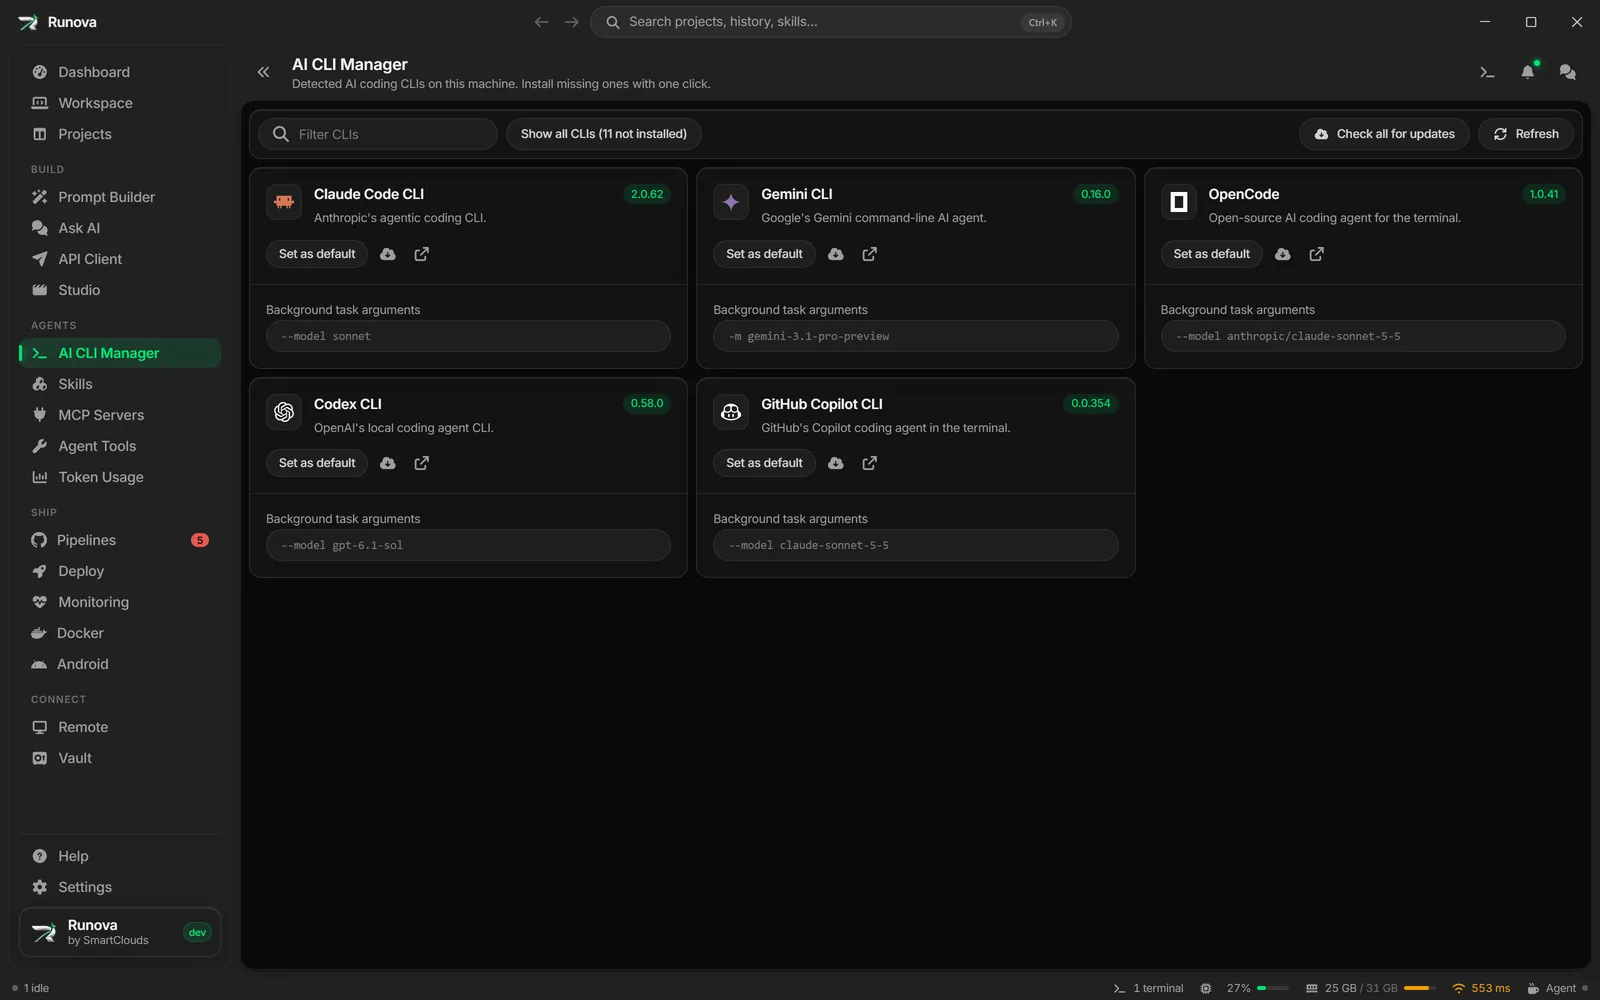
AI CLI Manager is the page that knows which AI coding agents are installed on your machine. It scans for them, shows their versions, installs the ones you are missing, and tells you when a newer version is out. The agents you manage here are the ones you launch in the Workspace, so this is also where the related settings (default CLI, launch defaults, agent order) are explained.
Where to find it
Click AI CLI Manager in the sidebar under Agents, or open the command palette and type “AI CLI Manager”. The related settings live in Settings under the Agents group (see Settings).
Supported CLIs
Runova knows these 16 CLIs. Each one has a card on the page.
| CLI | Notes |
|---|---|
| Claude Code CLI | Anthropic’s agentic coding CLI. |
| Codex CLI | OpenAI’s local coding agent. |
| Gemini CLI | Google’s command-line agent. |
| Cursor CLI | Cursor’s agent for the terminal. |
| GitHub Copilot CLI | GitHub’s Copilot agent in the terminal. |
| OpenCode | Open-source terminal coding agent. |
| OpenClaude | Open-source agent that runs against any model provider. |
| Grok CLI | xAI’s Grok coding agent. |
| Qwen CLI | Alibaba’s Qwen Code agent. |
| FreeBuff CLI | Free, ad-supported coding agent. |
| Aider | AI pair programming in your local git repo. |
| Goose | Block’s on-machine agent. |
| Cline CLI | Autonomous coding agent from the Cline team. |
| Continue CLI | Open-source assistant CLI (cn). |
| Pi | Minimal, extensible terminal coding agent. |
| Muse Code CLI | Meta’s coding agent for the terminal and CI. |
Each CLI installs the way its vendor recommends for your operating system:
- Their own installer: Claude Code, Codex, Grok, Cursor, GitHub Copilot, Goose, Aider, Qwen, Pi, Muse Code and Continue. On macOS and Linux that is a
curl ... | bashscript, on Windows a PowerShellirm ... | iexscript. Copilot on Windows installs with WinGet. - npm: Gemini CLI, OpenClaude, Cline and FreeBuff, plus OpenCode on Windows (it uses its own script on macOS and Linux).
Node.js is only needed for the npm ones. If an install needs a tool that is not on your machine, such as Node.js, pipx, Homebrew or WinGet, Runova tells you which one is missing and gives you a button to its download page, instead of opening a terminal that would only fail.
How detection works
When you open the page, Runova looks for each CLI on your PATH and runs its version command. A CLI counts as installed as soon as its executable is found, even if the version check is slow (some CLIs take more than ten seconds to answer, and one that is updating itself may not answer at all). In that case the badge just says Installed instead of a version number.
Results are cached for a few minutes, so moving between pages does not rescan every time. If something is missing, the scan result is only kept for about 20 seconds, so a CLI you just installed shows up quickly.
The page
Installed and not installed CLIs
By default the page shows only the CLIs it found. Each card has the CLI’s logo and name, a version badge (green with the version number when installed, Not installed otherwise) and a short description.
- If nothing is installed yet, the page says “No AI CLIs installed yet” and points you to Show all CLIs.
- Click Show all CLIs (N not installed) at the top to list every supported CLI, including the missing ones. The button then reads Hide not installed.
Open a CLI in a terminal
On an installed card, click the CLI’s name or logo. Runova opens a terminal session and starts that CLI, with your launch defaults (see below) already added to the command.
Install a CLI
- Click Show all CLIs if the CLI you want is hidden.
- Click Install on its card.
- A terminal opens with the install command already typed in. Press
Enterin that terminal to run it. - When it finishes, click Refresh at the top of the page. The card switches to installed.
If a CLI has no install command for your operating system, you get a message saying so instead of a terminal. The same goes for a missing tool the install needs, such as “Gemini CLI needs Node.js, which isn’t installed.” Click Get Node.js in that message to open the download page, install it, then click Install again.
Check for updates
- Click the cloud icon (Check for updates) on an installed card to check that one CLI. Runova asks the package registry (npm, PyPI or GitHub Releases) for the latest version.
- Click Check all for updates at the top to check every installed CLI, one after another.
If an update exists, an Update <name>? dialog shows the current version, the latest version and the exact command. Click Update to open a terminal with the command typed in (press Enter to run it), or Cancel to skip. When several CLIs have updates, the dialog steps through them one by one.
The update command is the CLI’s own updater where it has one (claude update, codex update, opencode upgrade and so on), which also handles a copy you installed with npm. A copy that came from Homebrew is updated with brew upgrade. For a CLI with no updater of its own, whose update re-runs its installer, an npm copy is updated with npm instead, so you don’t end up with two copies side by side. As with installs, you are told when the tool the update needs is missing.
Possible messages:
- “<name> is up to date” means you are on the latest version.
- “Can’t check updates for <name> automatically” means that CLI has no update source Runova can query.
- “Couldn’t reach the update server” means the registry did not answer (check your connection).
Refresh
Refresh skips the cache and scans again from scratch. Use it after you install, uninstall or update a CLI in a terminal of your own.
Set a default CLI
On an installed card, click Set as default. The button turns into Default CLI, and clicking it again clears the default. Only one CLI can be the default.
The default CLI is what Runova uses when a feature needs an AI agent and does not ask you which one. You can also pick it in Settings under Agents in the Default CLI card, which has a searchable list and a clear button.
Background task arguments
Each installed card has a Background task arguments box. Anything you type here (for example --model sonnet) is added when Runova runs that CLI in the background on its own: commit messages, tag suggestions, version bumps and skill audits. The box shows the full command underneath so you can see what will run.
These arguments are never used for terminals or Workspace tabs. Those use Launch defaults instead. The value saves when you leave the box or press Enter. The same box also appears in Settings under the Default CLI card for the CLI you picked as the default.
Open the homepage
The arrow icon (Open homepage) on a card opens the CLI’s website in your browser.
Launch defaults
Launch defaults is a card in Settings under Agents. It sets the model, effort and mode each agent starts with when Runova opens it in a terminal or a Workspace tab.
- Open Settings, go to Agents and find Launch defaults.
- Click an agent’s row to expand it. Only agents that Runova knows launch flags for are listed, and installed ones come first. Click Show N not installed at the bottom to list the rest.
- Pick a Model. You can search the list or type any model name.
- Pick an Effort (a segmented control: Not set, Low, Med, High, XHigh, Max). Levels the chosen model cannot use are disabled, and the control dims when the model has no effort setting.
- For agents with permission modes, choose a Mode card. Modes depend on the CLI, for example Ask first, Accept edits, Plan and Auto for Claude Code. Modes that let the agent change files and run commands without asking, such as Bypass permissions, carry a warning triangle.
- The preview line shows exactly what the terminal will type, for example
claude --permission-mode auto --model sonnet.
Anything left on Not set adds no flag, so the CLI picks its own value. Click Reset to clear a row. Each collapsed row shows the values you set as small chips.
Launch defaults apply only to terminals and Workspace tabs. To start an agent without them once, hold Alt and click the launcher.
Note: A risky mode is applied to every tab you open with that agent. Use it only for projects you can restore from git.
Agent order
Agent order (in Settings under Agents) controls the order agents are listed in when you start one in the Workspace: the + menu, the tiles in an empty pane and the number keys that pick them.
- Drag a row to move it, or use the up and down arrows on the right of each row.
- Installed agents get the number keys 1 to 9 in this order. Agents that are not installed show Not installed and get no number.
- Click Default order to go back to the standard order.
Running CLIs
The Running CLIs window shows every terminal that is open across your Workspace tabs and the terminal drawer, with the CPU and memory each one is using. Open it from any of these:
- The terminal count in the status bar at the bottom of the window (for example “3 terminals”).
- The Running CLIs button (chip icon) in the Workspace header.
- The command palette, by typing “Running CLIs”.
The window refreshes every few seconds while it is open.
- The top strip shows total CPU, RAM and how many terminals are running. Each terminal counts its shell and every process it started, agent CLIs included.
- Each row shows the terminal name, its project, where it lives (Workspace, Terminal drawer, SSH or Detached), the agent’s state (such as needs input), how long it has been running, and its CPU, memory and process count. SSH sessions show Remote, no stats because they run on the remote server. A busy terminal’s CPU is highlighted.
- Click the arrow on a row (Show details) to see the shell, folder, process ID and a table of its processes.
- The row buttons are Open (jumps to that terminal), Restart (Workspace tabs only, restarts it with the same command) and End session (or Close tab when its shell has already ended). Ending a session ends everything in it, including the agent, so unsaved agent work is lost. Runova asks you to confirm.
- Use the checkboxes and End selected to end several at once. Select all works on the rows currently shown.
- Type in the search box to match name, project, CLI, folder or process. Filters lets you filter by Where, Kind (Agent CLIs or Plain shells) and State (Running or Shell ended). Show everything clears the filters.
- Sort by offers CPU, Memory, Age, Name and Project. Choosing the same one again flips the direction.
- Refresh now (the circular arrow in the header) re-reads usage immediately.
CLI and tool update notifications
In Settings under General, the Check for CLI and tool updates switch makes Runova check once a day. It looks at every installed CLI here and every installed tool on the Agent Tools page. When a newer version exists, it adds a notification (“<name> update available”, with the old and new version) and rings the notification bell. Each release is announced only once. The check runs in the background, and a laptop that was asleep catches up soon after it wakes.
Tips
- If a CLI you just installed is not detected, click Refresh. If it is still missing, open a new terminal and make sure the command works there, since Runova looks on your
PATH. - Only the npm-based CLIs need Node.js. You don’t have to install it for Claude Code, Codex or the other CLIs with their own installer.
- Use Launch defaults for how an agent starts in the Workspace, and Background task arguments for what Runova runs silently. They are separate on purpose.