
Build
Studio
Studio makes videos for your projects, or on their own. An AI CLI on your computer writes the scenario from your brief, you edit it by hand or by asking AI, and every video keeps its edits and full history in a folder you choose, always outside the project's source. Nothing in the history is ever deleted, and you can go back to any earlier version.
Read about this part of Runova on the Studio page.
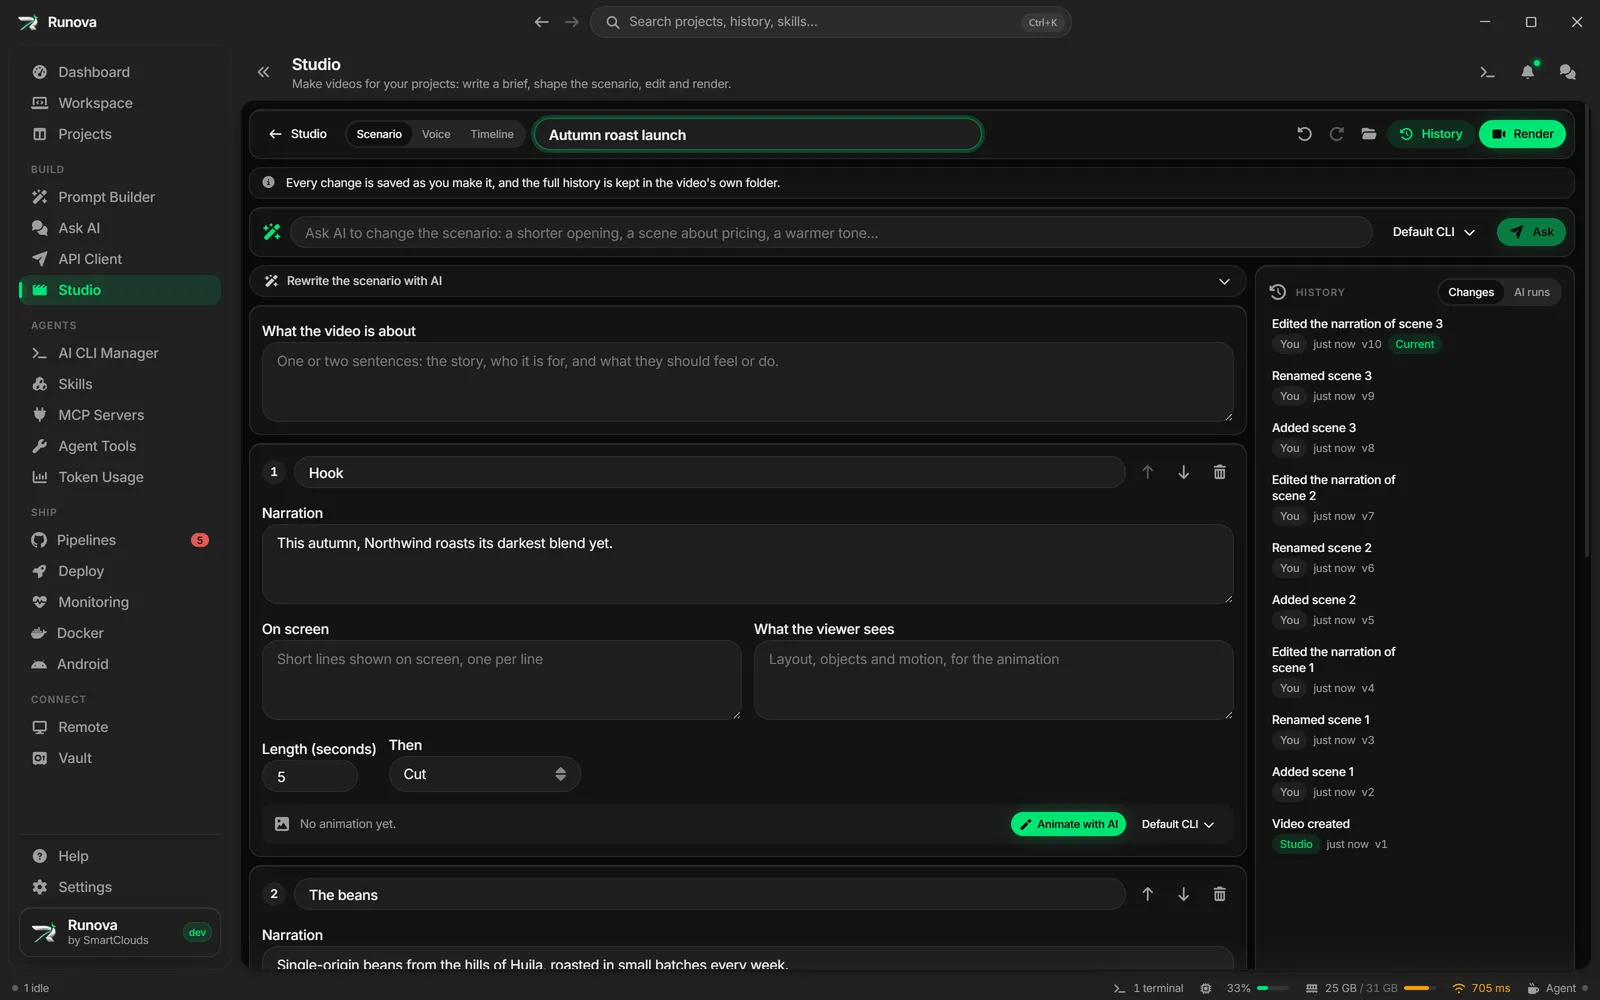
Studio is where you make videos: a launch teaser for a project, a walkthrough of a new feature, a short for social media, or a video that belongs to no project at all. A video starts as a scenario, a list of scenes with what each one shows and says, and grows from there.
Where to find it
Click Studio in the menu, in the Build group. Each project also has a Studio tab that lists only its own videos and shows where they are kept.
Make a video
- Click New video.
- Choose what it belongs to (one of your projects, or Standalone video), its language and its format: Landscape 16:9, Vertical 9:16, Square 1:1 or Portrait 4:5. Persian and English are written right to left and left to right automatically.
- With Write the scenario with AI on, say what the video is about in your own words: who it is for, what they should feel or do, anything it must say. Pick about how long it should be, a style if you want one, and the CLI, model and effort to use. The title can stay empty; the AI names the video.
- Click Create and write. The editor opens and the AI starts on the scenario.
Turn Write the scenario with AI off to start with an empty video and write it yourself; it then needs a title. Start from fills everything in from a saved recipe.
Write the scenario with AI
Studio runs one of the AI CLIs installed on this computer (Claude Code, Codex, Gemini, Grok, Cursor or OpenCode) with the CLI, model and effort you picked. Leave the CLI empty to use your default CLI from Settings.
While it works, a card shows which AI is writing, how long it has taken and what the CLI prints, with Cancel. If the answer does not fit (it is not valid, or it is in the wrong language), Studio sends it back with the exact problems, up to two times. The finished scenario lands as one entry in the history, so Undo brings back what was there before.
Leaving the editor does not stop a run: the scenario is written into the video when it finishes. Quitting Runova does stop it, and the run shows as interrupted with Try again, since a CLI cannot pick up where it stopped.
When the video already has scenes, Rewrite the scenario with AI opens the same brief to write a new one.
If a run fails, the card says why in the CLI’s own words, for example a CLI that needs you to sign in again or a model your plan does not include. Details shows everything that was sent and everything that came back.
Edit the scenario
Each scene has a title, the narration (what the voice-over says), the lines shown on screen (one per line), what the viewer sees (written for the animation), its length in seconds and how it hands over to the next scene. Use the arrows to reorder scenes and the bin to delete one.
A field saves when you leave it, and each save becomes one entry in the history, named after what changed.
Edit by typing
Type what you want changed in Ask AI above the scenario, for example “make the opening shorter” or “add a scene about pricing”, and press Enter. The button beside it shows which AI makes the change; click it to pick another.
The AI answers with a proposal: every change spelled out, with the text before and after. Apply makes all of it as one entry in the history, so one Undo takes it all back. Discard leaves the video as it is. If you edit the scenario before applying, and the proposal no longer fits, Studio says so; ask again.
Animate the scenes
Each scene card has an animation section. Animate with AI asks the CLI to write the scene’s motion graphics as a small web page, in the video’s style if it has one. Studio then checks the page in a hidden window before using it: it must load, draw something on every frame, draw the same picture each time it is asked for the same moment, and make no errors. A page that fails is sent back with the problems, up to two times. The button beside it shows which AI animates the scenes.
Once a scene has an animation:
- Its thumbnail shows the middle of the scene.
- Preview plays it, with a slider to move through it. A scene that takes longer than a frame to draw skips frames in the preview and says Slow scene; the final video draws every frame.
- Change asks the AI for a change to the animation, such as a bigger title or slower motion.
- Check runs the checks again. If it fails, Fix with AI sends the problems to the AI.
- Code opens the scene’s files. Edit them and Save (or Ctrl+S); every save is a new version, and Use this version goes back to any earlier one. Check works there too.
A scene page runs with no internet access and cannot reach Runova or your files. Each video folder also keeps a copy of every scene’s current code in scenes/, to open in an editor of your own; changes made there are not used.
Styles
See styles next to the style picker shows all fifteen styles, each with a short example scene playing in your video’s language and format. The style you pick guides the scenario, and the AI gets the style’s example when it animates the scenes.
Scene network
Animated scenes cannot reach the internet. If a project’s scenes need files from a host of yours, such as its own CDN, add the host under Scene network in the project’s Studio tab. Only https is allowed, and only those hosts. Leave it empty to keep scenes offline, which is the safest, since the code is written by AI.
Voice
Switch the editor to Voice in its toolbar to give the scenes their narration.
- Pick an Engine and a Voice, then Speak every scene, or speak one scene with its play button. OpenAI and Google Gemini use the keys in Settings > AI; ElevenLabs and Azure Speech keys go in Settings > Studio, where they are sealed with the vault. When the vault is locked, Studio asks you to unlock it rather than skipping the engine. Studio shows the engine’s list price for the text before you speak.
- The microphone button records a scene in your own voice. Its narration is shown large while you read, a meter shows you are heard, and you can play the take back and record it again before using it.
- A scene set to follow its narration takes the voice’s length plus half a second, and the scenes after it move along, with their voices and captions.
- Caption writes the scene’s captions where its words are spoken, when the voice gives word timings (ElevenLabs does), and by the length of each line otherwise.
- Lower the music while someone speaks turns music down by about 10 dB under the voice in the render.
Long narration is sent in pieces. If a run stops part way (no connection, a refused key, the app closing), speaking again sends only the pieces still missing. Studio never lists a Chinese voice.
Voices on this computer, and your own voice
Two engines run on your computer instead of online. Install them from Agent Tools > Dev Setup, in the Studio stack (the Voice view’s Open Dev Setup button goes there). Each one installs into its own Python inside Runova, nothing system-wide. Downloads carry on after a dropped connection or a restart, and every file is checked against its fingerprint before it is used.
- Piper speaks offline. Piper voices adds three Persian voices, free for any use, and one English voice for non-commercial use. Piper is GPL-3.0 software.
- OmniVoice speaks in a voice it clones from a few seconds of recording. Its model is licensed for non-commercial use only, and Studio says so wherever it is offered and on every render that uses it. It is quick with an NVIDIA graphics card or a Mac with Apple silicon and slow without one. The model is about 3.3 GB.
Voices in the Voice view keeps voice profiles: a short recording of your voice, or of someone who gave you permission. Read the text shown for six to ten seconds. Studio trims the silence, fills in what you said (correct it if needed), and saves the profile only after you confirm the voice is yours or that you may use it. OmniVoice speaks with any profile; Upload to ElevenLabs sends the recording to your ElevenLabs account, after asking, where it becomes a voice to pick. Deleting a profile also removes it from ElevenLabs.
Generate pictures and clips
Generate in the Media list makes a picture (OpenAI or Google Gemini) or a short clip (Google Gemini Omni) from a description, billed to your own account with the keys in Settings > AI. The price is shown before anything is sent, and Studio asks once more with it before it sends the request; what you spent on the video is summed up below. A finished one lands in Media as Generated picture or Generated clip, ready to add to the timeline. A clip takes a while: it carries on even if Runova restarts, and one cut off before the provider answered is marked so, never sent again (it may already have been billed). If a provider declines a description, its reason is shown.
The timeline
Switch the editor to Timeline in its toolbar. The scenes play one after another on the first row; the rows below hold what plays over them: Video and Images (shown full frame), Text (captions), and Voice, Music and Sound effects.
- Import in the Media list, or drop files onto it, to bring in video (MP4, MOV, WebM, MKV), sound (MP3, WAV, M4A, OGG, FLAC) and pictures (PNG, JPG, WebP). Each file is copied into the video’s folder, so moving or deleting the original does not break the video. Studio needs ffmpeg for this, as for rendering.
- Drag a file onto a row, or use + to add it at the playhead.
- Drag a clip to move it (it snaps to the playhead, the edges of scenes and other clips), drag its ends to trim it, and drag a scene to change the order. Drag the right edge of a scene to change its length.
- Select a clip to set its Volume, Fade in and Fade out, or a caption’s words, in the panel on the right.
- Caption adds a caption at the playhead; Caption scene writes captions from that scene’s narration, one line at a time, keeping Persian words whole.
- M mutes a row and S plays it alone.
- Keys: Space plays and pauses, S splits the selected clip at the playhead, Delete removes it (Shift+Delete also closes the gap), Left and Right step a frame (with Shift, a second), Home and End jump to the start and the end.
Every change is one step in the history, so Undo takes it back. In a render, video and pictures are laid over the scenes, captions are drawn by Chromium so Persian reads right to left, and the sound is mixed to the loudness you set (-14 LUFS by default). Ask AI can change the timeline too, for example “put Song.mp3 under the whole video at half volume” or “caption scene 2”.
Render the video
Click Render in the editor’s toolbar.
- Pick the Format (landscape, vertical, square or portrait), the Size (720p to 4K), the Frame rate (24, 30 or 60) and the Quality (Draft to check timing, Standard for sharing, High for sharper detail, Master to edit further). Each choice is saved with the video and can be undone like any edit.
- Codec: H.264 makes an MP4 that plays everywhere, H.265 an MP4 about half the size for newer players, VP9 a WebM for the web. A codec your ffmpeg cannot write is greyed out, with the reason on hover.
- Encode on the graphics card when it can uses your GPU’s encoder after a quick test that it works; if it fails on the video, Studio encodes it again on the processor by itself.
- The dialog says how long the video is, its size, about how big the file will be and how long the render takes, and warns when either drive is low on space. Changing the format warns you that scenes lay out again at the new shape.
The file goes in the video’s renders folder, named from the title and format unless you type a name. Renders run one at a time; start more and they wait their turn. You can keep editing, or close the video, while one runs. Its progress shows under the toolbar, and the list in the Render dialog has Cancel, Try again, Play, Show in folder and Remove (which takes it off the list and keeps the file).
A render is drawn in parts of about two seconds, each kept on this computer as it finishes. If Runova closes or crashes in the middle, the render carries on by itself the next time it starts, from the last finished part (turn that off in Settings > Agents > Studio). Rendering again after changing one scene draws only that scene again. A notification tells you when a render finishes, fails or is resumed.
Rendering needs ffmpeg. If it is missing, Studio says so and Open Dev Setup takes you to Agent Tools > Dev Setup with the Studio stack switched on, where ffmpeg installs in a click.
AI runs and recipes
The History panel has two tabs. Changes lists every change to the video. AI runs lists every scenario and edit the AI was asked for, including the ones that failed or were discarded, with the CLI, model and effort used. Details on a run shows what you asked, the exact request sent to the CLI, its answer and its log, for the first try and each repair round.
Compare on one run and Compare with this on another shows the two side by side: the stage, CLI, model and effort each ran with, and a diff of what each was asked and of the full request.
Save as recipe on a scenario run keeps how that video was made: the brief, style, language, format, length, the CLI, model and effort of each AI stage, the voice and the render choices. Saving again as A new version of a recipe keeps every earlier version too. Recipes on the Studio page lists them; Use starts a new video from one with all of those choices, and Versions starts from an earlier save. Export writes a recipe, with its versions, to a .amrecipe.json file to share; Import a recipe file adds one. Runova’s own backup includes Studio’s settings and recipes (your videos and media stay in their folders).
History, undo and restore
Every change is saved the moment you make it, so closing Runova, a crash or a power cut never loses an edit you made.
- Undo and Redo in the toolbar (or Ctrl+Z and Ctrl+Shift+Z outside a text field) step back and forward. They keep working after Runova restarts.
- History lists every change ever made to the video, newest first, with who made it (You, AI or Studio) and when.
- Compare on any entry shows what changed between that version and now: the scenario, each scene (with a diff of its animation code), the clips and the tracks.
- Restore on any entry takes the video back to how it was after that change. A restore is itself a new entry, so nothing after it is lost and you can undo the restore too.
- Start a new video from version N (in Compare) makes a separate video from that version, next to this one, with only the files it uses. This video keeps all of its history.
Nothing is ever removed from a video’s history.
Where videos are kept
Videos are never stored inside a project’s source folder, so they cannot end up in the repository or in front of an agent working on the code.
- Standalone videos go in the Studio library folder, by default
Runova Studioin your Videos folder. - Project videos go in a folder of their own for each project, by default inside the library folder. Change it in the project’s Studio tab with Change folder. Studio checks the folder as you type or browse: a folder inside the project, a system folder or one Runova cannot write to is refused, and a folder synced by OneDrive, Dropbox, iCloud or Google Drive, a network folder or a nearly full drive gets a warning.
- Change the library folder in Settings > Agents > Studio.
Each video is one folder holding studio.json (what the video is), studio.db (its full history) and document.json (its current state). Previews and render pieces go in a working folder on this computer, never in a synced one, and are cleared oldest first past the limit you set in Settings. Your videos and their history are never cleared.
Move, find or remove a video
Open a video card’s More menu:
- Open folder shows the video’s folder in your file manager.
- Move to another folder copies the video, checks the copy matches, switches to it, then offers to put the old copy in the trash.
- Remove from library takes the video off the list. Its folder stays where it is, and Add existing folder brings it back.
If a video’s folder was moved or renamed outside Runova, its card says so. Click Locate and pick the folder.
Open in another Runova
Only one copy of Runova can edit a video at a time, for example when the release and the development builds share a library, or two computers use a shared drive. The second one shows Open in another Runova, with which copy has it. If that copy stopped answering (it crashed, or that computer is off), Take over opens the video here.