
Build
API Client
Build, send and save HTTP requests, read the response, and keep your requests in collections stored in the Postman format.
Read about this part of Runova on the Build page.
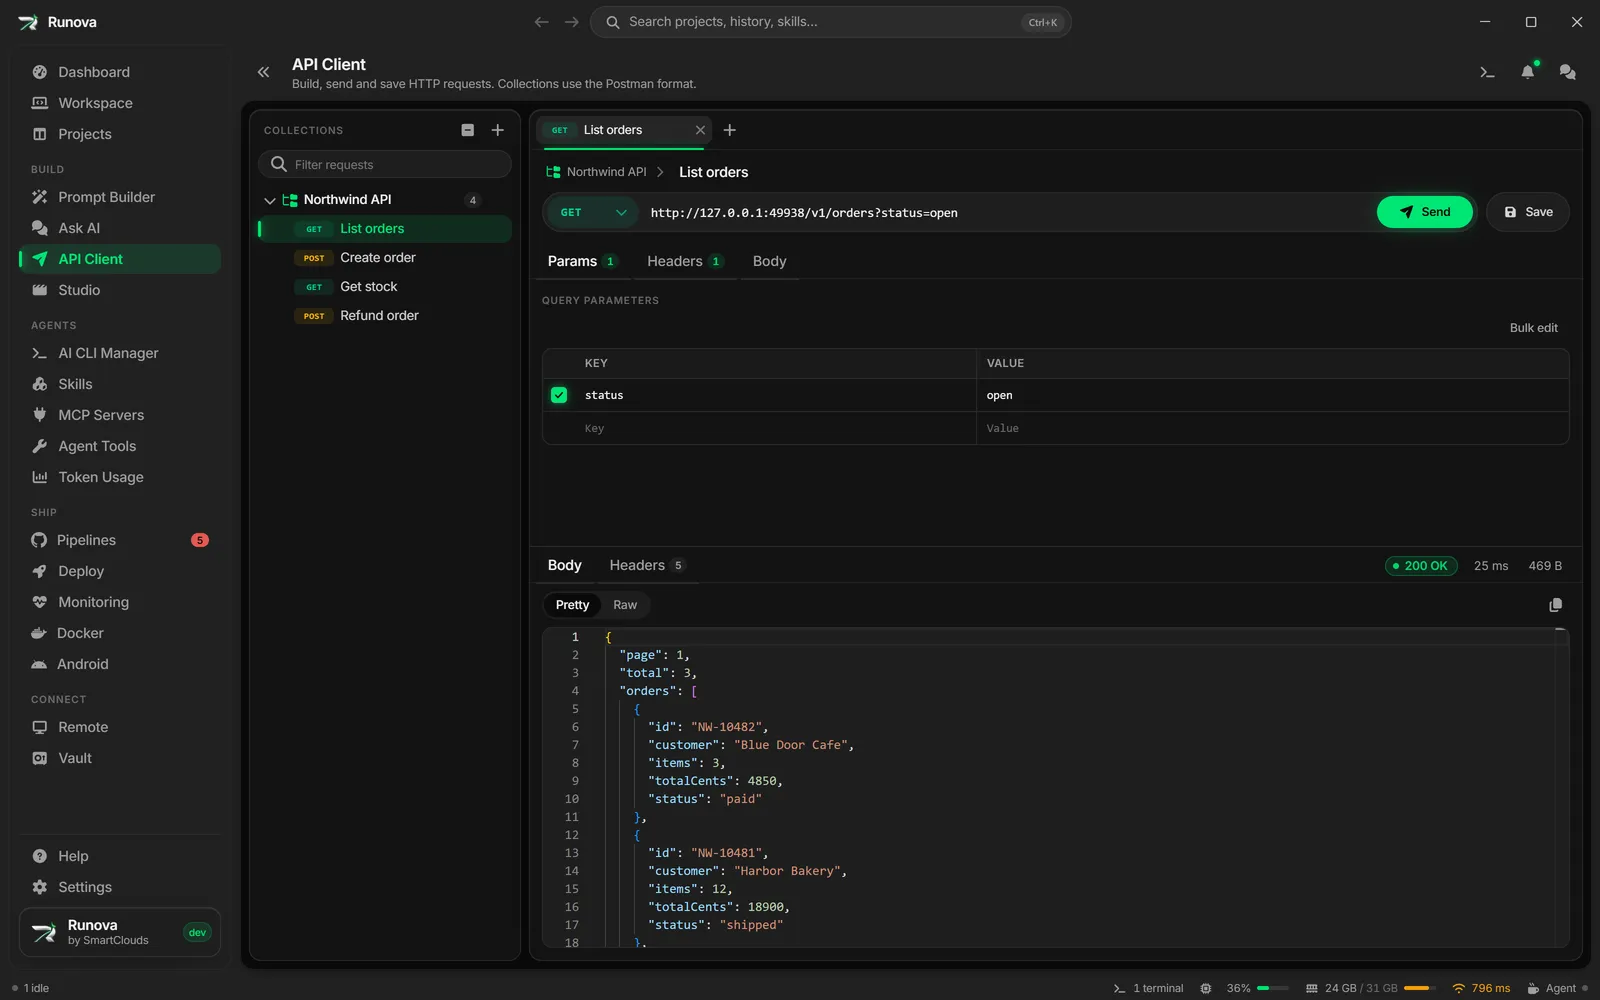
The API Client lets you try out a web API without leaving Runova. You pick an HTTP method, type a URL, add query parameters, headers and a body, press Send, and read the status, headers, timing and body of the response. Requests you want to keep are saved into collections (with optional folders), and collections are stored as standard Postman files.
Where to find it
Click API Client in the sidebar under Build, or open the command palette (Ctrl+K) and type API Client. The page is titled “API Client, Build, send and save HTTP requests. Collections use the Postman format.”
The page has two cards. On the left is the Collections sidebar. On the right is the request area with open request tabs, the URL bar, the request editor and the response. You can drag the divider between the two cards to change the sidebar width, and drag the divider between the request editor and the response to change their heights. Runova remembers both sizes.
Send your first request
- Click New request on the empty screen, or press
Ctrl+N(Cmd+Non macOS), or click the + button at the end of the tab strip. A tab called “Untitled Request” opens. - Choose a method on the left of the URL bar (it starts as GET).
- Type the address in the URL box, for example
https://api.example.com/users. - Press
Enterin the URL box, click Send, or pressCtrl+Enter(Cmd+Enter) from anywhere in the request. - Read the result in the response area below.
Send stays disabled until the URL box has something in it. While a request runs, Send becomes Cancel, and the response area shows “Sending…” with a running timer and its own Cancel button. If you cancel, the response area says “Request cancelled.”
A plain GET with just a URL is already a complete request.
Request tabs
Every open request lives in a tab at the top of the request area. Each tab has its own method, URL, parameters, headers, body and last response, so you can keep several requests open and flip between them.
- Click a tab to switch to it. The tab shows the method badge and the request name.
- A small dot on a tab means it has unsaved changes. Hover over the dot to see the close button.
- Close a tab with its x button or by middle-clicking it. If it has unsaved changes you are asked “Discard unsaved changes?” and can choose Discard.
- Opening a request that is already open just switches to its tab.
- Above the URL bar, Request name is an editable box. When the request is saved in a collection, the collection’s name shows before it with an arrow. If you clear the name, it goes back to “Untitled Request”. Renaming a saved request counts as an unsaved change.
Open tabs stay while you visit other pages in Runova but are not restored after you quit the app, so save requests you want to keep.
The URL bar
The URL bar is one rounded control with the method, the URL and the Send button, and a Save button beside it.
- Method: click it to pick GET, POST, PUT, PATCH, DELETE, HEAD or OPTIONS. Each method has its own color.
- URL: the placeholder shows the form of an address, including
{{baseUrl}}/users. Text in double curly braces is a variable, see the Variables section below. - Send (
Ctrl+Enter) sends the request. Cancel stops it. - Save (
Ctrl+S) saves the request, see the Save requests section below.
When the request area is narrow, Send and Save shrink to icons.
Edit the request
Below the URL bar are three tabs: Params, Headers and Body. A small number on Params or Headers counts the rows that are switched on and have a key. A dot on Body means the request sends a body.
Params
Params has a Query parameters table. Query parameters and the URL are kept in sync in both directions. Add a row and the ?key=value part of the URL updates. Edit the URL and the table updates.
If the URL contains path segments written as :name (for example /users/:id), a Path variables table appears under the query parameters. Each variable is listed with its name and a box where you type its value. The names come from the URL, so you only edit the values.
Headers
Headers is a table of header names and values. A note under it says that Content-Type, User-Agent and Content-Length are added for you when you do not set them yourself.
Key and value tables
The tables for Query parameters, Headers and form fields all work the same way:
- There is always one blank row at the end. Type in it and it becomes a real row, and a new blank row appears. No add button is needed.
- The checkbox at the start of a row switches it on or off. An off row is greyed out and struck through, is kept, and is not sent.
- The trash button at the end of a row (shown when you hover over it) removes the row.
- Bulk edit (top right of the table) switches to a text box where each line is
key:value. Put//in front of a line to make it a disabled row. Click Key-value edit to go back to the table.
Body
Body starts with a Body type choice:
- none: the request has no body (“This request does not have a body.”). This is the default.
- raw: a text editor for the body. Pick the format at the right: JSON (the default), Text, XML, HTML or JavaScript. This sets syntax highlighting. For JSON, Beautify reformats the text neatly.
- x-www-form-urlencoded: a Form fields table in the same key and value style as above.
Each body type keeps its own content. If you switch from raw to a form and back, nothing is lost. Only the body type that is selected is sent.
Variables
Text written as {{name}} is a variable placeholder. When you send a request that is saved in a collection, placeholders are filled in from the variables stored in that collection. If a variable in the URL is not set, the host name cannot be found and the error says to check whether a variable in it is set.
Variables, authorization and scripts come from the collection file itself. If a collection file contains them (for example a file edited by hand or made in Postman), a saved request picks up its folder and collection authorization, scripts and variables when you send it, and test results show up as described below.
The response
The lower half shows what came back from the last send of that tab. Before you send anything it says “Send a request to see the response here.”
Status, time and size
At the top right of the response, three small labels sum it up:
- The status with its text, such as
200 OK, colored by type of result (success, redirect, client error, server error). - The total time. Hover over it to see a breakdown: DNS lookup, TCP handshake, TLS handshake, Waiting (TTFB), Download and Total.
- The size. Hover over it to see the size of the headers and of the body.
Body tab
The Body tab has a Pretty / Raw / Preview switch and a Copy body button.
- Pretty shows the body in a read-only editor with syntax colors chosen from the response type. JSON is formatted for you.
- Raw shows the text exactly as it arrived.
- Preview is offered only for HTML and SVG responses. It shows a rendered page in a locked-down frame: scripts do not run and files from other sites are not loaded.
Other cases:
- A response with no body says “This response has no body.”
- Images are shown as pictures.
- Other binary responses show “Binary response (type, size)” and no content.
- A very large response (over 5 MB) shows only its first part, with a warning that says how much is shown.
Headers tab
The Headers tab lists every response header in a Key and Value table. The number next to the tab name is how many there are. Headers that repeat, such as several set-cookie lines, are each shown.
Tests tab
A Tests tab appears only when the request ran scripts that reported test results or script errors. It shows how many tests passed (for example 2/3), a list with a check or cross for each, and any script error messages.
When there is no response
If the server cannot be reached, the response area says Could not get a response, adds a hint (for example “Is the server running, and is the port right?”, “The host name could not be found.”, “The server took too long to answer.” or “The server certificate was not accepted.”), and prints the raw error underneath.
How requests are sent
- A request is stopped if the server does not answer in 60 seconds.
- Redirects are followed, up to 10 times.
- HTTPS certificates are checked, so a self-signed certificate is rejected.
- The proxy you set under Settings, Network is used for HTTP and HTTPS. A SOCKS proxy is not supported here, so requests go direct in that case.
Collections
The Collections sidebar on the left keeps your saved requests. A collection is a named group of requests that can contain folders.
At the top, Collections has a New collection button (the +) and, when something is expanded, a Collapse all button. Under it, the Filter requests box narrows the tree to matching collection, folder and request names (while you filter, everything that matches is shown open). Press Esc in the box or click Clear filter to clear it.
Create a collection
- Click New collection (the +), or Create a collection if you have none yet (“No collections yet”).
- Type a Collection name such as “Payments API” and click Create.
The new collection appears in the list with a count of its requests.
Work with collections, folders and requests
Click a collection or folder to open or close it. Click a request to open it in a tab. The method badge in front of each request shows its method. The request open in the current tab is highlighted.
Each row has an actions button (three dots, shown when you hover over the row):
| On a… | Actions |
|---|---|
| Collection | Add request, Add folder, Rename, Delete |
| Folder | Add request, Add folder, Delete |
| Request | Delete |
- Add request creates a request called “New Request” (a GET with no URL) in that spot and opens it in a tab. An empty collection also shows an Add a request row.
- Add folder asks for a Folder name (for example Users, Orders, Auth) and creates it. Folders can hold requests and other folders.
- Rename changes the collection name.
- Delete asks you to confirm. Deleting a collection also deletes all its requests (“This cannot be undone.”), and deleting a folder deletes everything in it. Tabs open for deleted requests are closed.
If a collection’s file cannot be read, its row shows a warning icon (hover for the reason) and offers only Delete.
Save requests
Save (or Ctrl+S) behaves in one of two ways:
- If the request came from a collection, or was saved before, it is written back to the same place, and the unsaved dot on its tab goes away.
- If it is a new request, the Save request dialog opens (“Pick a collection or a folder to keep it in.”). Type a Name (it starts as the URL, or “New Request”), then under Save to pick a collection or one of its folders. To make a new collection on the spot, click New collection, type its name, and click Pick an existing one to go back. Click Save. A message says “Saved” with the request’s name.
Where collections are stored
Each collection is its own file in the Postman collection format (version 2.1), kept in the data/api-client/collections folder inside Runova’s data folder on your computer. Because it is the standard format, you can import one of these files into Postman or another tool that reads Postman collections.
Saved collections are the way to keep your requests between sessions.
Keyboard shortcuts
These work while the cursor is anywhere on the API Client page, including inside the body editor.
| Action | Keys |
|---|---|
| Send the current request | Ctrl+Enter (Cmd+Enter on macOS), or Enter in the URL box |
| Save the current request | Ctrl+S (Cmd+S) |
| New request tab | Ctrl+N (Cmd+N) |
Tips
- Save a request before closing its tab, otherwise you are asked whether to discard it.
- Use Preview to look at an HTML page your API returns, and Raw to copy the exact bytes.
- Turn a header or parameter off with its checkbox to test without it, without losing the row.
- If a request fails with a certificate error, the server’s certificate is not trusted. Fix the certificate rather than looking for a way around it.