
Build
Prompt Builder
Turn a rough idea, typed or spoken in any language, into a clear prompt for your AI coding agent, then run it, save it or schedule it.
Read about this part of Runova on the Build page.
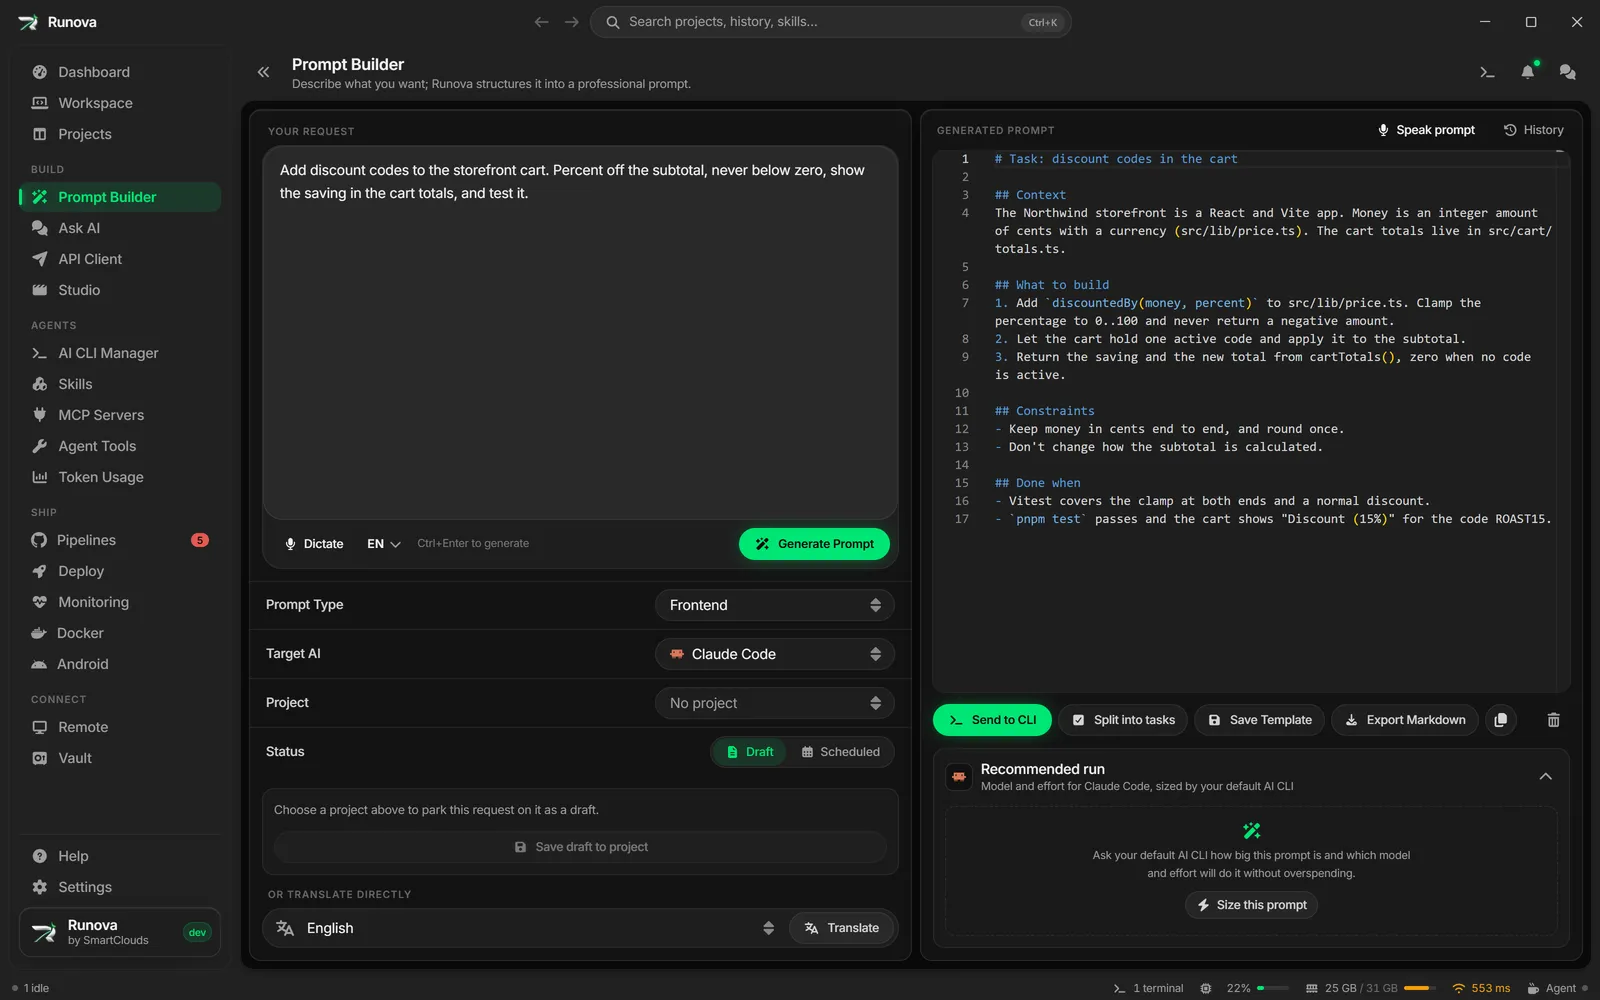
Prompt Builder helps you write good prompts for AI coding agents such as Claude Code, Codex or Gemini. You describe what you want in plain words (in any language, by typing or by voice), pick the kind of task and which agent will receive it, and Runova asks your AI provider (or your default AI CLI) to write a structured prompt. You can then copy it, send it to a terminal, save it as a project draft, or schedule it to run later.
Prompt Builder needs an AI provider (OpenAI, Gemini or Ollama) to write prompts, see AI providers, or an installed AI CLI if you pick the Default CLI tile in Settings (see below). It also has a smaller version, the Build Prompt dialog, that works on one project at a time (described below).
Where to find it
Click Prompt Builder in the sidebar under Build, or open the command palette (Ctrl+K) and type Prompt Builder. The page header reads “Describe what you want; Runova structures it into a professional prompt.”
The page keeps what you were doing. Your request, the chosen type and target, and the generated prompt are still there when you leave and come back, and after you restart the app.
Write a prompt
The page has two halves. The left half is where you describe the task, the right half is where the result appears.
Fill in the left half
- In Your request, describe what you want, for example “Add a login form with email/password validation”. Any language works. You can also click Dictate to speak it, see the Voice input section below.
- Choose a Prompt Type. The options are Frontend, Backend, Full Stack (the default), UI Design, UX Review, Product, API, Database, Testing, Security, Performance, DevOps, Documentation, Refactoring, Bug Fix, Code Review, Architecture, Mobile, Electron, React, Next.js, Node.js, .NET, Flutter, Python, AI Agent and Custom.
- Choose a Target AI. The list holds every AI CLI Runova knows (Claude Code, Gemini, OpenCode, OpenClaude, Codex, Grok, Cursor, Copilot, FreeBuff, Qwen, Aider, Goose, Cline, Continue, Pi and Muse Code). The prompt is shaped for the agent you pick.
- Optionally choose a Project. The box starts as “No project”. If you choose one, Target AI switches to that project’s agent. A project is needed to save a draft or a scheduled series.
- Leave Status on Draft, or switch to Scheduled (see below).
- Click Generate Prompt.
The request box has the writing check, so spelling and grammar issues are underlined, see Writing check, voice input and translation.
What Generate Prompt does
First your request is translated to English, whatever language you wrote it in. Then the prompt is written for the type and target you chose. The result appears in the Generated prompt editor on the right, and is added to your history.
Who writes it depends on the Prompt Builder writes with tiles in Settings, AI, Providers:
- OpenAI, Gemini or Ollama (OpenAI is the default): that provider, with its key and model.
- Default CLI: your default AI CLI (Settings, Agents, Default CLI, or the first installed one) writes it with the model it is set up with. No API key is needed, but the CLI has to be installed and signed in (see AI CLI Manager). A CLI can take longer than an API call, and it is stopped after 5 minutes.
The setting covers this page, the Build Prompt dialog and its desktop widget.
If the request box is empty you see “Describe what you want before generating a prompt.” If the provider has no model, you see “Set a <provider> model in Settings first.” With Default CLI and no CLI installed, the error says to install one from CLI Manager. The button shows Generating… while it works.
Translate directly
Under “or translate directly”, pick a language and click Translate to turn your request into that language without writing a prompt. The choices are English, Persian, Spanish, French, German, Arabic, Chinese (Simplified), Russian, Hindi and Turkish. The translation shows in the Generated prompt editor and is added to your history. Translation needs internet and no key, see Writing check, voice input and translation.
Work with the generated prompt
The Generated prompt editor on the right is a normal text editor, so you can fix the wording before using it. Below it are these buttons (all but Clear are disabled until there is a prompt):
| Button | What it does |
|---|---|
| Copy (icon) | Copies the prompt to the clipboard. |
| Save Template | Asks for a Template name and stores the prompt, type and target AI as a template. |
| Send to CLI | Opens a terminal with your AI CLI and the prompt already typed in. |
| Split into tasks | Breaks the work into Relay tasks, small tasks that each fit one AI session and run one after another. It works as soon as there is a request, even before you generate a prompt. A dialog asks which project the tasks are for if you have not picked one under Project. |
| Export Markdown | Saves the prompt as a file, offering the name prompt.md. |
| Clear (trash icon) | Empties the request and the generated prompt. |
Send to CLI
Send to CLI writes the prompt to a temporary file and opens a terminal tab with a command that starts the CLI and feeds it the prompt. The CLI is your default CLI (set in Settings, Agents, Default CLI), or the one that matches the Target AI if no default is set. If the prompt was sized for that same CLI, the suggested model and effort flags are added to the command too. If no CLI can be found you see “No CLI available for this target. Set a default CLI in Settings.”
Save as a draft or schedule a series
The Status picker under Project controls what the left half offers below it:
- Draft shows a Draft box. Save draft to project parks your request (with its type, target and generated prompt) on the chosen project, where you can finish it later. The button needs a project and a request. You see “Draft saved. Find it under the project’s Prompts section.”
- Scheduled shows a Scheduled series box for running several prompts on a project later. Pick a Run mode: Automatically at each time or Manually, when I press Run. Under it choose the CLI, Model and Effort to use. Click Add task for each prompt, write what should run in “What should run at this time?”, and for automatic runs set its date and time. Remove a task with its trash button. Save N task(s) to schedule stores the series on the project. It needs a project, and every task must have text (and a time for automatic runs). The prompt for each task is built from its text with your chosen type and target. You see “Scheduled series saved. Find it under the project’s Prompts section.”
See Projects and Scheduled tasks for where saved drafts and series show up.
Recommended run
Under the generated prompt, the Recommended run panel tells you how heavy the task is and which model and effort level to use, so you do not overspend on a small job. After Generate Prompt or Translate finishes, Runova automatically asks your default AI CLI to read the prompt and size it. This uses a CLI, not your API provider, so one must be installed and signed in (see AI CLI Manager). Sizing can take a short while and is stopped after 2 minutes. In the Build Prompt dialog this can be switched off, see the dialog section below.
When a result is ready the panel shows:
- A one-line summary and a task label, Light task, Moderate task or Complex task, with a small meter.
- Model: cards for the target agent’s models, each with its tier and a cost meter. A check mark badge shows the recommended one. Click a card to choose a different model. Use recommended puts the model and the effort back to the suggestion. It shows beside Model or Effort, whichever you changed.
- Effort: a switch of effort levels for the model, with a dot on the recommended one. Some agents have no effort setting, and then the panel says so.
- Why: small up and down arrows with reasons that made the task heavier or lighter.
- A cost line (Lowest cost to Highest cost), the model’s price per million tokens when known, and a ready-made command such as the CLI name with
--modeland--effortflags. Click the copy button next to it to copy the command.
Other controls:
- Size this prompt starts sizing when it has not run yet. The refresh button (Size the prompt again) re-runs it.
- Stop cancels a sizing in progress.
- If you edit the prompt or change Target AI afterwards, a banner says it changed since sizing, with a Size again link. The old advice is greyed out and its model flags are not used by Send to CLI until you size again.
- If sizing fails, the panel shows the error and a Try again link.
- The chevron button (Hide details / Show details) folds the panel to one line, and the page remembers that.
Voice input
Under Your request, click Dictate, speak, and click it again (Stop 0:12, with the time so far) to have your words transcribed and added to the end of the box. The chip next to it (EN, FA and so on) is the language Dictate listens for; click it to switch. To skip Generate and Translate entirely, click Speak prompt above Generated prompt instead: speak in English, and your words become the prompt exactly as you said them, sized like a translation. Esc or the × next to either button throws away a recording or a transcription that is taking too long. The first use downloads a speech model (the button shows the percentage), then it works offline. Choose the model size and spoken language under Settings, AI, Voice input. See Writing check, voice input and translation for details. The button is hidden when your system cannot record.
Prompt history
Every prompt you generate or translate is saved to your prompt history, with the original request, type, target and project.
The History dialog
Click History above the generated prompt to open the Prompt history dialog (“Pick a past prompt to load it back into the builder.”). It has a Search prompt history… box and a list of past prompts, newest first. Each entry shows its type, target badge, a Generated or Translated badge, the date and the start of the text. Click an entry to load its request, type, target and prompt back into the builder (“Loaded from history.”). Translations only restore the text and leave the pickers as they are.
If the history cannot be loaded, the dialog says “Couldn’t load prompt history.” with a Try again button.
Open full history at the bottom opens the Prompt History page.
The Prompt History page
The Prompt History page (“Every prompt you’ve generated or translated, searchable.”) has no sidebar entry of its own. Open it from Open full history, or search for a past prompt in the command palette (Ctrl+K) and pick it, which opens that entry. While you are on it, Prompt Builder stays highlighted in the sidebar.
The search box matches the request text, the prompt text, the type and the target AI. Each card shows the type, target, Generated or Translated badge, project name (if the project still exists) and date, then the first lines of the text, and these controls:
- Add tag: type a tag name and press
Enterto add it (Esccancels). Click the small x on a tag to remove it. - View details: opens the original input and the generated or translated prompt in full, with a Copy button.
- Copy: copies the prompt.
- Delete: asks “Delete this prompt history entry?” and removes it after you confirm. This cannot be undone.
The Build Prompt dialog for a project
The Build Prompt dialog is a compact Prompt Builder tied to one project, so the prompt can go straight into an agent working on that project.
Open it
- On the Projects page, open the menu of a project and choose Build a prompt for this project.
- In the Workspace, click the + menu of a pane and choose Build a prompt…, or press
Ctrl+G(Cmd+Gon macOS) while the Workspace is on screen. An empty pane also offers Build a prompt first.
The dialog remembers each project’s request, type, target and result separately.
Use it
- Pick the Type and Target at the top. The target starts as the project’s own agent.
- Write your request in Your request. The counter shows the number of characters. Click Dictate to speak it. The small chip next to it (EN, FA and so on) is the language Dictate listens for; click it to switch.
- To skip Generate and Translate entirely, click Speak prompt above Generated prompt instead. Speak in English, and your words go straight into the result box exactly as you said them, ready to copy or run.
- Click Generate prompt. It is written by your AI provider or your default CLI, whichever the Prompt Builder writes with tiles in Settings say (see What Generate Prompt does). If you wrote Persian, the dialog notes that the prompt is still written in English. Translate copies your request into English without writing a prompt.
- The result appears under Generated prompt, where you can still edit it. Copy copies it. While a request runs there is a Cancel button.
Closing the dialog does not stop a running Generate, Translate or sizing. It carries on in the background and a message such as “Prompt for <project> is ready.” tells you when it is done.
The Recommended run advice shows here as a small chip above the result. Click the chip to open the full panel.
By default the dialog sizes the prompt on its own as soon as Generate prompt, Translate or Speak prompt finishes, and the chip shows the result. To wait until you ask instead, switch off Build Prompt sizing under Settings, AI. With it off, a new prompt is not sized until you click the chip, which opens the panel and starts sizing right away. If you change the prompt or the target after a sizing, the chip keeps the old advice with a warning, and clicking it sizes the new text. The Prompt Builder page is not affected by this switch and always sizes after Generate or Translate.
Footer actions
- Clear empties the request and result.
- Split into tasks turns the request or the generated prompt into Relay tasks for this project. An AI planner reads the project without changing it and proposes tasks sized to the context budget you choose. You review them, leave some out, and then add them to the project’s task board, run them now, or start them later. Planning can take a while, so you can close the dialog and keep working; a notification tells you when the tasks are ready (see planning in the background). It is greyed out until there is a request.
- Save draft parks the prompt on the project (the tooltip calls this the project’s Overview tab, and the confirmation says “Draft saved. Find it on the project’s Overview tab.”). The dialog then closes.
- The main run button opens an agent in the Workspace with the prompt typed in and ready: Run on <model · effort> when a fresh sizing exists, otherwise Open in <your agent>. Press
Enterin that tab to run it. - The arrow next to it lists other ways: the suggested model, the default model and effort, Other agents you have installed, and Add scheduled task (Run it later, by hand or at a set time), which opens an Add scheduled task dialog.
- History at the top of the dialog opens the project’s Prompts tab.
- The window button toggles Maximize and Restore size.
Shortcuts in the dialog
These work only inside the Build Prompt dialog and the desktop widget. You can change them under Settings, Shortcuts, group Prompt builder.
| Action | Keys |
|---|---|
| Generate prompt | Ctrl+G or Ctrl+Enter (Cmd on macOS) |
| Translate request | Ctrl+T |
| Copy generated prompt | Ctrl+C when no text is selected |
The shortcut hints are printed on the buttons and at the bottom of the dialog. They are not active on the full Prompt Builder page.
Pin it to your desktop
In the normal (not maximized) dialog, the pin button (Add to desktop, tooltip “Keep this on the desktop”) turns the dialog into a small always-on-top floating window on your desktop, titled “Build Prompt” with the project name. It has the request, Type, Target, Generate and Translate buttons, the Generated prompt with Copy, and Save draft. Drag it by its top strip and close it with the x. It keeps its position, and cannot be made bigger. It shares its text with the dialog for the same project. See Widgets and desktop pet.
Tips
- Short, concrete requests work best. Mention the file, screen or error you care about.
- Let Prompt Builder translate for you. You can write in your own language and still hand the agent an English prompt.
- Use the Recommended run advice before starting a long agent task, to avoid paying for the biggest model when a smaller one is enough.
- A project’s Blueprint tab is a separate feature of the project page, see Projects.