
Workspace
Files and editor
Browse a project's files in the Explorer, edit them in the built-in editor, view images, and search files, types and text inside the project.
Read about this part of Runova on the Git, diffs and review page.
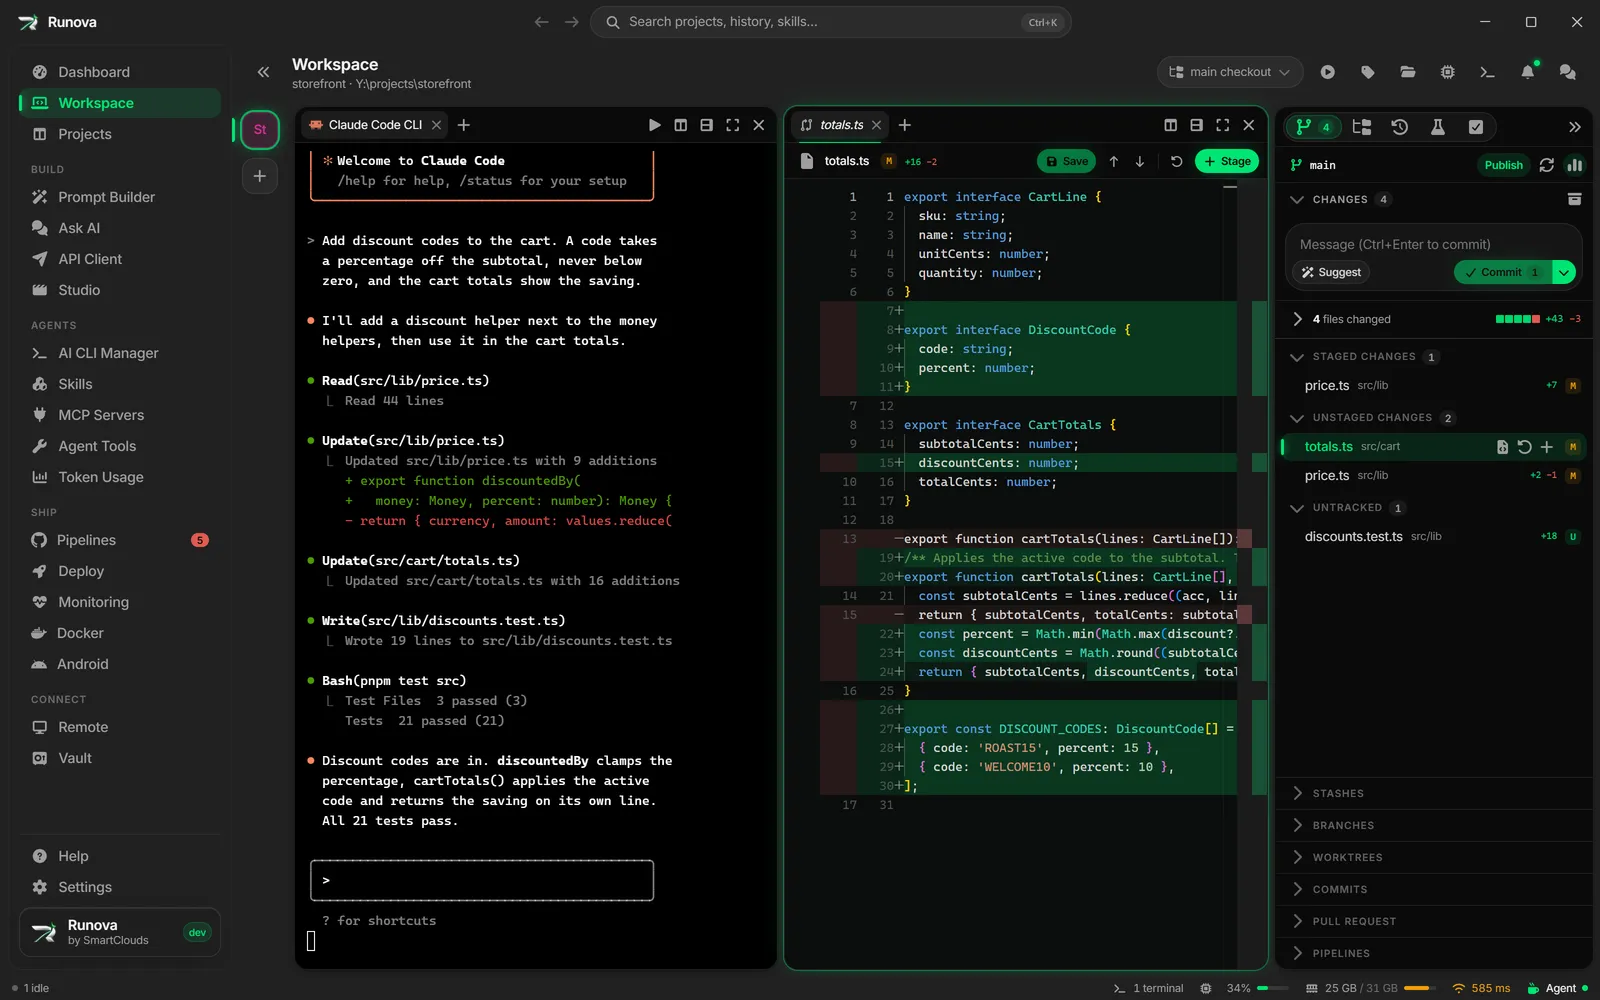
The Workspace has a file explorer and an editor built in, so you can look at what an agent changed, fix a line yourself, or find a function without leaving the project. Files open as tabs in your panes, next to your terminals. Pictures open in an image viewer, and a search box finds files, types, members and text anywhere in the project.
Where to find it
Open a project in the Workspace. In the project panel on the right, click the Explorer tab (the folder-tree icon). Press Ctrl+P (Cmd+P on macOS) anywhere in the Workspace to search files and code.
If the panel is hidden, press Ctrl+Shift+G to show it, or click Show the panel in the narrow strip on the right.
The Explorer
The Explorer shows the project’s folder as a tree. Click a folder to open or close it. Click a file to open it in the focused pane as a preview tab, and double-click (or press Enter) to keep it open. The file showing in the focused pane is highlighted in the tree.
What the tree shows
- Changed files carry git’s letter on the right (M modified, A added, D deleted, R renamed, ! conflict, U untracked) and are colored to match. Deleted files are struck through.
- A folder that contains a changed file shows a small amber dot, even when it is closed.
- Files and folders that your
.gitignoreexcludes are dimmed. In a project that is not a git repository, big generated folders such asnode_modules,distandbuildare dimmed instead. - The
.gitfolder is hidden. - An empty project folder shows This folder is empty. Create a file.
Toolbar buttons
The strip under the panel tabs shows the project’s folder name and these buttons:
| Button | What it does |
|---|---|
Search files (Ctrl+F) |
Opens the file name search described below. |
| New File… | Starts a new file in the selected folder. |
| New Folder… | Starts a new folder in the selected folder. |
| Open in VS Code | Opens the project folder in VS Code. |
| Refresh files | Reloads the tree. |
| Collapse Folders | Closes every open folder. |
Create, rename and delete
- Click New File… or New Folder…, or right-click a folder and choose the same item.
- Type a name in the box that appears in the tree. A name with a slash, such as
src/utils/format.ts, creates the folders in between. - Press
Enterto create it, orEscapeto cancel. If the name is not allowed or already exists, a red note under the box says why.
To rename, select a file or folder and press F2 (Enter on macOS), or right-click it and choose Rename…. The name box opens with the file’s name selected, without its extension. Open tabs follow the file to its new name, and keep any unsaved edits.
To delete, select the rows and press Delete, or choose Delete in the menu. Runova asks first, lists what will go, and moves it to the Recycle Bin (the Trash on macOS and Linux) so you can restore it. If a file you are deleting has unsaved edits in a tab, the dialog warns that they will be lost. Shift+Delete deletes permanently, after a confirmation that says it cannot be undone. If the Recycle Bin cannot take something, Runova offers Delete permanently instead.
Select, cut, copy and paste
Shift+clickselects a range.Ctrl+click(Cmd+clickon macOS) adds or removes one row.Ctrl+Aselects every visible row.Ctrl+X,Ctrl+CandCtrl+Vcut, copy and paste files and folders inside the project. A cut row fades until you paste it. A paste goes into the selected folder, or next to the selected file.- If a move would replace something, you get {name} already exists in {folder} and a Replace button. The file that was there goes to the Recycle Bin.
- Files you copied in File Explorer or Finder can be pasted into the tree too. They are copied into the folder you pasted on.
Drag and drop
Drag rows to a folder to move them. Hold Ctrl (Option on macOS) while dropping to copy instead. A folder you hover over for a moment opens by itself. You can also drag files from File Explorer or Finder onto the tree to copy them into the project.
Right-click menu
| Item | What it does |
|---|---|
Add to {agent} (Ctrl+L) |
Types @ references to the selected files into your running agent, without sending. See below. |
| New File…, New Folder… | Create inside the folder (or the project root). |
| Open to the Side | Splits the focused pane and opens the file in the new half. |
| Open With Default App | Opens the file in the app your computer uses for it. |
| Reveal in File Explorer | Shows it in File Explorer (Reveal in Finder on macOS, Open Containing Folder on Linux). |
| Open in Integrated Terminal | Opens a shell tab in that folder. |
| Cut, Copy, Paste | Work on files and folders. |
| Copy Path, Copy Relative Path | Copy the full path, or the path from the project root. |
| Add to .gitignore | Adds the file or folder to the repository’s root .gitignore. For a file, you can also pick All *.{ext} files. Only in git projects. |
| Rename…, Delete | As above. |
| Collapse Folders | Shown when you right-click the empty space under the tree. |
If git still tracks something you just ignored, a message offers Stop tracking. That removes it from git but leaves the file on disk.
Add files to an agent
Choose Add to {agent} (the item names the agent, for example Add to Claude Code, or Add to New Claude Code Tab when none is running). Runova types references like @src/app.ts @src/lib/ into the agent’s input box and focuses it. Folders end in a slash, and nothing is sent until you press Enter, so you can type your question straight after. See Terminals and agents for how the agent is chosen.
Keyboard in the Explorer
These keys work while the tree has focus. macOS differences are in the last column.
| Action | Windows and Linux | macOS |
|---|---|---|
| Move up or down | Up, Down (add Shift to extend the selection) |
same |
| Open or close a folder | Right, Left, Space |
same |
| Jump to first or last row | Home, End |
same |
| Open the file | Enter |
Cmd+Down |
| Rename | F2 |
Enter or F2 |
| Delete | Delete |
Cmd+Backspace or Delete |
| Delete permanently | Shift+Delete |
Cmd+Option+Backspace |
| Cut, copy, paste | Ctrl+X, Ctrl+C, Ctrl+V |
Cmd+X, Cmd+C, Cmd+V |
| Select all | Ctrl+A |
Cmd+A |
| Copy path | Shift+Alt+C |
Cmd+Option+C |
| Copy relative path | Ctrl+Shift+Alt+C |
Cmd+Option+Shift+C |
| Reveal in File Explorer | Shift+Alt+R |
Cmd+Option+R |
| Search files | Ctrl+F |
Cmd+F |
| Add to agent | Ctrl+L |
Cmd+L |
| Clear a cut or a multi-selection | Escape |
same |
Searching files by name
Click Search files or press Ctrl+F in the tree. A box appears above the tree and the tree gives way to a ranked list of matches. Names are matched first, then the rest of the path, with the matching letters highlighted.
UpandDownmove through the results,Enteropens the file,Escapeclears what you typed (a second press closes the box).- The number in the box is how many files match. The list shows the best matches if there are very many.
- Hover a result and click Show in tree to find it in the folder tree.
- Click Search files and code (the expand icon) to continue in the bigger search dialog, or click Search in file contents for “{text}” at the bottom of the list to look inside files.
- Very large projects are limited to the first 20,000 files, and the list says so when that happens.
File tabs and the editor
A file opens in a tab whose header shows its name, its folder, and these buttons.
- Save and
Ctrl+S(Cmd+S) write your edits to disk. An Unsaved marker with an amber dot shows while there are edits to save. - Reload from disk throws away unsaved edits and reads the file again. Use it when something else changed the file.
- Open in its default app opens the file outside Runova.
- For an image opened as source, Show the picture goes back to the viewer.
When a file changes on disk
Runova watches every open file. When something outside the editor changes it (an agent, a script, another editor), a bar appears above the editor.
- No unsaved edits. The tab loads the new version by itself and the bar says changed on disk and was reloaded. Click the × to close the bar, or just keep working. It goes away on your next edit.
- Unsaved edits. Your edits stay where they are, and the bar warns that the file changed on disk and your edits are not saved. Pick one:
- Show new version throws away your edits and shows the file as it is on disk now.
- Compare puts the two side by side, the file on disk on the left and your version on the right. You can edit the right side to bring changes over, then save. Click Compare again to go back to the editor.
- Keep mine keeps your edits. Save then writes them over the version on disk.
- Deleted. The bar says the file was deleted on disk. The text stays in the tab, and Save creates the file again.
Pictures in the image viewer reload on their own when they change.
The editor is the same one VS Code uses (Monaco), with syntax coloring chosen from the file extension, your app theme, word wrap on, and its usual find, multi-cursor and code editing keys. Files larger than about two million characters open read-only. A file that cannot be read shows This file could not be opened with the reason.
Right-click menu of a file tab
Reveal in File Explorer (or the Finder or folder equivalent), Reveal in Explorer View, Copy Path, Copy Relative Path and Close. The reveal items only work for files inside the project folder.
Open a file at a line
When you open a search result, the editor selects the match and scrolls it to the middle of the view.
Image tabs
Pictures (PNG, JPEG, GIF, WebP, AVIF, BMP, ICO, APNG, JFIF and SVG) open in an image viewer instead of as text. The header shows the picture’s size in pixels and its file size.
- The picture starts fitted to the pane, on a light checkerboard so transparency is visible.
- Click Zoom in or Zoom out, or hold
Ctrland scroll, to zoom. The percentage button switches between actual size and fit. Fit to the pane resets the view. Double-click the picture to toggle actual size. - Drag the picture to pan when it is bigger than the pane.
- For an SVG, Edit the source opens it as text in the editor, and Show the picture goes back.
Images inside a terminal have a separate full-size viewer, see Terminals and agents.
Search in the project
Press Ctrl+P (Cmd+P) in the Workspace to open the search dialog for the project on screen. It finds files by name, types and members by their declarations, and text inside files, all in one box. A preview of the selected result sits below the list.
Modes
Five tabs choose what to search. You can also type a prefix, or press Tab and Shift+Tab to cycle.
| Tab | Prefix | Finds |
|---|---|---|
| All | none | Files, types, members and text together, a few of each, with See all {n} links. |
| Files | f: |
File names and paths. |
| Types | t: |
Classes, interfaces, enums and type declarations. |
| Members | m: |
Functions, methods and properties. |
| Text | x: |
Text inside files. |
Each tab shows its count once you type. In All and Files, add a line after a name to jump there: app.ts:42, app.ts:42:7 or app.ts(42).
Text options
Three buttons at the right of the box change how text is matched. They can also be toggled with the keyboard.
- Match case (
Aa,Alt+C) - Match whole word (
ab,Alt+W) - Use regular expression (
.*,Alt+R)
Text search follows your .gitignore, skips node_modules, .git and files over 2 MB, and lists at most the first 2,000 matches. In Text it starts after two characters, and in All after three.
Keys in the dialog
| Key | What it does |
|---|---|
Up, Down, PageUp, PageDown |
Move through results. |
Enter |
Open the result and close the dialog. |
Shift+Enter |
Open it as a preview tab and keep the dialog open. |
Ctrl+Enter (Cmd+Enter) |
Open it in a new pane to the side. |
Tab, Shift+Tab |
Next or previous mode. |
Ctrl+P again |
Select the old query so you can type a new one. |
Escape |
Close. |
A result opens at the right place: a type or member jumps to its declaration, and a text match selects the matched text.
Recent files
With the box empty, All and Files list your Recent files for the project, newest first, up to 20. Files you open from anywhere in the Workspace are added, and renames and deletes are followed.
Preview
Use the eye button (Hide preview or Show preview) to toggle the preview. Drag the handle between the list and the preview to resize it. Pictures show in the preview too. Your last query, the three text options and the preview size are remembered for the next time.
If searching types and members says Searching types and members is not available in this build., the other modes still work.
Tips
- Single-click files to skim through them. Each click replaces the last preview tab, so you do not end up with fifty tabs.
- Type
x:and a few words in the search dialog to find where an error message comes from. - Use Open to the Side to keep a file next to the terminal where an agent is editing it.
- Right-click files and choose Add to {agent} to ask an agent about them without typing the paths yourself.