
Workspace
Git in the Workspace
Stage, commit, branch, push and merge from the Workspace's Source control panel, with AI help for commit messages, conflicts and pull requests.
Read about this part of Runova on the Git, diffs and review page.
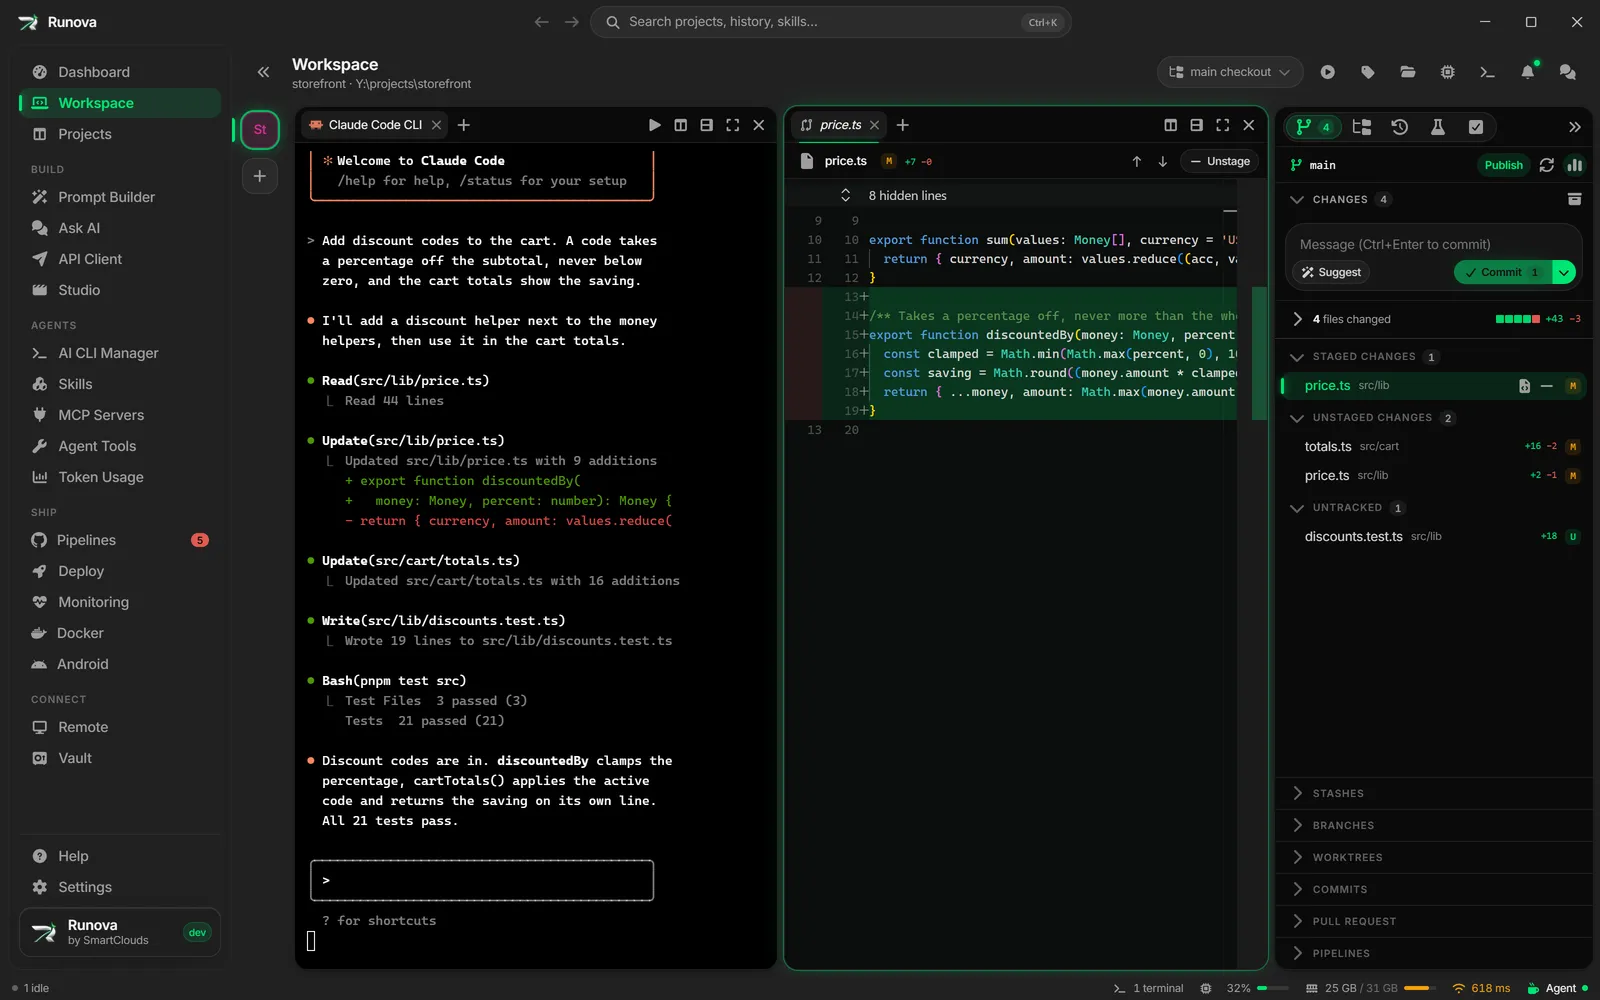
The Source control panel sits on the right of the Workspace and shows what your agents are changing in the project, as it happens. From it you can look at each diff, stage files or single lines, write a commit message (with AI if you like), commit and push, switch branches, open and merge a pull request, and fix merge conflicts.
Everything here works on the project folder on screen. If that is a worktree, it works on the worktree’s own branch, see Worktrees.
Where to find it
Open a project in the Workspace. The right panel opens on Source control (the branch icon). Its tabs are Source control, Explorer, Agent sessions, Tests and Tasks (the project’s Relay tasks). A number on the Source control icon counts changed files (or failing checks on your pull request, which take priority and turn it red).
- Press
Ctrl+Shift+G(Cmd+Shift+Gon macOS) to hide or show the panel. When it is hidden, a narrow strip with the tab icons stays on the right. Click an icon to bring the panel back on that tab. - Drag the panel’s left edge to resize it, between 240 and 560 pixels wide. Double-click the edge to go back to the default width.
If the folder is not a git repository, the panel says Not a git repository and offers Open the Git tab, which opens the project page where you can set one up (see Projects).
The branch bar
The strip at the top of Source control shows:
- The current branch name (or
detachedand the commit when you are not on a branch). Click it to jump to the Branches section. Its tooltip tells you what the branch is tracking. - A pull request pill next to it. #42 with a colored dot shows the branch’s pull request and its state. Create PR appears once the branch is published and has no pull request yet. Click either to open the Pull request section.
- One main button for what is needed now: Publish (the branch is not on the remote yet), Push (you have commits to send), Pull (the remote has new commits), or Sync (both, which pulls and then pushes). Arrows show how many commits are behind and ahead. When nothing is needed, only the fetch button shows.
- Fetch from remote (the circular arrows) updates what Runova knows about the remote without changing your files. Runova fetches once by itself when the panel first shows, so the counts mean something.
- Show line totals (the small chart icon) turns the line totals on and off, described below.
If the project has no remote, the sync buttons are not shown.
When a merge, rebase or similar operation is stopped half way, a banner says {operation} in progress with Fix with AI (when conflicts are the problem) and Abort. Abort asks first, then puts the repository back to how it was before the operation started.
Sections of Source control
Under the branch bar, the tab is a stack of sections that fold open and closed: Changes, Branches, Worktrees, Commits, Pull request and Pipelines. Only Changes is open at first. Click a section’s title to fold it, and open as many as you like. Each header can show a count: changed files, worktrees, unpushed commits, or pull request items that need you (red when checks fail). Drag the thin splitter between two open sections to change how much room each gets, and double-click it to reset.
Changes
Changes lists every changed file in groups: Conflicts (only during a merge problem), Staged changes, Unstaged changes and Untracked. Each group header shows a count and folds away. Hover a header for its bulk buttons.
| Group | Header buttons |
|---|---|
| Staged changes | Unstage all |
| Unstaged changes | Discard all changes, Stage all |
| Untracked | Delete all untracked files, Stage all |
If you have more than 2,000 untracked files, only the first 2,000 are listed and a warning suggests a missing .gitignore entry. When nothing has changed, the panel says Working tree clean and that files your agents change will show up the moment they are written.
Rows
Each row shows the file name, its folder, how many lines were added and removed, and a status letter: M modified, A added, D deleted, R renamed, C copied, T type changed, ! conflict, U untracked (new).
- Click a row to open its diff in a preview tab. Double-click, or press
Enter, to keep the tab open. - Hover a row for its buttons: Open file, Stage (or Unstage), Discard changes (Delete file for untracked files). In the conflicts group you get Mark as resolved and the conflict buttons described below.
- Move with
UpandDown. PressSpaceto stage or unstage the row, andDeleteto discard it. - Discards and deletes show a message with Undo, so a mistake is recoverable right away. Discarding or deleting a whole group asks first.
Right-click menu of a row
Open Changes, Open File, Open With Default App, Reveal in File Explorer (or the Finder or folder equivalent), Reveal in Explorer View, Copy Path, Copy Relative Path, then Stage or Unstage, Discard Changes (Delete File for untracked files), and for conflicts Resolve with AI and Mark as Resolved.
Line totals
With Show line totals on, a summary above the list shows how many files changed and how many lines were added and removed, with a small bar like GitHub’s. Click it to see the same numbers per group. Binary files and files too large to read have no line counts and are left out.
Writing a commit
When there are changes, a commit box sits at the top of Changes.
- Type a message in Commit message, or click the sparkle button (Write a commit message with AI) and let your AI CLI write it. The box shimmers while it works, and you can click the button again (Stop writing) to cancel. Edit the result however you like.
- Click Commit. It commits what is staged. If nothing is staged, the button reads Stage all & commit and stages everything first.
- To commit and push in one go, click the arrow next to the button (More commit options) and choose Commit & push. For a branch that has no remote copy yet, this publishes it.
Ctrl+Enter (Cmd+Enter) commits and Ctrl+Shift+Enter commits and pushes, while you are typing in the message box. A message you have half written is kept for each project, even if you switch tabs or pages, until you close Runova.
The commit button stays off while the message is empty, while there is nothing to commit, and while conflicts are unresolved. With conflicts the box says Resolve the conflicts below before committing. and shows Fix with AI.
AI commit messages
The sparkle button writes from the staged changes, or from every change when nothing is staged. How it writes is set in Settings, on the Agents tab, under Commit messages:
- Written by: which AI CLI writes the message. Left empty it uses the project’s CLI, then your default.
- Longest summary line: from 40 to 120 characters, 72 by default.
- Style: Conventional Commits, Plain summary, Summary and bullet points, or My own instructions.
- Extra instructions (optional), or Your instructions for the custom style. For example, “Mention the ticket id from the branch name.”
- Allow a body: lets the message have a short explanation under the summary. It is hidden for the bullet-points style.
See Settings.
Diffs
Opening a changed file shows its diff in a tab in the focused pane. The tab’s header names the file and its side (Staged, Working tree, New file or Conflict, or Commit {id} for a past commit).
- Previous change and Next change (
F7andShift+F7) jump between changed blocks. - Show side by side or Show inline switches the layout, and Hide whitespace changes ignores whitespace-only edits.
- Keep this tab open pins a preview tab, and Open file opens the file in the editor.
- For a working tree change, the right side is the real file. Edit it in place and click Save (or
Ctrl+S). An Unsaved marker shows until you do. Staged content and old commits are read-only. - Stage, Unstage, Discard changes and Mark resolved act on the whole file.
- To stage, unstage or discard only some lines, select them in the diff and use the small action that appears, or the right-click items such as Stage Selected Lines. Save your edits first, or it asks you to.
- If a file is no longer changed, the tab says so and offers Show staged or Show working tree when the other side still has changes.
- Pictures show a Before and After view (Added or Deleted when only one exists). A binary file says Binary file, and a huge one says it is too large to diff.
Branches
Open the Branches section to see local branches, then remote-only ones under Remote. The current branch has a check mark and is bold, and the default branch is tagged default.
- Switch: click a branch. If you have uncommitted changes, Runova asks Switch to {branch}? first. Git carries your changes over when it can, and refuses (and says why) when they would be overwritten.
- Create: click New branch (the + in the section header), type a name (spaces become dashes), and press
Enter. The new branch is created from where you are and you switch to it. - Find: with more than eight branches, a Filter branches box appears.
- Open on GitHub: double-click a branch. A branch that is not pushed yet says so.
- Delete: hover a branch and click Delete branch. Remote-only branches say Delete remote branch and are removed from the remote for everyone, after a confirmation. The current branch, the default branch and
mastercannot be deleted here. - Branches held by a worktree: git keeps a branch checked out in only one place. A branch in another worktree or the main checkout is tagged in worktree or in main checkout, and clicking it opens that workspace instead. Other branches have Open in a new worktree. See Worktrees.
Commits
Commits lists the latest 100 commits on the branch with a line of history down the side. Commits that are not pushed yet have a hollow dot and the label not pushed. Each shows its message, short id, author, how long ago it was made, and any tags.
- Click a commit to expand its files, then click a file to see that commit’s diff.
- Hover a commit and click Copy commit id.
Conflicts
When a merge, rebase or similar operation leaves conflicts, the Conflicts group lists the files, the commit box is blocked, and the count on the Changes header turns red.
Resolve a file by hand
Hover a conflicted row for Ours (Keep your version) and Theirs (Keep the incoming version), which take one side whole. Or open the file, edit out the conflict markers, then click Mark as resolved (or Mark resolved in its diff tab). Click Abort in the banner to cancel the whole operation.
Resolve a file with AI
Click Resolve with AI (the sparkle on the row, or in the diff tab header). Your AI CLI reads both sides and writes the merged file in the background. Nothing is staged, so you can review the result. The row shimmers while it works, and clicking the spinner (Stop resolving with AI) cancels and puts the file back. When it is done a message gives the CLI’s summary with an Undo button. If it fails you see AI could not resolve the conflict. Stage and the side-picking buttons are off for that file while the AI is working.
Fix all conflicts with AI
Fix with AI (in the banner, or beside the conflict notice in the commit box) opens a dialog with one prompt that lists every conflicted file. It works like every Fix with AI dialog: you review the prompt, pick a model and effort, and the agent opens in a tab with the prompt typed, ready for Enter. See Terminals and agents.
Pull requests
The Pull request section walks the current branch from no pull request, through checks and review, to merge. It uses the GitHub CLI (gh). A refresh button reloads it, and Open in a larger view shows the same cards in a big dialog with review on one side and checks and merge on the other.
Before you start
The section tells you what is missing instead of failing quietly.
- No remote: add a GitHub remote and publish the branch.
- GitHub CLI not found: install
gh. The Open Agent Tools button goes to Agent tools. - No GitHub remote: the repository is not hosted on GitHub.
- Sign in to GitHub: click Run gh auth login. A terminal opens with the command typed, ready for
Enter. - On the default branch, it says Pull requests start from a branch and offers New branch.
Create a pull request
With no pull request yet:
- Check the branches at the top. The base is the repository’s default branch, and you can pick another from the list.
- If you have uncommitted changes, a note says they are not part of the pull request until you commit them, with a Review changes button.
- Type a Title and an optional description. The sparkle button (Write the title and description with AI) drafts both from your changes. Click it again to stop.
- Tick Open as a draft if you want one.
- Click Create pull request. The branch is published or pushed first when needed, and a message offers Open on GitHub. If
ghis not available, Runova opens GitHub’s own pull request page in your browser.
After you publish a branch with Publish or Commit & push, a message offers Create pull request too, as long as GitHub is set up for the project.
Follow an open pull request
The section shows the pull request’s number, title, state (Open, Draft, Merged, Closed), branches and size, with a button to open it on GitHub, then three cards that fold. Cards that need attention start open.
- Checks lists each check, failures first. Click one to open it on GitHub. For a failed GitHub Actions check, Fix with AI hands the failure to an agent, and Copy error copies it. See Pipelines for the all-projects view.
- Review shows the review decision (Approved, Changes requested, Review required) and open review threads. Each thread shows the file and line, and you can Reply or Resolve (Unresolve) it. Show {n} resolved reveals the finished ones.
- Merge is the last step, described below.
The review card also has:
- Fix comments with AI, which builds a prompt from the open threads and opens the Fix with AI dialog.
- Review with AI: your project’s CLI reads the pull request’s diff without changing files and writes a review. You can edit it, then click Post as comment.
- A comment box. Click Post comment or press
Ctrl+Enter. Above it are one-click review commands, which fill the box with a request for a review bot. The defaults are@claude review,/gemini review,@coderabbitai reviewand@codex review. Edit the list in Settings, on the Agents tab, under Review commands. Type a command, click Add, remove one with its x, or click Reset to defaults. See Settings.
Merge
The Merge card lists what is in the way, or says Ready to merge into {base}.
- Things GitHub will always refuse stop the button: the pull request is closed or merged, it is still a draft (a Mark ready button fixes that), it conflicts with the base, or you have uncommitted changes while cleanup is on.
- Softer warnings, such as failed or running checks, a reviewer who asked for changes, an approval still needed, or open threads, do not stop you. The confirmation then says GitHub still refuses the merge if the repository requires them, and its button reads Merge anyway.
- The arrow beside the button (Choose merge method) picks Squash and merge (the default), Create a merge commit or Rebase and merge. Your choice is remembered per project.
- Delete {branch} here and on GitHub, then switch to {base} is ticked by default. After the merge, Runova switches to the base branch, pulls the merge and deletes the branch locally and on GitHub. Each step is listed. If a step fails, Retry cleanup tries again.
- A confirmation dialog spells out what will happen before anything runs.
If the pull request was merged elsewhere and you are still on its branch, a card says Merged into {base} with a button to switch and delete the branch. A closed one offers a new pull request. A summary, Merged #{n} into {base}, stays on screen after the merge until you dismiss it.
Pipelines
The Pipelines section lists each GitHub Actions workflow of the repository with its latest run, failures first. Click a row to see that pipeline’s details. A failed run has Fix with AI and Copy error buttons. It needs gh installed and signed in, and shows the same notices as the pull request section if not. For a list across all your projects, see Pipelines.
Pipeline details
Click a row, or the Open pipelines in a larger view button in the section header, to open a larger window. Every pipeline is listed on the left, and the one you pick shows its details on the right. Press Esc to close it. It reads the same data as the section, so both stay current while it is open.
For the selected pipeline’s latest run you see:
- The run. Its name, commit title and outcome, then the branch, run number, the attempt (after a re-run), what started it, who started it and the short commit hash. Below that is when it started and how long it took, or how long it has been running. Hover the time for the exact date.
- Jobs. One card per job with its outcome and how long it took. Click a card to open it onto its steps, each with its outcome and duration, and the failed step is highlighted. Failed and running jobs start open, and so does a run’s only job. The link icon on a job opens it on GitHub.
- Annotations. The errors, warnings and notices the jobs left, when there are any. See Pipelines.
- Failure output. For a failed run, a folded block with the failed jobs’ errors and the end of their logs. Runova only reads it when you open it, and Copy copies it.
The buttons under the run’s details are Fix with AI and Copy error for a failed run, Stop while it is still going, and Open run on GitHub. A pipeline that has never run says so and offers Open workflow on GitHub. In the toolbar, Refresh from GitHub asks again, and Open Actions on GitHub opens the repository’s Actions page.
A run that is still going refreshes about every 10 seconds, so you can watch its steps move along.
A failure alert can land here: in Settings, Notifications, Pipeline failures, set When I click a failure to Project workspace, and clicking the message or the pet’s bubble opens this project’s Workspace with the Pipelines section unfolded. See Settings.
Worktrees section
The Worktrees section lists the project’s worktrees, with a New worktree button in its header. Everything about it is in Worktrees.
Tips
- Keep Changes open beside a running agent. Click the first row and watch diffs arrive.
- Stage only the lines you want from a messy diff, and let the agent’s other edits wait for the next commit.
- Set Style in Commit messages once, and every AI message follows your team’s convention.
- Use Commit & push on a new branch to publish it and get the Create pull request prompt in one go.