
Workspace
Workspace
Run AI agents, shells, files, a browser and git for one project side by side, in panes you split and arrange yourself.
Read about this part of Runova on the Workspace and agent status page.
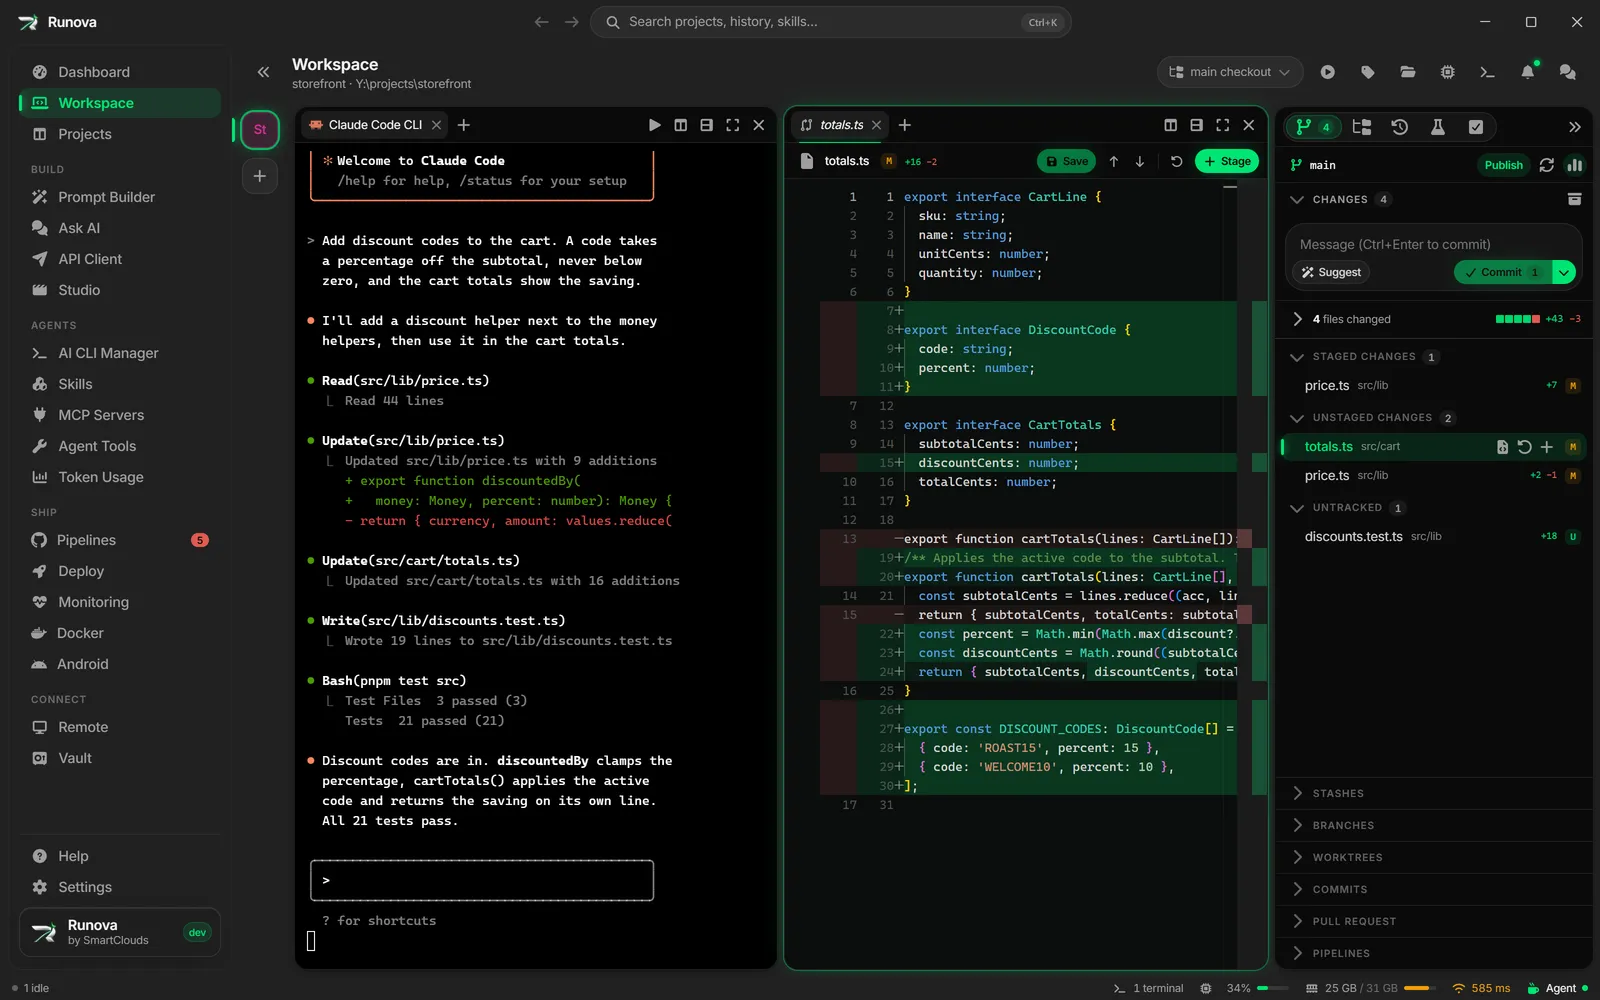
The Workspace is where you actually work on a project. It gives each project its own set of panes, and each pane holds tabs: AI agent CLIs, plain shells, a built-in browser, files and diffs. On the left a rail lists the projects you have open, and on the right a panel shows git changes, files, agent sessions and tests for the project on screen.
Everything you start here keeps running when you switch to another project or another page, so a long agent run does not stop because you looked elsewhere.
Where to find it
Click Workspace in the sidebar (it sits near the top, under Dashboard). You can also:
- Open a project on the Projects page and click Open workspace in its header.
- Open the command palette (
Ctrl+K, orCmd+Kon macOS), type a project name, and pick it from the Open workspace group. - Click No agents running in the status bar at the bottom of the window. When agents are running, the same spot lists them by state, and clicking one jumps to its tab.
Once you have opened a project, Workspace reopens on the project you used last. Settings has a Startup page option that can bring the whole app back to the Workspace when it launches, see Settings.
The layout
| Area | What it is |
|---|---|
| Project rail (far left) | One tile for every project you have open, with its worktrees under it. |
| Panes (center) | Your tabs. Split the area into as many panes as you like. |
| Project panel (right) | Source control, Explorer, Agent sessions, Tests and Tasks for the project on screen. See Git in the Workspace, Files and editor, Browser and tests and Relay tasks. |
The page header shows the project name, its folder, and a row of buttons described under Header buttons.
Picking a project
The welcome page
When no project is open yet, the Workspace shows Pick a project to work on with a card for every project that is not archived. Click a card to open it. If you have no projects, the page tells you to add one on the Projects page first (see Projects).
The project rail
Each open project is a tile. A tile shows the project’s icon, or its initials when you have not set an icon.
- Click a tile to switch to that project. The tile for the project on screen has a ring and a marker bar on its left edge.
- Hover a tile to see the project name, its folder, how many terminals are open and how many are working, and whether something is waiting on you.
- Drag a tile up or down to reorder the rail. A line shows where it will land.
- Click the small x that appears on a tile when you hover it, or right-click the tile and choose Close workspace, to close the project’s workspace. If terminals are still running, Runova asks Close the {project} workspace? and says how many terminals will be stopped. Confirm with Close workspace.
- Right-click a tile for New worktree… and, when the project has worktrees, Hide worktrees or Show worktrees. See Worktrees.
Open another project
Click the dashed + button at the bottom of the rail (Open another project). A small search box opens with the placeholder Open a project…. Type part of a name or folder and pick a project. Projects that are already on the rail are left out. If every project is open you see Every project is already open., and if nothing matches you see No matching project.
Panes and splits
A pane is a tab strip with a body below it. A new workspace starts with one pane.
Split a pane
Click Split right or Split down at the right end of a pane’s tab strip, or press Ctrl+Shift+D (split right) or Ctrl+Shift+E (split down). The new pane opens empty with the launcher, ready for an agent or shell. See Terminals and agents.
Move between panes
Click inside a pane to focus it. With more than one pane the focused pane gets a highlighted border. Move focus from the keyboard with Ctrl+Alt+Left, Ctrl+Alt+Right, Ctrl+Alt+Up and Ctrl+Alt+Down.
Resize panes
Drag the thin handle between two panes. Double-click it to reset the split to half and half. The handle also takes keyboard focus, and the arrow keys nudge it in small steps. A pane can only shrink down to a size where its tab strip and a few rows of text still fit.
Zoom a pane
When there is more than one pane, each pane has a Zoom pane button. It makes that pane fill the whole workspace area. The button turns into Restore pane while zoomed. The shortcut is Ctrl+Shift+Enter.
Close a pane
Click Close pane (the x at the right of the tab strip, shown when there is more than one pane). It closes every tab in the pane. If agents or commands in it are busy, Runova asks Close this pane? first.
Drag tabs between panes
Drag a tab by its title.
- Drop it on another pane’s tab strip to move it there. A vertical line shows the spot.
- Drop it on the left, right, top or bottom edge of a pane’s body to split that pane and put the tab in the new half. A dashed outline previews the result.
- Drop it in the middle of a pane’s body to move it into that pane.
Your pane layout is saved, so it comes back the next time you open Runova.
Tabs
A tab can be an agent or shell terminal, a browser page, a file, or a diff. Tab names and icons tell them apart: agents show the CLI’s logo, shells show a terminal icon, browser tabs show the page’s icon, files show a document or picture icon, and diffs show a compare icon.
- Click a tab to show it. Middle-click it, or click its small x, to close it.
- Drag a tab left or right to reorder it. When tabs do not fit, scroll the strip with the mouse wheel.
- Double-click a terminal tab, or right-click it and choose Rename, to give it your own name. Press
Enterto save andEscapeto cancel. - Hover a tab for details: its full name, the folder, and for agents the model and effort it runs on and its status.
- Files and diffs you open with a single click open as a preview tab, shown in italics. The next file you open replaces it. Double-click the tab, edit the file, or click Keep this tab open in a diff to keep it.
- A tab whose shell has ended shows its name struck through.
- Closing an agent that is busy (working, or waiting on a question) asks Close {name}? first and says the agent will be stopped. An idle or finished agent closes straight away.
Tab menus
Right-click a tab for the actions that fit its kind.
| Tab | Menu |
|---|---|
| Terminal or agent | Rename, the Auto-continue switches for agents, Close |
| File | Reveal in File Explorer (Finder on macOS, Open Containing Folder on Linux), Reveal in Explorer View, Copy Path, Copy Relative Path, Close |
| Browser | Reload, Copy address, Open in system browser, Close |
Diff tabs have no menu. Use the tab’s x or the shortcut to close them.
Go to a tab from the keyboard
Ctrl+TaborCtrl+PageDown: next tab in the focused pane.Ctrl+Shift+TaborCtrl+PageUp: previous tab.Alt+1toAlt+9: jump to the tab at that position.Ctrl+Shift+W: close the active tab.
Starting things in a pane
The + button after the last tab in a pane (New tab) opens a menu with:
- Build a prompt… to turn a rough request into a prompt and run it in this pane. See Prompt Builder.
- Agents, the installed AI CLIs, in your chosen order. Claude Code, Codex, Gemini, Grok and Cursor open a list of models (and efforts) when you hover them, to start that tab on a specific model.
- Shells, such as PowerShell, PowerShell 7 and Command Prompt on Windows, or zsh, bash and fish elsewhere.
- Browser for a web page, usually your dev server.
- Manage CLIs, which opens AI CLI Manager, and Keyboard shortcuts, which opens the shortcuts tab in Settings.
Ctrl+Shift+T opens this menu for the focused pane. An empty pane shows the same choices as large tiles. All the detail on launching agents is in Terminals and agents.
Header buttons
The Workspace adds a few buttons to the page header.
Which checkout you are in
The branch switcher at the left of the buttons shows main checkout or the branch of the worktree on screen. Click it to jump to another checkout of the same project, create a worktree, or open Manage worktrees. See Worktrees.
Run
The play button starts the project’s run command, for example pnpm dev. Its tooltip names the command, and F5 does the same. The command runs in the terminal drawer at the bottom of the app, not in a pane. Use Shift+F5 to stop it.
- With one run command, it starts right away. With several, a picker asks which one. A command that asks for values opens a form for them first.
- Right-click the button to list the project’s commands and pick one, or choose Edit run commands (or Add a run command when there are none).
- With no command set, the button opens Create a run command with AI. Describe what you want to run and Claude Code opens in a new tab, reads the project and suggests a command for you to approve. The right-click menu has Create with AI too, and the dialog has I’ll write it myself to open the run commands instead. See Run commands.
To open a dev server in a pane instead, start it in a terminal tab. See Browser and tests.
Pause
While one of the project’s runs is going, a pause button appears next to Run. It freezes the run so it uses no CPU, and the same button, now a play button, resumes it. It acts on all of the project’s runs at once. F6 does the same for the newest run. See Pause a run, including how to have Runova pause runs for you while an agent works in the same folder.
Tag a version
The tag icon opens the project’s Tag a version flow without leaving the Workspace. See Projects.
Project details
The folder icon (Project details) opens the project’s page.
Running CLIs
The chip icon (Running CLIs) opens a dialog listing every terminal in the app with the CPU and memory it is using. It covers workspace tabs, terminal drawer sessions, SSH sessions and terminals that kept running in the background.
- The top strip shows total CPU and memory and how many terminals are running. Each terminal counts its shell and every process it started, including agent CLIs.
- Search by name, project, CLI, folder or process. The filter button limits the list by source (Workspace, Terminal drawer, SSH, Detached), by kind (agent or shell) and by state (running or ended).
- Sort by CPU, Memory, Age, Name or Project. Click the same sort again to flip its direction.
- Each row has buttons to show details, Open the terminal, Restart (workspace tabs only), and End session (or Close tab for one that already ended).
- Tick rows and click End selected to stop several at once. Runova always asks before it ends something that is still running.
- SSH rows show Remote, no stats, because those shells run on the server.
Attention badges
Runova marks agents that need you, so you can work in another tab or page and still notice.
- On a tab: a spinning ring means the agent is working, a pulsing amber dot means it needs your input (the tab also turns amber), and a solid green dot means it finished and you have not looked yet.
- On a project tile in the rail: the most urgent state among that project’s tabs. Waiting on you comes first, then finished, then working.
- On Workspace in the sidebar: an amber dot for a waiting agent, or a green dot for a finished one.
- In the status bar: counts of agents by state, with a list you can click to jump to a tab.
- As a system notification when you are looking at another page or app (see the Workspace notifications setting in Settings). Clicking it brings that tab forward.
The green dot goes away once you look at the finished tab with Runova in front. More on statuses in Terminals and agents.
Keep terminals running
In Settings, on the General tab, Keep terminals running is on by default. With it on, closing Runova does not end your terminal sessions. They carry on in the background and come back with their output the next time you open the app. Restarting to install an update always keeps them.
Turn it off if you want quitting the app to end every terminal.
When you close the app while agent CLI sessions are open, Runova asks Close Runova? and tells you whether they will keep running or be stopped. Click Close app to continue.
If a shell is gone when you come back (after a reboot, for example), its tab says This session ended while Runova was closed. with Restart and Close buttons. Claude Code and Codex agent tabs that had a conversation pick it back up on their own. See Settings.
Workspace terminal background
By default a terminal in a pane looks the way its CLI looks in any ordinary terminal, for example Claude Code’s own gray. In Settings, on the General tab, Workspace terminal background lets you paint a fixed color behind every pane terminal instead. Turn it on, then pick a color. Text colors adjust so they stay readable on the color you chose. See Settings.
Keyboard shortcuts
These work on the Workspace page. On macOS, use Cmd where the table says Ctrl. You can rebind any of them in Settings, on the Shortcuts tab (see Keyboard shortcuts).
| Action | Shortcut |
|---|---|
| New tab menu | Ctrl+Shift+T |
| Open agent 1 to 9 (by its place in the + menu) | Ctrl+1 to Ctrl+9 |
| Build a prompt | Ctrl+G |
| New browser tab | Ctrl+Shift+B |
| Comment on a page element (browser tab) | Ctrl+Shift+C |
| Close tab | Ctrl+Shift+W |
| Split pane right / down | Ctrl+Shift+D / Ctrl+Shift+E |
| Focus the pane left, right, above, below | Ctrl+Alt+Left, Right, Up, Down |
| Next / previous tab | Ctrl+Tab / Ctrl+Shift+Tab (also Ctrl+PageDown / Ctrl+PageUp) |
| Go to tab 1 to 9 | Alt+1 to Alt+9 |
| Zoom pane | Ctrl+Shift+Enter |
| Show or hide the project panel | Ctrl+Shift+G |
| New worktree | Ctrl+Shift+N |
| Run project | F5 |
| Stop run | Shift+F5 |
| Pause or resume run | F6 |
| Search files and code | Ctrl+P |
| Next / previous change in a diff | F7 / Shift+F7 |
Ctrl+T still toggles the terminal drawer here, because the Workspace uses Ctrl+Shift+T for its own new-tab menu.
Tips
- Give each agent its own pane so you can watch several tasks at once, and zoom one when you need to read it closely.
- Keep the project panel open on Source control to watch every change an agent writes, as it happens.
- Use Running CLIs when the fan spins up and you want to know which terminal is responsible.
- Search this guide any time with
F1, or use Ask the guide on the Help page. See Help center.