
Workspace
Terminals and agents
Start AI agent CLIs and shells in Workspace panes, follow their status, and use copy, paste, images, links and past conversations.
Read about this part of Runova on the Workspace and agent status page.
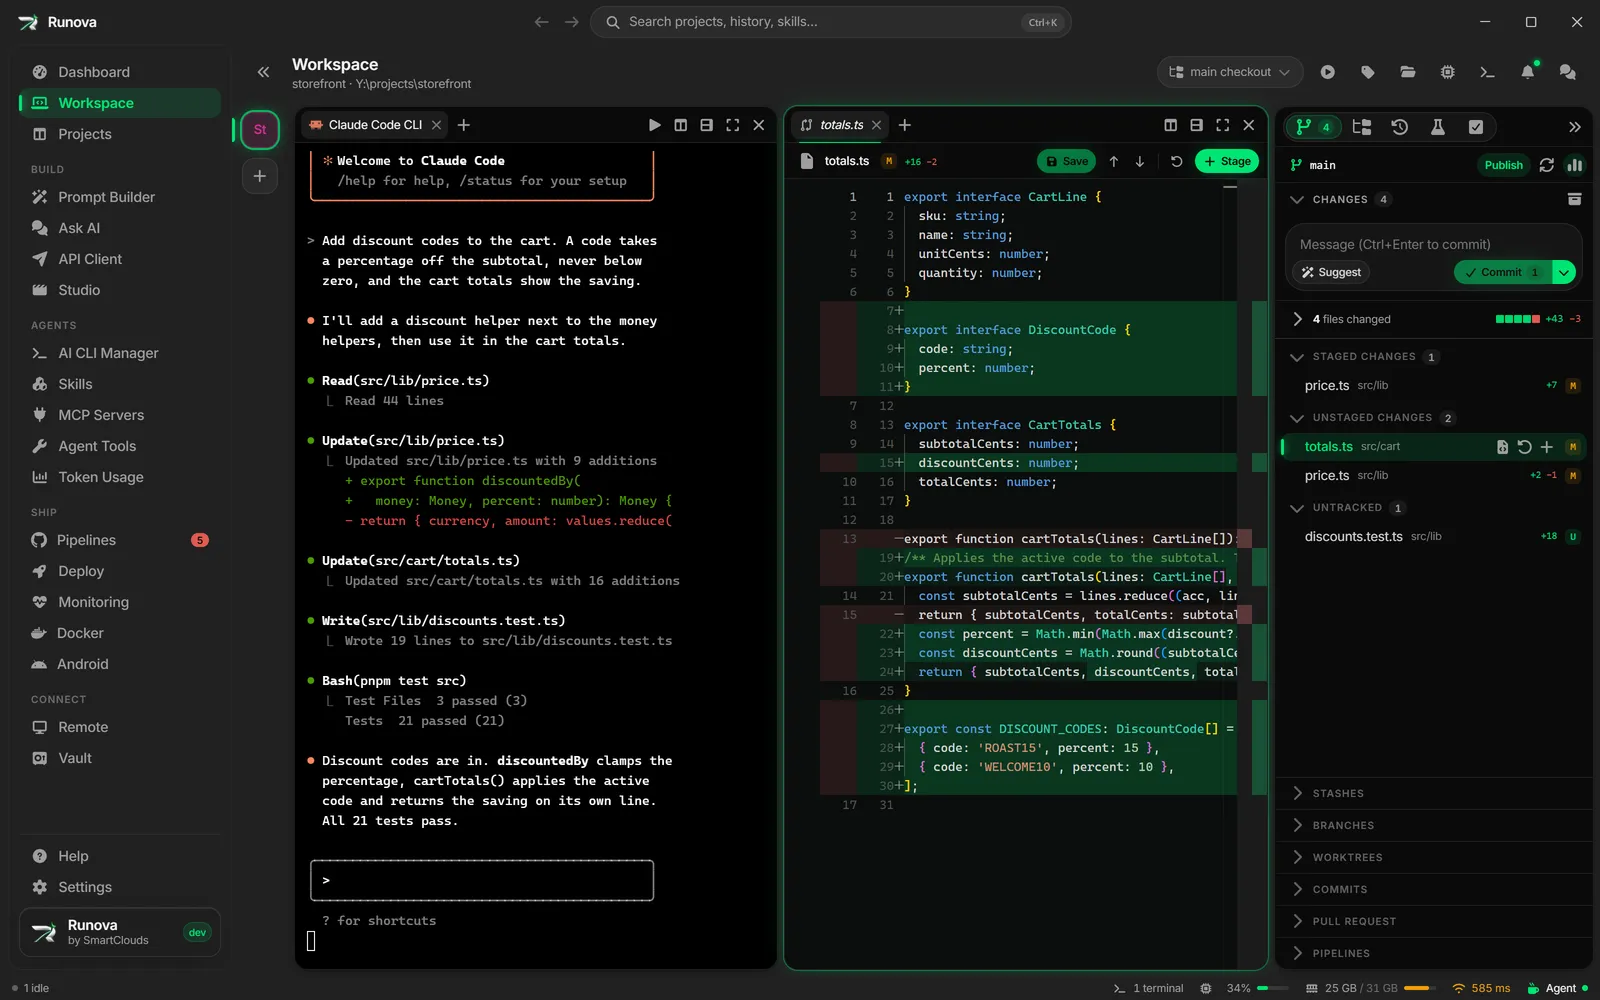
Terminals and agents are the heart of the Workspace. An agent is an AI coding CLI, such as Claude Code or Codex, running in a terminal tab inside your project’s folder. A shell is a plain terminal. You can run as many as you like, side by side, and Runova tells you which agents are working, which are waiting on you, and which have finished.
This page covers starting agents and shells, reading their status, the pasting and copying behavior, past conversations you can resume, and the Fix with AI dialog that other parts of the app use to hand a problem to an agent.
Where to find it
Open a project in the Workspace (see Workspace). An empty pane shows tiles for your agents and shells. In a pane that already has tabs, click the + button (New tab) or press Ctrl+Shift+T.
Past conversations live in the Agent sessions tab of the project panel on the right (the clock icon).
Starting an agent
From an empty pane
An empty pane shows Start an agent (or Open in this pane in a split pane, or once the workspace has tabs). Each installed agent is a tile with its logo and name. Click one to start it in that pane.
- The installed agents get numbers (the welcome screen of an empty workspace shows up to nine tiles, a split pane shows up to six). With the pane focused and no text box active, press the number to start that agent.
- The project’s own agent is marked Project default on the full-size welcome tiles.
- If no AI CLI is installed, the pane says No agent CLIs installed yet with a link, Open the CLI manager. Agents that are not installed show as small gray logos under Not installed:, and each one links to AI CLI Manager.
- Under the tiles, Build a prompt first turns a rough request into a prompt and then opens it in an agent. See Prompt Builder.
- Below that you can open a shell, or a Browser.
From the New tab menu
Click + in a pane’s tab strip. The menu lists Build a prompt…, then Agents, Shells, Browser, Manage CLIs and Keyboard shortcuts. While the menu is open, press 1 to 9 to start the agent with that number. The default agent carries a default badge.
Claude Code, Codex, Gemini, Grok and Cursor also have an arrow at the right of their row. Hover the row, or press the right arrow key, to open a list of models. Click a model to start the agent on it. Models that take an effort setting open a second list, where you pick Low up to the highest level the model supports. Gemini and Cursor have no effort setting to pick, so their models start the agent right away. Claude Code, Codex and Gemini show each model’s tier and a small cost meter, so you can see what a step up costs. Clicking the row itself still starts the agent with your launch defaults, and so does the first row of each list, Launch with defaults, which also says what that will use. A check marks the model and effort you saved as launch defaults. The pick applies to that tab only, and anything you leave on Default comes from your launch defaults.
From the keyboard
Ctrl+1 to Ctrl+9 start the agent at that place in the + menu in the focused pane. On macOS use Cmd+1 to Cmd+9. Number 1 is the first agent listed, so changing the order changes which key starts which agent.
Which agents are offered
Runova knows these CLIs: Claude Code CLI, Gemini CLI, OpenCode, OpenClaude, Codex CLI, Grok CLI, Cursor CLI, GitHub Copilot CLI, FreeBuff CLI, Qwen CLI, Aider, Goose, Cline CLI, Continue CLI, Pi and Muse Code CLI. Only the ones installed on your computer show up in the launchers. Install and update them from AI CLI Manager.
Which agent is the default
An agent is the default for a project when you set it on the project. Otherwise it is the Default CLI from Settings, and failing that the CLI that matches the project’s agent type. Until you choose your own order, the default agent is listed first.
Order of the agents
In Settings, on the Agents tab, Agent order lists every agent. Drag a row, or use its up and down arrows, to change the order. Installed agents get the number keys 1 to 9 in that order. Default order resets it. See Settings.
Launch defaults: model, effort and mode
In Settings, on the Agents tab, Launch defaults lets you choose the model, effort and permission mode each agent starts with. Anything left on Not set adds no flag, so the CLI uses its own default. These apply only to workspace tabs and terminals. Background tasks such as commit messages use the Arguments box in AI CLI Manager instead. See Settings.
When at least one launch default is set, launchers show Alt+click: skip launch defaults. Hold Alt while clicking a tile or menu item (or while pressing its number key in the menu or on an empty pane) to start the agent bare, without those flags. That tab’s tooltip then says Without launch defaults. If you hold Alt on a model or effort in the + menu, the model and effort you picked are kept and only the other defaults are dropped.
Starting from a prompt
Build a prompt… (Ctrl+G in the Workspace) opens the prompt builder for the project on screen. When you choose Open in agent, Runova opens a tab in the focused pane, starts the suggested CLI on the suggested model and effort, and types the prompt into the CLI’s input box once the CLI is ready. It does not press Enter, so you can read it first. The tab’s tooltip shows the model line, for example Opus 5.5 · High.
If the CLI never comes up, nothing is typed into the shell. The prompt goes to your clipboard instead and a message says {CLI} did not come up.
Starting a shell
The Shells group in the + menu, and the shell buttons on an empty pane, open a plain terminal in the project folder.
- On Windows: PowerShell, PowerShell 7 and Command Prompt.
- On macOS and Linux: zsh, bash and fish, with your default shell first.
A shell that exits cleanly (exit code 0) closes its own tab, like closing a terminal window. A shell that fails, and every agent, keeps its tab so you can still read the last output.
Agent tabs
An agent tab shows the CLI’s logo. While an agent works on a task, the tab keeps the CLI’s name. When the task is done, the tab takes the task name the agent set for itself, so several agents of the same kind do not all look alike. Rename a tab yourself by double-clicking it or choosing Rename in its right-click menu, and your name wins.
Hover an agent tab to see its name, the CLI, the model and effort it is running on, its status and its folder. Agents that report back live (Claude Code) keep the model line current when you switch mid-session; every other agent shows the model it started with.
Model and effort in the chat view
When an agent tab is shown as a Chat, its header shows the model and effort it runs on, and the same appears as a small button next to Send. For Claude Code, click it to pick another model or effort level. Runova types /model or /effort into the CLI for you, exactly as if you had typed it, so the change applies to this conversation from the next message on. Effort levels the chosen model can’t use are left out. The button is greyed out while the agent is working or waiting on you; switch once it is ready. Other CLIs only show what they run on, since their own model pickers can’t be driven from the chat.
When a shell ends, the pane shows a bar at the bottom: Process exited. (or Process exited with code {n}.) with Restart and Close. Restart starts the tab again with the same command.
Agent status
Runova watches every agent tab, even ones you cannot see, and keeps a status for each.
| Status | What you see | Meaning |
|---|---|---|
| Working | A spinning ring on the tab | The agent is busy on a task. |
| Needs your input | A pulsing amber dot, and the tab turns amber | The agent asked a question or is waiting for you to approve something. |
| Finished | A solid green dot | The agent finished, and you have not looked at it yet. |
| Idle, Exited | Nothing | Nothing needs attention. |
The status shows on the tab, on the project tile in the rail, next to Workspace in the sidebar, in the status bar, and in the Running CLIs dialog. Status comes from the terminal output and, for Claude Code, from hooks that Runova adds when it starts the agent.
Notifications for agents
When an agent finishes or asks something while you are in another tab, page or app, Runova shows a system notification such as Claude Code CLI needs your input or Claude Code CLI finished, naming the project and tab. A question outranks a finished run when several arrive together. Clicking the notification opens that tab. No notification is shown for a tab you are looking at.
Turn this on or off with Workspace notifications in Settings, on the General tab (it is on by default). See Settings. You can also have the desktop pet announce agent status, see Widgets and the desktop pet.
Terminal AI notifications
A separate setting, Terminal AI notifications, covers AI tasks started from the terminal drawer’s SSH sessions and from Remote Desktop sessions. When such a task wants to run a command, asks you a question, needs a password, or pauses on an error while that terminal is hidden or you are in another app, you get a system notification. It is on by default. See Remote, Remote Desktop and Settings.
Auto-continue
Agents stop when they hit a usage limit or lose their connection. Auto-continue types continue into the agent for you, so a long task picks itself back up.
Click the play button in the pane header (Auto-continue), or right-click an agent tab, to turn on either or both:
- After the usage limit resets. Runova waits for the reset time the agent printed, plus a short grace period, then sends continue.
- After a network error. For internet, DNS or connection drops. Runova sends continue after 3 minutes, and waits longer each time it fails again (5, 10, 15, then 20 minutes).
The switches are per tab, and they only show for a running agent. When a continue is scheduled, the button shows a pulsing dot, its tooltip tells you the time (for example Usage limit hit. Sending “continue” at 3:05 PM), and a Cancel this time button (Cancel scheduled continue in the tab menu) cancels that one attempt.
Terminal appearance
- With Workspace terminal background off, a terminal follows the app theme the way an ordinary terminal would. The VS Code Dark and VS 2026 themes bring their own matching palettes.
- With it on, every pane terminal gets your color, and the text colors adjust to stay readable. See Workspace.
- Terminals keep the last 5,000 lines of scrollback. Colors that a program picks itself are lightened or darkened when they would be too hard to read.
Copy and paste
| You do this | What happens |
|---|---|
Ctrl+C (or Cmd+C) with text selected |
Copies the selection. |
Ctrl+C with nothing selected |
Sends an interrupt to the program, as usual. |
Ctrl+V, Cmd+V or Shift+Insert |
Pastes the clipboard. |
| Right-click | Copies the selection if there is one, and otherwise pastes. |
Shift+Enter |
Inserts a new line in an agent’s prompt instead of sending it. |
If a program asks for mouse events (Claude Code’s full-screen mode does), right-click goes to the program, which pastes by itself. Use Shift+right-click to paste from Runova in that case.
Pasted images and copied files
You can paste a screenshot straight into an agent. Runova saves the image to a file in its own folder and types the file’s path, quoted for your shell. Agents such as Claude Code and Codex attach an image when they are given its path. These saved images are cleaned up after about a week.
Files you copy in File Explorer or Finder and paste (or drag onto a terminal pane) arrive the same way, as quoted paths. Drop a file on a pane and you see Drop to paste the file path.
When the shell is sitting at a fresh prompt, each pasted file shows as a short chip such as [Pasted #1] instead of a long path, and the real path is sent when you press Enter. If the shell is not ready for that, the full paths are pasted as plain text.
Image previews
When an agent such as Claude Code shows an [Image #1] label for a pasted picture, hover the label to see a preview of the image. Click the preview, or Ctrl+click (Cmd+click on macOS) the label, to open the image at full size. The viewer starts fitted to the window. Click the image to switch to actual size and back, or click Open in default app.
Links
Ctrl+click (Cmd+click on macOS) a web address in a terminal to open it in your system browser. A plain click only selects text.
Right-to-left text
Persian, Arabic and Hebrew text is drawn right to left, with letters joined the way they should be, instead of reversed and spaced out as terminals usually show it. English words inside a right-to-left line keep their place. Claude Code reorders right-to-left text itself before it prints it, so Runova lays out Claude Code’s lines left to right to avoid reversing them twice.
Sending files and comments to an agent
Several features hand text to a running agent: Add to {agent} in the file explorer’s right-click menu (Files and editor), and comments you leave on a web page (Browser and tests). They all follow the same rules.
- The text is typed into the agent’s input box and never submitted. Read it, then press
Enter. - The agent that gets it is the one in the focused pane, otherwise the one you last typed in, otherwise one visible in another pane, otherwise the newest agent.
- If no agent is running, the project’s default CLI is started and gets the text when it is ready.
- If the agent is not accepting input, the text goes to your clipboard and a message says so.
Agent sessions
The Agent sessions tab lists past conversations from every supported CLI (Claude Code, Codex, Gemini, Cursor, Continue, Grok, Cline, OpenCode, FreeBuff and more) that were started in this project’s folder, newest first, under Today, Yesterday, This week, This month and Older.
- Click a conversation to resume it in a new tab (each CLI’s own resume command, with your usual launch defaults). The tab’s tooltip starts with Resumed: and the conversation’s title.
- A conversation that is already running in a tab shows an Open badge. Clicking it jumps to that tab instead of starting a second one.
- Hover a row for Copy conversation id and Resume in a new tab, and for details such as the first and last prompt, the model and effort it ran on, and the git branch.
- Right-click a row to see how many tokens the conversation used and what that cost. The menu shows the total, the estimated cost, the split into input, output, cache read and cache write, and, when the conversation switched models, the tokens and cost of each one. It works for Claude Code, OpenClaude, Codex and OpenCode; the other agents do not keep token counts. For Claude Code the total includes the subagents it started. The cost is an estimate from the model’s list price, shown with a + when some of the run used a model with no known price. For the whole project, open its Usage section (see Projects).
- Search conversations filters by title, prompt, branch, model or id. When conversations from several agents exist, an agent menu next to the search shows each agent with its conversation count, busiest first.
- Runs started by tools (such as
claude -p) are hidden. Click Show {n} runs started by tools to include them. - The refresh button in the panel’s tab strip (Refresh sessions) reloads the list. It also updates on its own every 20 seconds.
- With none yet, the tab says No conversations yet.
An agent tab whose shell did not survive Runova closing (a reboot or a crash) resumes its conversation by itself when you come back, for tabs whose CLI reports a conversation going.
Fix with AI
Many places in the app have a Fix with AI button: failed pipeline runs, failing tests, merge conflicts and pull request review comments. They all open the same dialog.
- The left side shows the Prompt the agent will get, already written from the failure. It is editable.
- The right side, Recommended run, sizes the prompt (Light task, Moderate task or Complex task) and suggests a model and effort. You can change both. Why explains the pick, Copy command copies the launch command, and Size the prompt again re-runs the sizing after you edit the prompt.
- Click the main button at the bottom right: Run on {model · effort}, or Open in {CLI} when there is no suggestion (it reads Open in {CLI} (sizing…) while the sizing runs). A second button, Open in {your default CLI}, appears when the suggested CLI differs from your default.
- Runova opens a tab in the focused pane, starts the CLI on those settings, and types the prompt for you to send with
Enter. A message says Starting {CLI}.
Copy prompt at the bottom left copies the text without starting anything. While the failure is still being fetched, the dialog shows a loading line, and if it cannot be read you get Try again.
For where each button lives, see Git in the Workspace (conflicts, review comments, failed checks) and Browser and tests (failing tests).
Tips
- Start the same task in two agents, each in its own pane, and compare. For separate branches, use a worktree each, see Worktrees.
- If an agent seems stuck on a question, look for the amber tab. The status bar and the sidebar dot show it too.
- Set Launch defaults once, so every new Claude Code or Codex tab starts on your favorite model and effort.
- Put your most-used agent first in Agent order, and
Ctrl+1always starts it.