
Agents
Skills
Browse, install, favorite and security-check agent skills from skills.sh and your own repositories, and see which skills your agents actually use.
Read about this part of Runova on the Agents page.
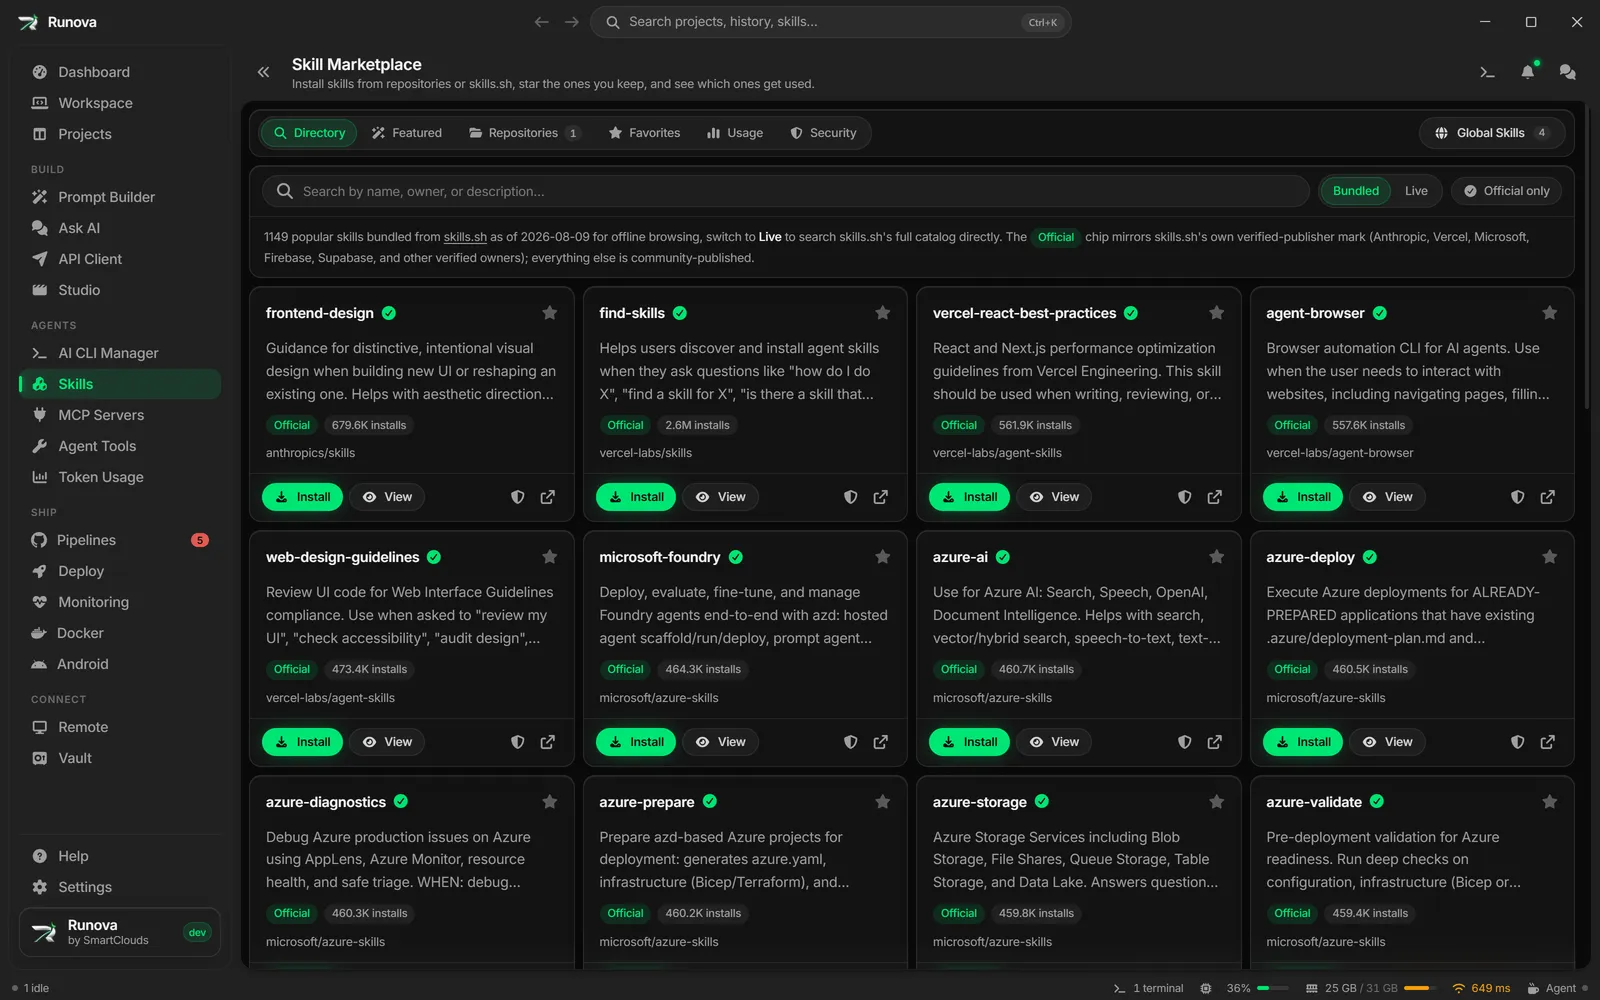
A skill is a folder of instructions (usually a SKILL.md file) that an AI agent reads and follows, such as a code review checklist or a commit message guide. The Skills page is a marketplace for them. You can browse the skills.sh directory, add your own skill repositories, install skills into projects or globally, keep a list of favorites, see which skills your agents really use, and scan any skill for unsafe instructions before you trust it.
Where to find it
Click Skills in the sidebar under Agents, or open the command palette and type “Skills”. The page title reads Skill Marketplace. The command palette also searches the skills in your repositories: pick one and Runova opens the Skills page with that repository and skill name carried into the Repositories tab’s filter.
Installed skills also show up in a project’s Skills tab (see Projects), and Settings under General has a Skill repositories card with a Manage button that jumps here.
The tabs
The page has six tabs along the top, plus a Global Skills button on the right.
| Tab | What it is for |
|---|---|
| Directory | Browse popular skills from skills.sh. |
| Featured | Skills that ship their own installer, such as UI UX Pro Max. |
| Repositories | Skills from repositories you added (a folder, a git repo or a JSON index). |
| Favorites | Every skill you starred, in one place. |
| Usage | Which skills your agents invoked, and how often. |
| Security | Check any skill for unsafe instructions and see your check history. |
Directory (skills.sh)
The Directory tab lists popular skills from skills.sh. A snapshot of the catalog is bundled with the app, so you can browse it offline. The text above the grid tells you how many skills are bundled and the snapshot date.
- Use the Search box to filter by name, owner or description.
- Bundled searches the offline snapshot. Live searches the full skills.sh catalog over the internet. Live search needs at least 2 characters and shows “Couldn’t reach skills.sh” if you are offline.
- Official only hides everything except publishers skills.sh has verified. Official skills carry an Official badge and a blue check mark. Everything else is badged Community.
- The grid loads 36 skills at a time. Click Show more to load the next batch.
Each card shows the skill name, a short description, Official or Community, how many installs it has, its repository and the result of its last security check if you ran one. The card buttons are:
- The star, to favorite the skill.
- Install, which opens the install picker (see below).
- View, which opens a dialog with the full description and the exact install command. The dialog has a copy button, Install… and Open on skills.sh.
- The shield, to check the skill for unsafe instructions.
- The arrow icon, to open the skill’s page on skills.sh.
Repositories
The Repositories tab is for skills you collect yourself. A repository is a source of skills that Runova indexes for you.
If you have no repositories yet, Runova adds one called Runova Examples that lives on your machine and holds three sample skills (Code Review Checklist, Commit Message Guide and Caveman).
Add a repository
- Open the Repositories tab and click Add Repository.
- Enter a Name. For a local folder you can leave it empty to use the folder name.
- Choose the Type:
- Local folder: a folder on your computer. Type or paste the path, or click the folder icon to browse. The dialog checks the folder and tells you how many skills it found. A folder of skills can be subfolders that each hold a
SKILL.md, or plain.mdfiles. Arepository.jsonfile is optional. - Git repository: a URL such as
https://github.com/org/skills.git. Runova clones it and pulls updates when you refresh. - URL (JSON index): a link to a
repository.jsonindex file.
- Local folder: a folder on your computer. Type or paste the path, or click the folder icon to browse. The dialog checks the folder and tells you how many skills it found. A folder of skills can be subfolders that each hold a
- Click Add. For git and URL sources a name is required.
Local folders are watched, so adding or deleting a skill in the folder updates the marketplace by itself.
Browse a repository
- The Repository picker defaults to All repositories, which puts every repository’s skills in one grid. Pick a single repository to narrow it down. In the all view, a repository name on a card is a link that switches to that repository.
- The refresh button re-reads the selected repository (or all of them). The trash button removes the selected repository from Runova (skills already installed stay where they are).
- Search filters by name, description, category, tag or repository name.
- Each card shows the name, category, tags, author and version, and the last security check result. Buttons: the star, Install, the shield (security check) and Docs when the skill has a documentation link.
- If a repository cannot be read, its name and the error appear in red above the grid.
- The grid shows 36 at a time, with a Show more button.
Install a skill
Clicking Install on any card opens an Install <skill> dialog.
- Optionally type in Search projects to narrow the list.
- Tick Install globally to make the skill available to every project, and/or tick one or more projects.
- Click Install. The button shows how many places you picked.
What happens next depends on where the skill came from:
- From a repository (including the example repository): Runova copies the skill files straight into each project’s agent skills folder. It uses the folders the project already has (for example
.claude/skills,.agents/skills,.codex/skillsor.cursor/skills), or falls back to the default for the project’s agent type. A global install goes into~/.claude/skills. You get an “Installed to N locations” message. - From skills.sh: Runova opens a terminal for each place you picked and types the exact install command skills.sh publishes. Press
Enterin each terminal to run it. A global install runs the same command from your home folder.
Note: Skills.sh installs need Node.js, since the command runs through
npx.
Global Skills
Click Global Skills (top right of the page, with a count) to see every skill installed for all projects.
- Filter by assistant with the buttons All, Claude Code, Codex, Cursor, OpenCode and Gemini.
- Each row shows the skill, its version, the assistants it is installed for, an update available badge when a newer version exists, and its last security verdict.
- Row buttons: the star, the shield (security check), Update (when a newer version is available) and the trash can to remove it. Removing asks you to confirm. For UI UX Pro Max, removing opens a terminal with the uninstall command for you to run.
Updates to a project’s skills are shown in that project’s Skills tab, with the same Update button.
Featured: UI UX Pro Max
The Featured tab holds skills that come with their own installer, so Runova walks you through the installer instead of copying a folder. Right now that is UI UX Pro Max, a design skill that turns a product description into a design system and keeps the assistant on it while it writes UI code.
The card has these buttons:
- Install (or Install again when it is already installed globally) opens the install wizard.
- What it does opens an explainer: how a request flows, the sector rules, supported stacks and example prompts.
- Check for updates compares your installed version with the latest release. If there is an update, Update now opens a terminal with the update commands typed in (press
Enterto run them). When it was installed through the Claude Code plugin marketplace, you update it from/plugininside Claude Code instead. - Icon buttons open its GitHub repository and website.
The install wizard
- Method: choose npm CLI (recommended, installs the
uiproCLI once and runsuipro initwhere you want the skill), npx, nothing installed globally, or Claude Code plugin marketplace (two slash commands typed inside Claude Code, Claude Code only). - Assistants: pick which AI assistants get the skill, or Every assistant. (Skipped for the plugin method.)
- Location: tick the projects, and/or install globally. (Skipped for the plugin method.)
- Review: the wizard checks prerequisites (npm, Python 3 and whether the
uiproCLI is already installed), then shows the exact commands. Click Open N terminals to type them into terminals, then pressEnterin each one, starting with the CLI install. For the plugin method, Copy both commands and paste them into a Claude Code session.
Python 3 is needed for the skill’s scripts. The wizard offers Get Python when it is missing.
Favorites
Click the star on a skill to favorite it. A star works on cards in the Directory, Repositories and Usage tabs and on rows in Global Skills. The Favorites tab (with a count) lists them all. It has a Search favorites box and the same actions as the original card: Install, copy the install command, the shield and an open-on-skills.sh link. Cards show a badge for where the skill came from (skills.sh, Repository, Installed or Local), how often your agents used it, and its last security verdict. Click the star again to remove it. With no favorites, the tab explains how to add some.
Usage
The Usage tab shows which skills your agents actually invoked. It reads the Claude Code session transcripts on your machine, so it counts every run, whether you started the session from Runova or from another terminal. Nothing leaves your computer. The first scan reads every session and can take a moment. Click Rescan to read new activity, and the header shows how many sessions were read and when.
- Four tiles show Skills used, Total invocations, Last 7 days and Last used.
- A Last 30 days bar chart shows invocations per day. Hover a bar for the exact count.
- By skill lists each skill with a bar, a small 30-day trend, the projects it was used in, its count and when it was last used. Sort with Most used, Recently used or Name. The top three get a medal color.
- By project groups the same data by project folder.
- Search used skills or projects filters either view.
- The folder-plus icon (Add to another project) opens a dialog that finds where the skill’s files live (a project, your global skills or a plugin) and copies the folder into the projects you tick. Projects that already have it show Already has it and are left alone.
- The star favorites a skill.
If there are no transcripts yet, or none that used a skill, the tab says so.
Security checks
A skill is text an agent will follow, so a bad one can do real harm. Runova can scan a skill’s files for risky instructions without installing or running anything.
What it looks for
The scan matches the skill’s text against 14 risk categories: Prompt injection, Data exfiltration, Credential theft, Privilege escalation, Supply chain, Remote code execution, Anti-refusal, System prompt leakage, Memory poisoning, Unsafe output handling, Dark-pattern payment funnel, Hidden content, Destructive actions and Overbroad permissions. The Security tab lists each with a one-line description.
Run a check
- Click the shield on a skill card (or in Global Skills, Favorites, or a project’s Skills tab).
- In the Security check dialog, optionally turn on Deep review with an agent CLI (see below).
- Click Run security check. While it runs you can click Cancel.
The report shows a verdict, a score out of 100, the number of files scanned, finding counts by severity (Critical, High, Medium, Low) and each finding with its line and the offending text. Verdicts are Looks safe, Read before installing, Risky and Do not install. A clean result is not a guarantee. It only means nothing matched a known pattern, so read a skill before trusting it with anything sensitive.
The dialog also lists Earlier checks for that skill. Click one to reopen it, or click Check again to rescan. The last verdict also appears as a badge on the skill’s cards.
Deep review with an agent CLI
Turn on Deep review with an agent CLI to send the skill’s text to an installed CLI for a second opinion. It is slower and can only make the verdict stricter. Choose a CLI from the list (Default CLI (from Settings) or any installed CLI that can answer a one-off prompt). Findings from the review are tagged CLI review, and the CLI’s own summary is shown in the report. If no suitable CLI is detected, install one from AI CLI Manager.
Check any skill
At the top of the Security tab, Check any skill scans something that is not installed or added as a repository:
- Type or paste a folder path or a GitHub address, or click the folder icon to browse. A GitHub link can point at the repository, a branch or the skill’s own folder. Short forms like
owner/repo, a skills.sh address, or a wholenpx skills add ...command work too. - Runova lists the skills it finds there (N skills found).
- Click Check on one, or Check all (N) to scan them one after another with progress (“Checking 3 of 12”). Open appears instead of Check when a skill already has a result.
The deep-review switch applies to the whole Check all run, and it runs the CLI once per skill, so it can take a long time.
A project’s Skills tab has the same Check all and deep review options for the skills installed there, and an “Also in this project” list for skills that came with the repository rather than from Runova.
Check history
Every check is saved on this machine. The Security tab shows Check history with the saved count. Each entry shows the skill, verdict, where it came from (Repository, Installed, GitHub or Local folder), a CLI badge if a deep review ran, the finding count and the time. Use View to reopen the full report and the trash icon to delete one. Clear history deletes them all after you confirm (the skills themselves are not touched).
Tips
- Run a security check on any community skill before you install it, especially one with few installs.
- Use Install globally for skills you want everywhere, and a project install for skills that only make sense in one codebase.
- Keep favorites for the skills you reinstall often.
- Use AI CLI Manager to install the CLI you want for deep reviews.