
Getting started
Projects
Add and organise your projects, then use each project's page for its prompts and Blueprint, git, token usage and cost, security scans, packages, Docker, bootstrap files, skills, MCP servers, hooks and environments.
Read about this part of Runova on the Projects page.
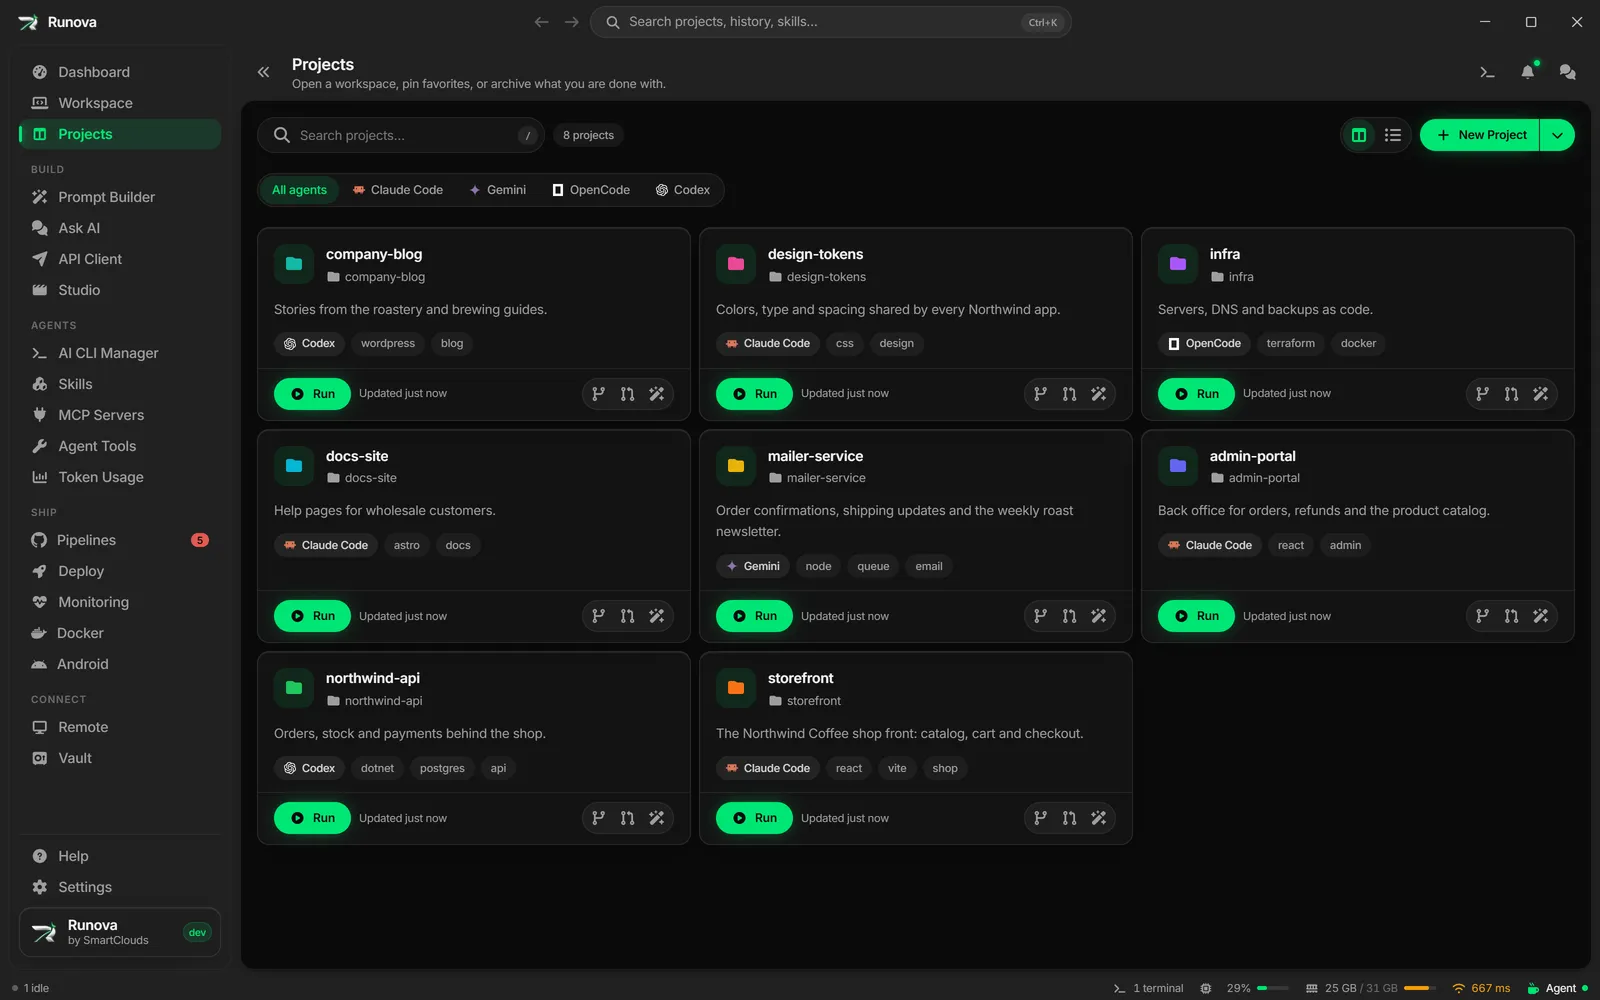
A project in Runova is a folder on your computer that you work on with AI agents. The Projects page lists them all so you can search, pin, reorder and open them. Each project then has its own page with everything about it in one place: a standing prompt for agents, a Blueprint that turns an idea into a plan, drafts and scheduled prompts, git tools, token usage and cost, security scans, dependency updates, Docker containers, scaffolding files for your agent, skills, MCP servers, notification hooks and saved environment files.
Where to find it
Click Projects in the menu, or press Ctrl+P (Cmd+P on macOS) from any page except the Workspace (there, Ctrl+P opens file search). You can also open the command palette and type a project’s name, or click New Project on the Dashboard. A project’s own page is at /projects/<id>, and the section you are on is kept in the address (for example ?tab=git), so going back and forward lands you in the same place.
The Projects page
The page header reads “Projects”, with the line “Open a workspace, pin favorites, or archive what you are done with.” Click a card or row to open that project’s page.
Search, filter and view
- The search box at the top (“Search projects…”) matches names, descriptions, folder paths and tags. Press
/anywhere on the page to jump to it, andEscto clear it. A count such as “5 projects”, or “2 of 5” while filtering, sits beside it. - When your projects use more than one agent type, a row of chips filters by agent: All agents plus one chip per type that exists, such as Claude Code or Codex.
- The Archived button (with a count) appears once you have archived something. It switches the page to the archived projects. Click it again to go back. Search and the agent filter work on whichever set is on screen.
- The two buttons beside it switch between Grid view and List view. Runova remembers the choice.
Pinned, all and archived
Pinned projects get their own Pinned section at the top, and the rest follow under All projects (or Matches while a search or filter is on, or Archived in the archived view). Pinned projects have an accent bar on their left edge.
Reorder projects
Hover a card or row and drag it by the grip icon (Drag to reorder) to put it before or after another one in the same group. A pinned project stays among the pinned ones. Reordering is turned off while a search or agent filter is active or while you are viewing archived projects, and the grip is greyed out with a tooltip saying to clear the filter.
What a card shows and does
Each project card or row shows its icon, name, “Updated …” time, description, an agent badge, up to three tags (with a “+N” for more), and links. The icons on the card:
- Pin to top or Unpin project, and Archive project or Restore project, appear on hover. Archiving moves a project out of the way without deleting it.
- The agent badge (for example Claude Code) opens that agent’s CLI in a terminal in the project folder. Generic projects have no CLI, so their badge does nothing.
- The folder link opens the project folder in your file manager. The globe and branch icons open its website and its repository.
- Run starts the project’s run command in a terminal. If the project has several commands it opens a Run command dialog to pick one. A command that asks for values opens a short form for them first. If it has none, the project page opens with a dialog that offers to create one with AI. See Run commands.
- A small group of three icon buttons: Open the Git section (the project’s Git tab), Review with diffray (the review wizard) and Build a prompt for this project (the Build Prompt dialog).
An empty list shows “No projects yet” with a New Project button. If a search matches nothing, the page says so and offers Clear filters.
Create or edit a project
Click New Project (on the Projects page or the Dashboard). The same dialog is used for Edit project on a project’s page. It has three tabs, and you can fill in only the first and come back to the rest later.
- Click New Project.
- On the Basics tab, enter a Name and choose a Folder. Both are required.
- Add anything else you want on the three tabs.
- Click Create project, or press
Ctrl+Enter(Cmd+Enter). When editing, the button reads Save changes.
Until the name and folder are filled in, the button is disabled and the footer says “Name and folder are required”.
Basics tab
| Field | What it does |
|---|---|
| Name | The project’s name. |
| Folder | Where the project lives. Paste a path or click Browse. Terminals and agents start in this folder. Picking a folder fills in the name from the folder name if the name is empty. |
| Git repository | Where the code is hosted. Paste a GitHub link (github.com/owner/repo) to clone it into the folder on Create: the dialog says “Will clone into …”. The folder must be empty (an existing repo is kept as-is). A private repo needs the GitHub CLI signed in (gh auth login), and Runova uses that sign-in for the clone and for later fetches and pulls. A failed clone still creates the project with the link, and the error tells you why. Use Clone from GitHub on the project’s Git tab to try again, see Git. An Open button opens the link. Fetch and pull afterwards from the project’s Git tab. |
| Tags | Press Enter or comma to add a tag. Backspace in the empty box removes the last one. Tags are used by search and filtering. |
| Description | One line about what the project is. |
Appearance tab
- Icon: click the tile to choose an image, or drop an image on it. Choose image and Remove buttons do the same. PNG or SVG looks best. Large images are scaled down for you. With no image, the project shows a folder glyph.
- Tile color: the square behind the icon. Pick a swatch, the theme default, or the pencil swatch for any other color with its opacity.
- Glyph color: the color of the folder mark. It only appears while there is no image.
- Website: the project’s site. When you leave the field and there is no icon yet, Runova fetches the site’s favicon as the icon. Use favicon does it on demand and tells you if none was found.
Agent tab
- Agent type: how Runova talks to this project’s assistant. The choices are Claude Code, Gemini, OpenCode, Codex, Cursor and Generic. The type decides which files Bootstrap creates and which CLI the agent badge opens.
- AI CLI: which CLI runs helper tasks such as tag suggestions and version bumps. App default (from Settings) follows Settings, Agents, Default CLI.
- Run commands: see below.
- Notes: free text for anything worth remembering, such as where credentials live.
Run commands
Run commands are what the Run button executes in the project folder. The list has three columns: Order, Environment and Command. Give each command a short name in Environment (for example dev) and the command itself (for example npm run dev). Click Add command to add more, and the trash button to remove one.
The order matters. Run lists the commands top to bottom, and a project with one command runs it straight away. Drag a row by its grip to reorder, or focus the grip and use the arrow keys.
When you click Run, Runova opens a terminal in the project folder, types the command and runs it, and shows a message such as Running "dev". The status bar then shows the run with its port, CPU and memory, and Shift+F5 stops the run in the drawer (or the newest run). If the project still has Docker containers running when you stop, Runova asks whether to stop them too, see Docker. See Interface tour.
Create a run command with AI
If you are not sure what to run, let an AI agent work it out. Click Create with AI in the Run commands list of Edit project, in the Terminal section while the project has no run command, or in the More project actions menu. In the Workspace, right-click Run and choose Create with AI. Pressing Run on a project with no run command opens it too.
The dialog asks What should it run? and starts with a plain request you can change. Click an example to use it, such as running the mobile app on the Android emulator, starting the dev server, or creating a .bat file that runs the project together with a run command that calls it. Click Start, or press Ctrl+Enter (Cmd+Enter on a Mac).
Runova opens Claude Code in a new tab in the project’s Workspace and types your request into it, with the details the agent needs. Press Enter in the tab to send it. The agent reads the project, may write a script, and suggests one command. The suggestion comes back to Runova as Add “name” to project? with the command exactly as written:
- Add command saves it to the project’s run commands.
- Add and run saves it and starts it right away.
- Discard drops it.
Nothing is saved until you choose, and nothing runs until you press Run or Add and run. If you would rather type the command yourself, click I’ll write it myself.
This needs Claude Code to be installed. For this one session the agent gets two things: a list of the project’s run commands and a way to suggest a new one. That access ends after two hours, and nothing is added to the project’s .mcp.json.
Commands that ask for a value
A command can leave a value open until you run it. Write a name in double braces where the value goes, for example npm run dev -- --port {{port}}. When you click Run, Runova opens a short form with one field per name, shows the command exactly as it will run, and starts it in the project folder once you press Enter or Run.
{{port}}is required. The run waits until the field has a value.{{port=3000}}is required, and the field starts with 3000.{{args?}}is optional. Left empty, it is dropped from the command.{{args?=--watch}}is optional, and the field starts with--watch.
Values go in exactly as typed, with no quoting. If a value can hold spaces, put the quotes in the command, for example open "{{path}}". A name used more than once asks only once.
To add one, click Ask for a value on a command’s row, or use Add command that asks for input. Typed values show in the status bar and stay with the terminal tab, so do not type a password or token into one.
To keep {{name}} as plain text, put spaces inside the braces, as in {{ name }}. Go template text such as {{range .Items}} is left alone.
Pause a run
A dev server with hot reload rebuilds every time a file changes, which takes CPU you may want for something else. Pause freezes the run’s shell and everything it started. A paused run uses no CPU and keeps its state, so when you Resume it carries on where it was and picks up every file change in one go. It works on Windows, macOS and Linux.
You can pause and resume in four places:
- The Workspace header. A pause button sits beside Run while the project on screen has a run going. It acts on all of that project’s runs at once, since a web app and its API usually watch the same files. It turns into a play button (Resume) while they are paused.
- The status bar. Open the run item and use Pause or Resume on a run’s row, or Pause all and Resume all when there are two or more. See Interface tour.
- The keyboard.
F6pauses or resumes the same runShift+F5would stop, the one open in the drawer or else the newest. You can change it in Settings > Shortcuts, where it is listed as Pause or resume run in the Terminal group. - The paused run’s terminal. A banner across the top says it is paused and has a Resume button. A frozen terminal looks hung, because what you type is only read once the run thaws.
A run whose command has finished (only its shell is left) has nothing to pause.
Pause while an agent works
Turn on Pause runs while an agent works at the bottom of the status bar’s run panel, and Runova does it for you. While an AI agent is working in the same folder as a run (or in a folder above or below it), the run is paused. A few seconds after the agent stops working, the run resumes by itself. The wait is there because agents go quiet for a moment between steps. It is off by default.
- A banner on the run’s terminal says Paused while an agent works in this folder.
- If you click Resume while the agent is still working, Runova leaves that run alone until the agent is done.
- A run you paused yourself is never resumed for you.
- Turning the switch off resumes the runs it paused.
A project’s page
The page has a header, a section list on the left (a tab bar on narrow windows) and the section’s content on the right.
Header
- Projects at the top left goes back to the list.
- The project’s icon, name and description, then badges: the agent (click to open that CLI in a terminal here), Archived if it is archived, and its tags.
- The folder path. Click it to copy the path (“Path copied to clipboard.”). Beside it, Open in File Explorer and Open terminal here, and links to the website and repository if set.
- Run appears when the project has a run command.
- Open workspace opens this project in the Workspace.
- Prompt opens the standing prompt editor. See Overview.
- Task board opens the project’s Relay tasks as a board you can run from.
- The More project actions menu has Edit project, Set a run command and Create run command with AI (when there is none), Open folder, Open terminal, Archive project or Restore project, and Remove project. Removing asks first and only removes the project from Runova: your files on disk are kept.
Sections
The list on the left has two groups. Work: Overview, Blueprint, Prompts, Git, Usage, Review, Security, Packages, Docker, Terminal. Setup: Bootstrap, Skills, MCP, Hooks, Environments, Config. At the bottom of the list, Created and Updated show when the project was added and last changed.
Small badges flag things that need a look: Prompts shows open drafts plus missed scheduled prompts (amber when any was missed), Skills and MCP show how many are installed (Skills turns amber when updates are available), and Security shows how many critical and high findings the last scan found. Review only appears once the diffray tool is installed (see Agent Tools).
Overview
The Overview section has the project’s standing prompt and its notes.
- Standing prompt is context agents should start from every time they work on this project: stack, conventions, constraints. Click Define prompt (or Edit prompt) to open the Project prompt editor. It is a Markdown editor with a word and character count. Copy copies it, Clear empties it, and Save prompt stores it. The header’s Prompt button opens the same editor.
- Notes is a scratchpad for things you do not want in the standing prompt. Use Add notes or Edit notes, then Save notes.
- If the diffray tool is installed, a Review with diffray card opens the Review section.
Blueprint
Blueprint turns an idea into a plan. You describe the project in six steps, then Runova writes a ready-to-use prompt that tells an agent to act as a Product Manager and produce the planning documents for it. It is a section of the page, not a dialog, because you will come back to it over days.
The step rail across the top has Idea (what you are building), Architecture (structure and stack), Backend (services and data), Frontend (UI and client), CI/CD (build and release), Quality (testing and standards) and Review (write the prompt). Every step can be opened in any order and a tick marks the ones with text. Buttons at the bottom, named after the previous and next step, move along. Steps save on their own when you click away.
Write a step
- Open a step. A Markdown editor with live preview opens, with a hint in the box about what to cover.
- Write in plain Markdown. Persian is fine, and the generated prompt comes out in English either way.
- Use the preset chips above the editor to add ready-made snippets. Clicking a chip appends its text. If a step has no presets, a link takes you to Settings. You can edit presets under Settings, General, Blueprint presets.
- Click Attach files, or paste or drop onto the editor, to add images, video or other files. They land where the caret is, up to 25 MB each. Under the editor, each file can be inserted again (Insert), opened outside Runova, renamed (click its name) or deleted. A file that is not used in the text is marked “not in the text”.
- Leave Include this in ticked (the box names the project’s agent file, such as AGENTS.md or CLAUDE.md) to copy this step into that file in the project. Ticked steps go into one managed block, so repeating it never duplicates anything.
- Click History to see every saved version of the step and Restore this version to bring one back. A restore is saved as a new version, so nothing is lost.
Generate the prompt
- Fill in at least one step, then open the Review step.
- Set Docs folder, the folder (relative to the project root) where the agent should write the plan. The default is
docs. - Turn Confirm before writing files on if you want the agent to list its planned phases and epics and wait for your yes before writing anything.
- Turn on Split into Relay tasks if you want the backlog written as task files that each fit one AI session, and pick Context per session under it. See Relay tasks. Once the agent has written them, a Tasks ready banner on the Blueprint tab has an Open board button.
- Click Generate prompt (it reads Regenerate prompt once one exists). Use the arrow beside it to choose who writes the prompt under Generate with: a CLI, a model and an effort level (Written by, Model, Effort), or the AI provider from Settings. The choice is remembered for the project. Steps written in Persian are translated first.
- Read and edit the prompt in the editor. Save prompt stores your edits.
The prompt asks the agent to write a product brief, a roadmap with phases, one file per epic, a backlog of tasks, milestones and a risk list inside the docs folder. With Split into Relay tasks on, the backlog is written as Relay task files instead.
Under the editor you can Copy the prompt, Save as draft (it appears in the project’s Prompts section under Drafts), Use as standing prompt, or Run in CLI. Run in CLI asks for the model and effort, then opens the agent in a Workspace tab with the prompt typed in. Press Enter there to run it. The History button on this step lists earlier versions of the prompt.
Prompts
The Prompts section keeps every prompt for the project in one place. Three views switch with the buttons at the top, and a search box (“Search prompts…”) filters the list:
- History shows everything together: prompts you generated or translated, drafts and scheduled prompts, grouped by day.
- Drafts holds prompts you have not finished. Open drafts are listed under In progress, and finished ones are hidden behind Show N implemented.
- Scheduled holds prompts ready to run. They are grouped as Needs attention (missed), Up next and Done.
Click New prompt to write one (or New draft or Schedule a prompt from an empty view). Prompt Builder opens the Prompt Builder page. In the New prompt dialog, Save as is Draft (still writing it) or Scheduled (ready to run). A scheduled prompt also has:
- Run: Manually (when you press Run) or Automatically (at a set time, using Run at). Automatic runs open a new terminal tab in the project folder. Runova has to be running at that time, otherwise the prompt is marked Missed. Give a missed prompt a new time to put it back in the queue.
- The CLI, model and effort to run it with.
Each entry has icons: Copy prompt, Delete, and depending on its kind Move to another project, Edit, Schedule it (for a draft), Mark implemented and Reopen draft, Run now or Run again, and Cancel. History entries can show the original input you typed with Show original input, and a draft can be edited in place (Ctrl+Enter saves). See also Scheduled tasks.
Git
The Git section is a full set of everyday git tools for the project’s folder. See Git in the Workspace for the Workspace version.
If the folder is not a repository, the section says so and offers Initialize repository or Clone from GitHub…. If the project has a GitHub address saved but nothing was cloned yet (for example the clone on Create failed), the section says “This project’s GitHub repository isn’t on this computer yet” and the first button is Clone followed by the repository name, with Initialize a new repository next to it.
Clone from GitHub… asks for the Repository address (https://github.com/owner/repo) and clones it into the project’s folder. If the folder already has files, Runova asks before it connects them to the repository, and your files are left as they are, so differences show up as changes. A private repository needs the GitHub CLI signed in (gh auth login). If git cannot start the GitHub CLI, the message says “Make sure gh is installed and on your PATH”, so check that gh runs in a terminal and try again.
Initialize repository starts a new repository instead. The setup wizard walks through two steps:
- Set up git for this project: choose the Initial branch (default
master), and whether to commit the files already in the folder (Commit the files that are already in the folder, with a Commit message, default “Initial commit”). Click Initialize repository. - Connect this project to GitHub: with the GitHub CLI installed and signed in, choose an Owner (your account or an organization) and a Repository name, click Check, then Connect and push (or Create repository and push if it does not exist yet, with an optional description and a private or public choice). Connect over SSH instead of HTTPS is available. Without the GitHub CLI you can use Use a remote URL instead and paste a remote address. A final step says what was pushed and links to the repository.
In an existing repository the top of the section shows:
- A branch picker (search to switch branches, and remote-only branches can be checked out) and a Branch chart and history button.
- Badges: In sync, N ahead, N behind, No remote, and Clean or N changed files.
- Fetch, Pull, Push and Sync (the one that matters most for the current state is highlighted). With no remote, Connect to GitHub replaces Sync. Review with diffray appears when that tool is installed.
Below the top row:
- Changed files: every changed file with a status badge (modified, added, deleted, renamed or untracked).
- Branches: type a New branch name (or Suggest with AI, which uses your CLI to propose one from your changes) and click Create. Default branch lets you choose which remote branch is the default (it must exist on the remote, and GitHub is updated when the GitHub CLI is signed in), then Set default. All branches lists every branch with badges (current, default, remote), a history button, and a menu with History, Rename and Delete. Rename can also rename the remote branch, and Delete can delete the remote branch and delete an unmerged branch.
- Commit changes: a Commit message box with Suggest with AI and Commit all changes.
- Version tag: shows the latest tag and how many commits are after it, with Tag a version. See Tag a version.
- Pull request: Create pull request pushes the branch and opens a pull request with the GitHub CLI, or the compare page in your browser if it is not installed. The dialog asks for a Title, a Base branch and a Description, and its button is Create Pull Request.
- GitHub Actions: when the project has a GitHub remote, each workflow in the repository is listed with its latest run (Passing, Failed, Running, Queued and so on). The switch on each row decides whether you are notified about its failures. Icons run a workflow now (when it supports manual runs), stop a running one, copy a failed run’s error and open the run on GitHub.
- Worktrees: what a new worktree of this project starts with. Setup command runs in its own terminal tab in every new worktree, and Its own files to copy overrides the app-wide patterns for this project. See Worktrees.
The branch history dialog, Branch history, shows an activity chart for the last 12 weeks and the commits on the branch with a graph, authors, tags and a short hash you can click to copy.
Usage
The Usage section shows what the project’s agent conversations have used, and what that would cost at list prices. It reads the conversation logs your CLIs already keep for this project, so there is nothing to set up. For one conversation, right-click it in the Workspace’s Agent sessions tab instead (see Agent sessions). For all your projects at once, see Token Usage.
- The switch at the top right picks the period: All time (the default), 30 days or 7 days. Refresh reads the logs again. Reading a long history takes a few seconds the first time, and the section shows placeholders meanwhile. The result is kept, so coming back is quick.
- Three figures head the section: Est. cost, Tokens (with the exact count under it) and Conversations (with the number of agents they came from).
- Spend over time draws a bar per day, or per week once the period is longer than about two months. Hover a bar for its date, cost and tokens. Cost and Tokens switch what the bars show. When no price is known, only tokens are shown.
- By agent and By model show where the spend came from, largest first. A model with no known price says Unpriced.
- Token mix splits the tokens into input, output, cache read and cache write.
- Most expensive conversations ranks the eight that cost the most.
- The section counts the project’s folder and each of its git worktrees (see Worktrees).
- It works for Claude Code, OpenClaude, Codex and OpenCode. The other agents do not record tokens, so their conversations are named in a note instead of being counted. OpenCode keeps one total per conversation, so its usage is dated by the conversation’s last update.
The cost is an estimate from public list prices, not an invoice, and a subscription plan charges something different. It shows a + when some tokens ran on a model with no known price, so the real figure is at least that. Notes under the section say what is left out: conversations that could not be read, agents that keep no token counts, or that only the newest conversations were read. A section that could not be read says Usage could not be read. with a Try again button, and a project with no conversations says No usage yet.
Review
The Review section runs diffray, a multi-agent code reviewer, over the project. It only shows once diffray is installed from Agent Tools. It needs a git repository: otherwise it points you to the Git section. A wizard has four steps:
- Diffs (what to scan): Working tree (uncommitted changes, or the last commit if clean), Compare to a branch (pick a Base branch), Last N commits (a Commit count from 1 to 50, with presets), Changed files (tick files, and optionally review whole files rather than just the diff), or Whole codebase (every source file, with a Folder, Include tests and Files per pass, and a note that large trees cost real tokens).
- Agents (who looks): Quality, Bugs, Security, Performance and Consistency. Select all or Clear change them together.
- Engine (which AI): pick the CLI that runs the agents (Claude Code, Cursor Agent, OpenCode or Codex), a Model, and a Severity filter. Switches: Skip validation (faster, more false positives), Stream progress, and Save findings as JSON with a Report file name. Compare models shows a table of speed, quality and cost.
- Launch (run the review): shows the exact command or commands. Write .diffray.json saves your choices for later runs. Click Run review. The command is typed into a terminal in the project folder but not run until you press
Enter.
The review wizard can also be opened as a dialog from a project card (Review with diffray).
Security
The Security section scans the project with security tools and gives one merged report. Scanners are installed from Agent Tools (when none is installed, a Browse security tools button goes there), and the section is never hidden so you can see what exists.
| Scanner | What it covers | Time |
|---|---|---|
| Semgrep | Pattern-based static analysis across many languages. A good first scan. | 1 to 5 minutes |
| Trivy | Known CVEs in dependencies, hardcoded secrets, infrastructure-as-code problems. | 1 to 3 minutes |
| Bearer | Data-flow analysis that follows sensitive data through the code. | 2 to 10 minutes |
| SonarQube | Vulnerabilities and security hotspots, with history on its own dashboard. | 5 to 20 minutes |
| CodeQL | Deep analysis tracing untrusted input to dangerous code. Slow, finds real paths. | 10 to 45 minutes |
| Strix | An autonomous agent that runs your code and proves vulnerabilities. Costs tokens on your own API key. | 15 to 60 minutes |
- Tick the scanners you want. Each card says Ready (with its version) or why it cannot run, with an Install or Set up button. Refresh scanner status re-checks.
- Click Run scan. Progress shows per scanner, with its output behind a toggle and a Cancel button. You can leave the tab while it runs.
- Read the report.
Setup is per project: Semgrep needs a Ruleset, CodeQL needs a Language (with Detect) and, for compiled languages, a Build command, SonarQube needs a Server URL, Project key and Token, and Strix needs a Model and LLM API key. These are stored in this computer’s settings file and removed from reports and logs.
Strix asks for confirmation (Run it) before every run because it executes your code in a sandbox and spends tokens.
The report shows a verdict (Nothing serious found, Worth a look, Needs attention or Fix before shipping), a score out of 100, a bar of severities, the findings grouped from Critical down to Info, and per-scanner status. Filter by severity or scanner, or search by file or rule. Click a finding to see its code excerpt, a suggested fix, and CWE, OWASP or CVE tags. Secrets that were matched are masked.
Copy report has three formats: AI fix prompt (worst findings first, ready to paste at an agent), Markdown report and Raw JSON. Each finding also has its own copy button. History reopens earlier scans. The scanner output for each run is available at the bottom of the report.
Packages
The Packages section lists the dependencies of the project and which are outdated. It reads package.json with npm, Yarn, pnpm or Bun, pubspec.yaml for Dart and Flutter, and .NET project files for NuGet. If it finds none it says so and offers Scan again.
- The top shows the number of packages, how many are outdated (or All current) and the ecosystems found, with a Refresh button.
- Search packages and the filters All, Outdated and Dev narrow the lists.
- Each ecosystem has its own block. Each row shows the name, Dev, Not installed or Latest unknown badges where they apply, the current and latest version and whether the change is major, minor or patch.
- Click Update on a row, or tick rows (or Select N outdated) and click Update N, to update them. A progress line shows “Updating 2 of 5”, and rows show a tick or a warning.
- Copy gives an AI update prompt (versions and steps, ready to paste at an agent) or just the Package names, for the selected packages or for all outdated ones.
If the package manager is not installed, the block says so.
Docker
The Docker section lists containers started with docker compose from this exact project folder. Start, stop, restart and remove them, or Stop all when several are running. If Docker is not installed or not on the PATH, it says so. If there are no containers it explains how to start them. The full container manager is the Docker page.
Terminal
The Terminal section opens a shell in the project folder. Open terminal here opens it in the terminal drawer, Run (or Run followed by the command, if there is only one) starts the project, asking for any values first, and, when there are none, Set a run command opens Edit project on the run commands while Create with AI has an agent suggest one. Terminals already open for this project are listed under Open here with a Show button. Hiding the drawer does not stop the shell.
Bootstrap
Bootstrap creates the files and folders an AI agent expects, following that agent’s own documented layout. It never overwrites a file that already exists.
The section previews Files it will create and Folders it will create, based on the project’s agent type:
- Claude Code:
.claude/CLAUDE.md,.claude/settings.json, rules, agents, skills and commands folders and a review command. - Gemini:
GEMINI.md,.gemini/settings.jsonand a review command. - Codex:
AGENTS.md,.codex/config.tomland a skills folder. - OpenCode:
AGENTS.md,opencode.json, and agent and command folders. - Cursor:
AGENTS.md,.cursor/rules/project-conventions.mdcand commands. - Generic:
AGENTS.md.
Every type also gets a .runova folder with PROJECT_CONTEXT.md, ROADMAP.md and TASKS.md.
- Open Bootstrap and review the preview.
- Click Bootstrap Project.
- In the dialog titled Describe followed by the project name, write what the project does. The text fills the Overview part of the files, and is saved on the project. Leave it empty to use default template files.
- If you wrote in Persian, click Translate & continue, review the English, edit if needed and click Bootstrap project. The translation is also saved to your prompt history.
- A result list shows each file as created or already existing.
Below the plan, Browse and edit project files is a small file browser for the project folder. Click a folder to enter it, .. up to go back, and a file to edit it. Markdown files open in a rich editor, with Markdown and Text buttons to switch, and other files open in a code editor. Click Save. Switching files with unsaved changes asks before discarding them.
Skills
The Skills section lists skills installed into this project, with their version and the result of any safety check. Each row has a Check button (scan the skill for unsafe instructions), Update when a newer version exists, and Remove. Check all checks them all, and the Deep review with an agent CLI switch adds a second opinion from an installed CLI (slower, and it can only make a verdict stricter). Skills that came with the repository rather than through Runova are listed under Also in this project and can be checked too. Browse marketplace opens the Skills page for this project. See Skills.
MCP
The MCP section lists MCP servers installed into this project with a Remove button for each. Browse marketplace opens the MCP Servers page for this project. See MCP Servers.
The switch at the top, Let agents suggest run commands, lets an agent in this project propose a run command for you. Turning it on adds a runova server to the project’s .mcp.json and writes a small script into .runova. The first time the agent uses it in the project, Claude Code asks you to approve that server and to allow its tools. When the agent proposes a command, Runova shows it in a dialog with the command exactly as written. Add command saves it to the project’s run commands, Add and run saves it and starts it, and Discard drops it. Nothing runs until you press Run or Add and run. This switch is for agents you start yourself. Create with AI under Run commands sets this up for you and needs no switch. Turning the switch off removes the entry and the script, and drops any proposals still waiting.
Hooks
Hooks send a notification when an agent in this project finishes or needs you. There are three independent cards: Completion (a Telegram message when the agent finishes), Confirmation (a Telegram message when it needs your confirmation, and your reply is forwarded to the project’s open terminal) and Desktop companion (the desktop pet speaks the message).
For each card, turn the switch on, choose the Installed agent, edit the message (use {{project}} for the project name), and click Save. Send test (or Preview on pet) tries it. With Claude Code the hook is wired into .claude/settings.json automatically. For other agents Runova generates a script at .runova/hooks/notify-<kind>.cjs that you wire into the agent yourself. The Telegram cards need a bot set up in Settings, Notifications. The pet card needs the desktop companion turned on. See Notifications and Telegram and Widgets and desktop pet.
Other hooks lists hooks found in the project’s .claude/settings.json and settings.local.json that Runova did not create. Edit one (Matcher and the JSON body) or delete it.
Environments
The Environments section keeps this project’s env files and logins for each stage in one place, stored encrypted on this computer and included in a password-protected backup.
- Add environment creates a stage: Development, Test, Staging, Production, or Custom… with a name such as QA or Demo.
- Import from folder copies the
.envfiles in the project root into Runova. It guesses each file’s stage, lets you choose the target environment, skips files over 1 MB and never changes the files in the folder. - Select an environment from the list. Its Env files card has Add file (paste or type the contents) and icons to edit, copy the contents, write it back to the project folder and delete it. Writing a file to the folder asks before replacing one that exists, and warns if the file is not in
.gitignore. - Its Credentials card has Add credential (a label, username, URL or host, password, token or key, and notes) with icons to open the URL, copy the password, edit and delete.
- Protect with a passkey encrypts saved passwords and environment secrets with a passkey instead of only the OS keychain. When set, Unlock vault is needed before using them, and you can change or remove the passkey.
Deleting an environment removes its saved files and credentials from Runova only.
Config
The Config section edits .runova/config.json in the project folder in a JSON editor. Click Save to write it. It refuses invalid JSON.
Tag a version
Tagging a version creates a git tag (for example v1.4.0) on the current commit and pushes it if the repository has a remote. It is in the Git section (Tag a version) and also in the Workspace header (the Tag a version button, with a tag icon).
- Click Tag a version. The dialog shows the Latest tag and the Next one, and how many commits came since.
- Choose a version. Patch (fixes only), Minor (new features) and Major (breaking changes) fill in the next number. Or click Suggest with AI, which reads the commits since the latest tag with your CLI and proposes a version and tag message. You can also type a Version yourself.
- To cut a pre-release, pick Beta or Preview above the bump buttons (the default is Stable). The version becomes
1.4.0-beta.1, and the number goes up from the pre-release tags already there (-beta.2,-beta.3). After a pre-release, Patch and Minor land on the release it was heading for (1.4.0) instead of skipping past it. Switch back to Stable to drop the suffix.
- To cut a pre-release, pick Beta or Preview above the bump buttons (the default is Stable). The version becomes
- The Prefix (default
v) names the tag series. If the repository uses several prefixes, Prefixes in use switches between them. Runova remembers the prefix per project. - Add a Tag message (optional).
- Optionally click Update version in files, described below.
- Click Create & push tag (or Create tag when there is no remote).
The dialog warns if the tag already exists, if there are uncommitted files that will not be part of the tag, and if the version you typed is not in major.minor.patch form (it is created exactly as typed).
Update version in files
Update version in files runs your CLI over the repository to set the new version in package.json, other manifests and version strings. It takes minutes, you can close the dialog and keep working, and a notification tells you when it is done.
You then review every changed file. For each file you can Keep or Revert the whole file, or open it and keep or revert single lines or blocks (shift-click to choose a range). Keep the rest and Revert the rest finish quickly. A file marked Had edits already had uncommitted changes of yours. When every file is decided, click Commit N kept files. Tagging stays locked until the version bump is committed, because the tag goes on the last commit. If you create the tag before committing the bump, a warning explains that the tag would carry the old version. Back to tag returns to the tag dialog.
The Build Prompt dialog
Build Prompt turns a rough request into a clear prompt for a project. Open it from the Build a prompt for this project button on a project card. In the Workspace, Ctrl+G opens it for the project on screen. Your request and result are remembered per project, and Generate and Translate keep running if you close the dialog.
- Choose a Type and a Target AI. See Prompt Builder for what they mean.
- Type your request in Your request, or click Dictate to speak it. Persian is fine, and the prompt comes out in English.
- Click Generate prompt (
Ctrl+GorCtrl+Enter). Translate (Ctrl+T) rewrites your request in English without generating a prompt. Cancel stops either. - Use Copy (
Ctrl+C, ignored while text is selected) or edit the result. - Click Save draft to keep it in the project’s Prompts section, Open in (or Run on) an agent to open the agent in the Workspace with the prompt typed in (press
Enterthere to run it), or the arrow for other agents and Add scheduled task.
Split into tasks at the bottom turns the request into Relay tasks: small tasks that each fit one AI session and run one after another. It is greyed out until you have typed a request or generated a prompt.
A chip above the result can size the prompt and suggest a model and effort, in which case the button reads Run on that model. History goes to the project’s Prompts section. Maximize enlarges the dialog, and Add to desktop pins a small Build Prompt widget for that project to your desktop. See Widgets and desktop pet.
Tips
- Pin the two or three projects you use most so they stay at the top.
- Give each project a distinct tile color. It is easier to spot in the list and in notifications.
- Put several run commands on a project (for example
devandtest) and drag the one you use most to the top. - Use the standing prompt for rules every task needs, and the Blueprint for a one-off plan.
- If a project’s folder moved, open Edit project and set the new Folder.