
Agents
Agent Tools
A checklist that installs the developer tools a computer needs (Git, Node.js, .NET, Flutter, Android, Docker), plus a curated list of third-party tools that cut agent token spend, add code intelligence or scan your code for security problems.
Read about this part of Runova on the Agents page.
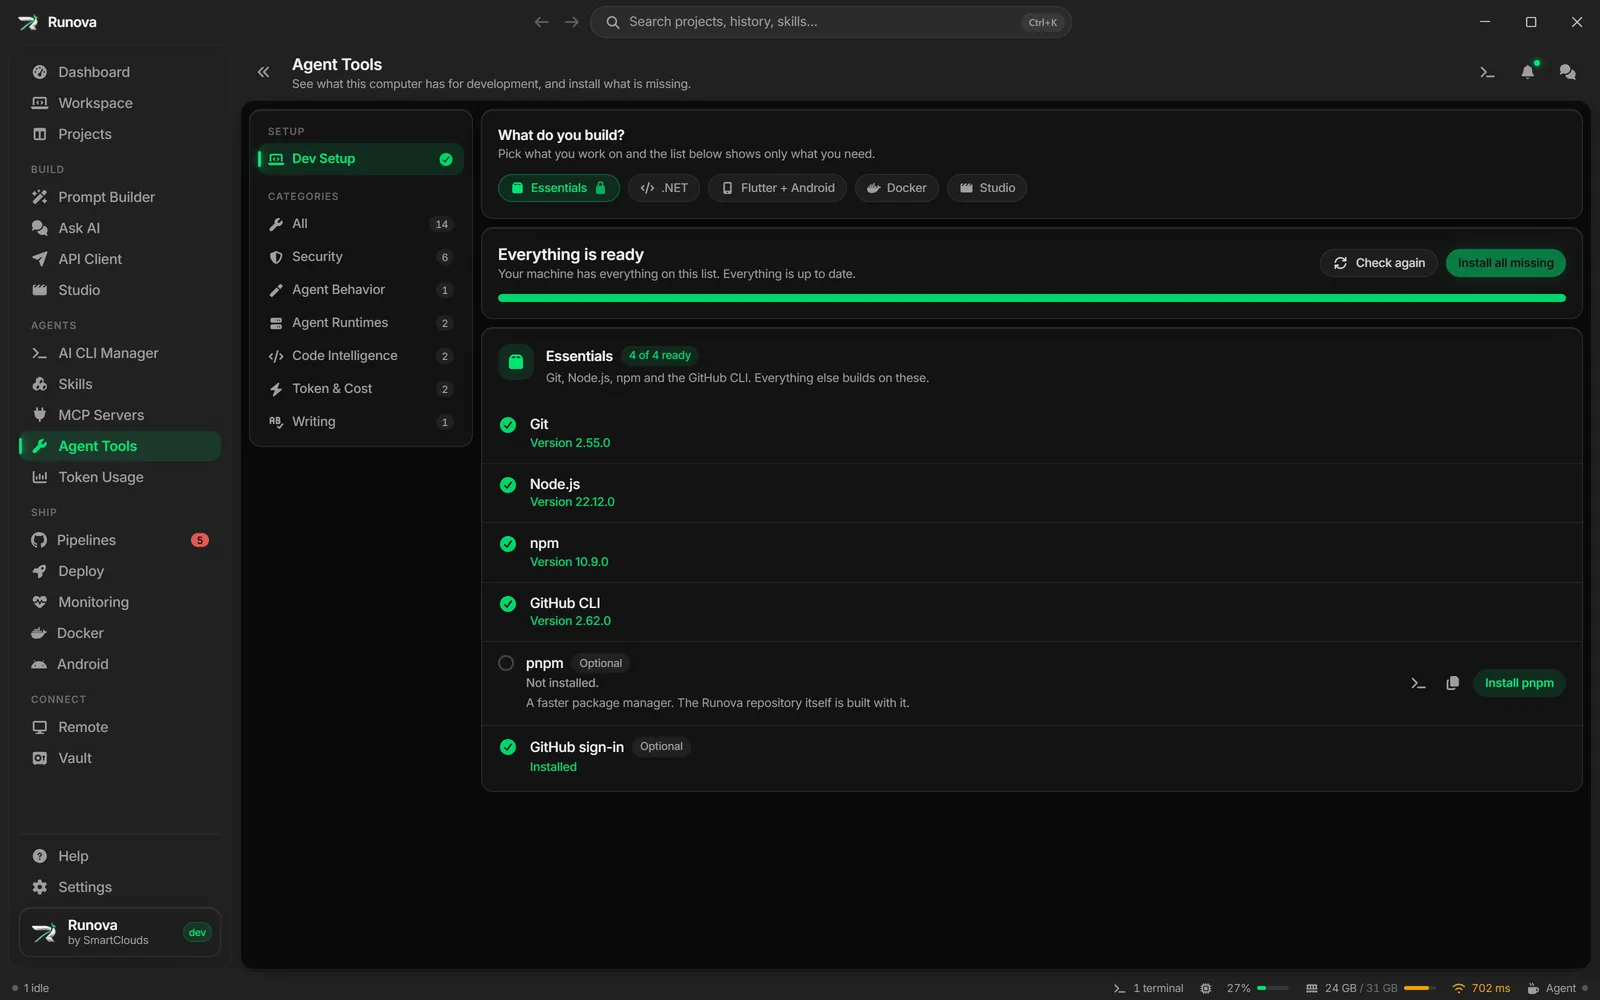
Agent Tools has two jobs. Dev Setup is a checklist of the developer tools a computer needs, with a button to install each one that is missing. The rest of the page is a catalog of outside tools that make AI coding agents cheaper, smarter or safer. They are not MCP servers or skills (those have their own pages). Each tool has a card where you can install it, configure it, update it, run its Docker container and open its website or GitHub page. The security scanners you install here are the ones a project’s Security tab runs.
Where to find it
Click Agent Tools in the sidebar under Agents, or open the command palette and type “Agent Tools”. A project’s Security tab also links here with a Browse security tools button, which opens this page on the Security tab.
Dev Setup
Dev Setup checks what this computer already has, shows each tool as ready or not, and installs the ones that are missing. Open it from Dev Setup under Setup in the page’s left menu, or open the page with ?tab=dev-setup. Beside the entry, a number says how many required tools are still missing, and a tick means none are.
Pick what you build
What do you build? at the top has a chip for each stack. Essentials is always on. Turn on the others and their tools join the list. Runova remembers your choice.
| Stack | What it checks and installs |
|---|---|
| Essentials | Git, Node.js (22.12 or newer), npm and the GitHub CLI. pnpm and a GitHub sign-in are listed as optional. On a Mac it also needs Homebrew and the Xcode Command Line Tools. |
| .NET | The .NET SDK (10 or newer) and, as an optional extra, the Entity Framework tool. |
| Flutter + Android | Java 17, the Flutter SDK (which includes Dart), the Android command-line tools, the Android SDK licenses, platform tools, the emulator, an Android 16 platform and an emulator image. Android Studio is an optional extra, and on a Mac so are Xcode and CocoaPods. |
| Docker | Docker Desktop (Docker Engine on Linux), a check that Docker is running and, on Windows, the Windows Subsystem for Linux that Docker Desktop runs on. |
Read the checklist
Each tool is a row with a name, a line saying how it stands and one button.
- Version 22.12.0 means it is installed and recent enough. A Not on your PATH badge means it was found but a terminal would not find it. That row has an Add to PATH button (it names the tool, such as Add Git to PATH) that puts the tool’s folder on your user PATH. On Windows it changes your user PATH in the registry, and on macOS and Linux it adds a marked block to your shell startup file. Terminals that are already open will not see the change, so open a new one.
- 2.103.0 available next to a version means a newer one exists. The tool still counts as ready, and its Update button (such as Update GitHub CLI) brings it up to date. See Updates below.
- Not installed. Needs 22.12 or newer. has an Install button. A tool that is installed but too old says Needs 22.12 or newer and has an Update button.
- Waiting for Git means the tool needs something first. Its button is switched off, and Install all missing takes care of the order. A tool that comes with another says Comes with Node.js.
- While the page is still looking, a row shows a shimmer instead of a verdict, so a tool is never called missing before it has been checked.
Beside the main button, Open in terminal types the same command into a terminal for you to run yourself and Copy command copies it.
Install
- One click. Install runs the install inside Runova and shows live progress with a Cancel button. This is how winget on Windows and Homebrew on macOS install, and how pnpm and the Entity Framework tool install. Flutter and the Android tools have no package, so Runova downloads them itself from Google, checks the SHA-256 or SHA-1 checksum and unpacks them. Flutter goes into
develop/flutterin your home folder and is added to your user PATH, and the Android tools go into the existing Android SDK folder or, if there is none, the one Android Studio would use. - In a terminal. Anything that needs your password, a restart or a question (Linux packages, some Mac apps, the Windows Subsystem for Linux, the GitHub sign-in) opens a terminal with the command typed in. Press
Enterto run it, and the row checks again by itself every few seconds. - A download page. On Windows without winget, the row opens the tool’s download page. The page tells you when winget is missing and links to App Installer in the Microsoft Store.
Install all missing runs every step it can, in order. Steps that need a terminal or a download stay for you, and the button says how many. Press it again once you have done them. While a run goes on, the card shows which tool it is on and how far along the whole run is, and Cancel install stops it.
Installing the Android SDK licenses or Docker Desktop first asks you to accept the agreements, with their addresses listed. Nothing is accepted until you press Accept and install.
Updates
A tool that is installed can still be behind. When the page opens, Runova asks whatever would do the update whether a newer version exists: winget on Windows, Homebrew on a Mac, apt, dnf or pacman on Linux, the npm registry for pnpm, NuGet for the Entity Framework tool, Google’s release list for Flutter and the Android SDK manager for the Android tools. Asking the same tool that will do the update means the available badge and the button never disagree.
- They do not hold the list up. The rows show first, and each source’s badges appear as soon as that source answers. The card says Checking for updates until the last one is in. Answers are remembered for half an hour, and Check again asks every source again.
- Ready stays ready. A tool that is behind still counts in 6 of 6 ready. The card counts the updates separately, and each stack shows how many of its tools have one.
- Update brings one tool up to date, and Update all does every update Runova can run itself. Updates that need a terminal stay for you, and the button says how many. When nothing is missing, Update all takes the place of Install all missing. Updates do not ask you to accept any agreement again.
- Docker Desktop says Update available without a number, because the version Docker prints is the engine’s and not the app’s.
- Flutter updates by running
flutter upgrade, so it needs the copy to be a git checkout, which the official download is. - Could not check for updates. means no source answered. That is not the same as being up to date, and the card does not say so.
- A tool that was installed some other way than the one Runova would use, such as Node.js through nvm, shows no update.
When something fails
The row says why in a sentence, such as “winget could not finish (code 1603)”, and the Install log opens by itself with everything the installer printed. Use Try again, run the same install in a terminal, or Copy log to share it. A download that fails its checksum is deleted and never unpacked.
After an install, terminals that were already open do not see the new tools, so open a new one. If an installer says a restart is needed, Runova says so too.
Note: Runova edits your user PATH only to add Flutter’s folder when it installs Flutter, or the folder of a tool when you press Add to PATH. On Windows it changes your user PATH in the registry and keeps every existing entry as it was. On macOS and Linux it adds one marked block to your shell startup file. If your PATH has an entry in quotes, Runova leaves it alone and asks you to add the folder by hand.
The page layout
Target project
The Target project picker at the bottom of the left menu chooses a project for actions that work inside a codebase, such as initializing a tool in a project or writing its config file. Docker and global setup actions do not need one. If an action needs a project and none is chosen, Runova says “Choose a target project first.” The picker and the filter box only act on tool cards, so they are hidden on Dev Setup.
Category tabs
The left menu has two groups. Setup holds Dev Setup. Categories filters the cards, each with a count: All, Security, Agent Behavior, Agent Runtimes, Code Intelligence, Token & Cost and Writing. Security comes first after All. You can also jump straight to a tab by opening the page with ?tab=security or ?tab=dev-setup.
Refresh and update checks
- Refresh re-checks which tools are installed.
- Check all for updates checks every installed tool that has an update source, one at a time. Tools that cannot be checked are counted and reported (“All checkable tools are up to date (N could not be checked)”).
A tool card
Each card shows the tool name, its category, a description, a status badge, tags and the author. The status badge is Not detected or the version number when found. Some tools have special wording (Not in tools folder for LanguageTool, Not downloaded for CodeQL). Tools with a Docker option also show a Docker badge with one of these states: unavailable (Docker is not installed), not created, running or stopped. A Server running badge shows when the LanguageTool server is up.
Install a tool
The main button on a card depends on how the tool installs.
- Install (npm), Install (pipx), Install (winget), Install (brew), Install (script) or plain Install: the button names whatever runs. Click it and a terminal opens with the install command typed in. Press
Enterin that terminal to run it. - Install (interactive): used by Ponytail. It opens a terminal running Claude Code and copies the setup commands to your clipboard. Press
Enterto launch Claude Code, paste the commands (Ctrl+Shift+V, orCmd+Von macOS, not plainCtrl+V) and pressEnteragain. - Setup instructions or Copy setup commands: for tools with no install command for your operating system, or that must be set up by hand. It copies the written steps to your clipboard.
- Uninstall: replaces the install button once a tool is detected. It opens a terminal with the uninstall command for you to run. Tools that are uninstalled by hand (such as Ponytail) have a trash icon instead (Copy uninstall commands) that copies the steps to your clipboard.
Nothing runs until you press Enter in the terminal, so you can read the command first. If a tool has no command for your operating system, you see a message instead of a terminal.
Each tool uses the installer its makers recommend. CodeGraph, OpenClaw, Hermes Agent and RTK (on macOS and Linux) use their own install scripts, and RTK installs with WinGet on Windows. Semgrep installs with pipx. Trivy, and Bearer on Linux, are downloaded into ~/.local/bin in your home folder, so they need no sudo. Bearer on macOS comes from Homebrew. 9Router and diffray install with npm.
If the command needs something that is not on your machine, such as Node.js for npm, pipx, Homebrew or WinGet, Runova says which one is missing, for example “Semgrep needs pipx, which isn’t installed.”, and gives you a button to its download page. No terminal opens, since the command would only fail. This applies to installs, updates and uninstalls.
After installing, click Refresh. Tools installed with pipx, or into ~/.local/bin, can land in a folder that is not on PATH. Runova looks there itself, so the card picks them up on Refresh.
Update a tool
- Click the cloud icon (Check for updates) on an installed tool’s card. Runova asks npm, PyPI or GitHub Releases for the latest version.
- If there is a newer version, an Update <name>? dialog shows the current version, the latest version and the command. Click Update to open a terminal with the command typed in (press
Enterto run it) or Cancel. With Check all for updates, the dialog steps through each tool that has an update.
Once a day Runova can also check in the background and ring the notification bell when a CLI or tool has a new version. That is the Check for CLI and tool updates switch in Settings under General. See AI CLI Manager.
Configure a tool
A wrench icon (Configure) appears on tools that have settings. It opens a Configure <name> dialog with a few fields, a live preview of what will be done, and a button.
- Tools whose setting applies to a project say “This applies to the target project selected above.” Tools that apply machine-wide say “This applies machine-wide, not to a specific project.”
- The preview shows the command to run, the file that will be written or the text that will be copied.
- The button changes with the action: Run in terminal (opens a terminal with the command typed in), Write to project (writes a file into the target project) or Copy to clipboard.
- If the action needs a project and none is chosen, the button is disabled with a note to pick one.
Some cards also have quick action buttons for common setup commands, listed below.
Docker
For tools that can run as a container, the card has Docker buttons:
- Install with Docker creates the container (disabled with a tooltip when Docker is not installed on this machine).
- Once it exists: Start container, Stop container, Reset container (recreate from image) and Delete container.
- Open dashboard (globe icon) opens the tool’s local dashboard when the container is running.
Each Docker action opens a terminal with the Docker command typed in. Press Enter to run it. See Docker for managing containers in general.
The tools
Runova currently lists 14 tools.
| Tool | Category | What it does |
|---|---|---|
| 9Router | Token & Cost | Proxy that routes agent requests across many model providers with fallbacks and output compression. Has a Docker option and a local dashboard on port 20128. Configure sets the dashboard port and initial password (change the default password after first login). |
| RTK (Rust Token Killer) | Token & Cost | CLI proxy that compresses command output before it reaches the model. Configure builds an rtk init command for your target agent (Claude Code, GitHub Copilot, Gemini CLI, Codex, OpenCode, Cursor, Windsurf, Cline, Kilo Code, Antigravity, Pi, Hermes or Factory Droid), with options for global install, non-interactive and hook only. |
| Ponytail | Agent Behavior | Claude Code plugin that pushes agents toward minimal code. Installed through Claude Code’s plugin commands. Configure sets the intensity (Lite, Full, Ultra or Off) and copies a config file to save at ~/.config/ponytail/config.json. |
| CodeGraph | Code Intelligence | Indexes a codebase into a local knowledge graph so agents search it cheaply. Quick action Initialize in project. Configure writes a codegraph.json with extra exclude and force-include globs. |
| diffray | Code Intelligence | Free multi-agent code review CLI that reviews git diffs locally. Quick actions Initialize in project and Install /diffray slash command. Configure picks the review executor and whether to skip tests and build output. |
| OpenClaw | Agent Runtimes | Self-hosted personal AI assistant gateway with a local web UI on port 18789. Docker option, quick action Start gateway (foreground), and Configure for the port, gateway token and sandboxing. |
| Hermes Agent | Agent Runtimes | Self-improving agent from Nous Research with an OpenAI-compatible gateway and optional dashboard. Docker option, quick actions Run setup wizard and Diagnose and fix, and Configure for gateway port and dashboard. |
| LanguageTool | Writing | The grammar checker behind the writing checks. See the section below. |
| Semgrep | Security | Pattern-based static analysis for 30+ languages. Configure picks a ruleset. |
| Trivy | Security | Finds known CVEs in dependencies, hardcoded secrets and infrastructure misconfigurations. Quick action Update vulnerability DB. |
| Bearer | Security | Data-flow analysis for sensitive data. No Windows build, so on Windows it runs through Docker (quick action Pull Docker image). |
| SonarQube Community Build | Security | Self-hosted analysis server with a dashboard on port 9000, run as a Docker container. |
| CodeQL CLI | Security | GitHub’s semantic code analysis engine. Downloaded by Runova itself. |
| Strix | Security | Autonomous AI agent that runs your code in a sandbox and proves vulnerabilities. Needs Docker and your own LLM API key, and a run costs tokens. Configure copies the model and API key as environment variables. |
Warning: 9Router’s published default dashboard password is
123456. Change it after your first login.
Security scanners
The Security tab on this page holds six scanners: Semgrep, Trivy, Bearer, SonarQube, CodeQL and Strix. Installing a scanner here is only the first step. You run scans from a project’s Security tab, which merges every scanner’s findings into one report with a score out of 100, a History menu of previous scans and a Copy report menu (an AI fix prompt, a Markdown report or raw JSON). See Projects for the project side.
Setup notes for each scanner:
- Semgrep and Trivy are the quick ones. Semgrep’s Auto ruleset downloads rules from semgrep.dev on every scan, so pick one of the
p/packs (Security audit, OWASP Top 10 or Default) to stay offline. - Bearer installs with Homebrew on macOS and an install script on Linux. On Windows, press Pull Docker image and Runova starts a container per scan with your project mounted read-only.
- SonarQube needs these steps: click Install with Docker to create the server, wait for
http://localhost:9000(the first start takes a couple of minutes), log in withadmin/admin, change the password, create a token under My Account, Security, and paste it into the SonarQube setup in a project’s Security tab. The card’s Copy setup commands button copies these steps. - CodeQL CLI has a Download CodeQL button. Runova fetches the official release (about 420 MB to download and 700 MB unpacked), verifies its SHA-256 checksum and unpacks it into its own tools folder, with nothing on your
PATHand no admin rights needed. A progress bar appears with a Cancel button. Afterwards you get Open folder, Reinstall and Remove. Acodeqlalready on yourPATHis used in preference, and the card says so. - Strix costs money. A project’s Security tab asks you to confirm before it starts, because it can run for up to an hour and spends tokens on your own API key.
LanguageTool
LanguageTool is the grammar, spelling and style checker behind Runova’s writing checks. Installing it here lets every check run offline on your machine instead of sending text to LanguageTool’s public service. It needs Java 17 or newer on your PATH.
- Click Download zip to get
LanguageTool-stable.zip. - Click Open tools folder and extract the zip there.
- Click Start server (enabled once it is detected). The first start loads its rules. Stop server appears while it runs.
- Click Writing settings to jump to Settings (the AI group), then choose Local server as the source in the Writing check card.
See Writing, voice and translation for the writing checks themselves.
Tips
- Install Semgrep first for security scans. It is the fastest and works on almost any project.
- Click Refresh whenever you install or uninstall a tool in a terminal of your own.
- Use the Target project picker once at the top, then run several project-level actions without choosing again.
- For tools you do not use any more, Uninstall is one click and a terminal confirmation away.