
Connect
Vault
A password manager built into Runova that keeps logins, API keys, secure notes and custom secrets encrypted on your computer behind one master password.
Read about this part of Runova on the Connect page.
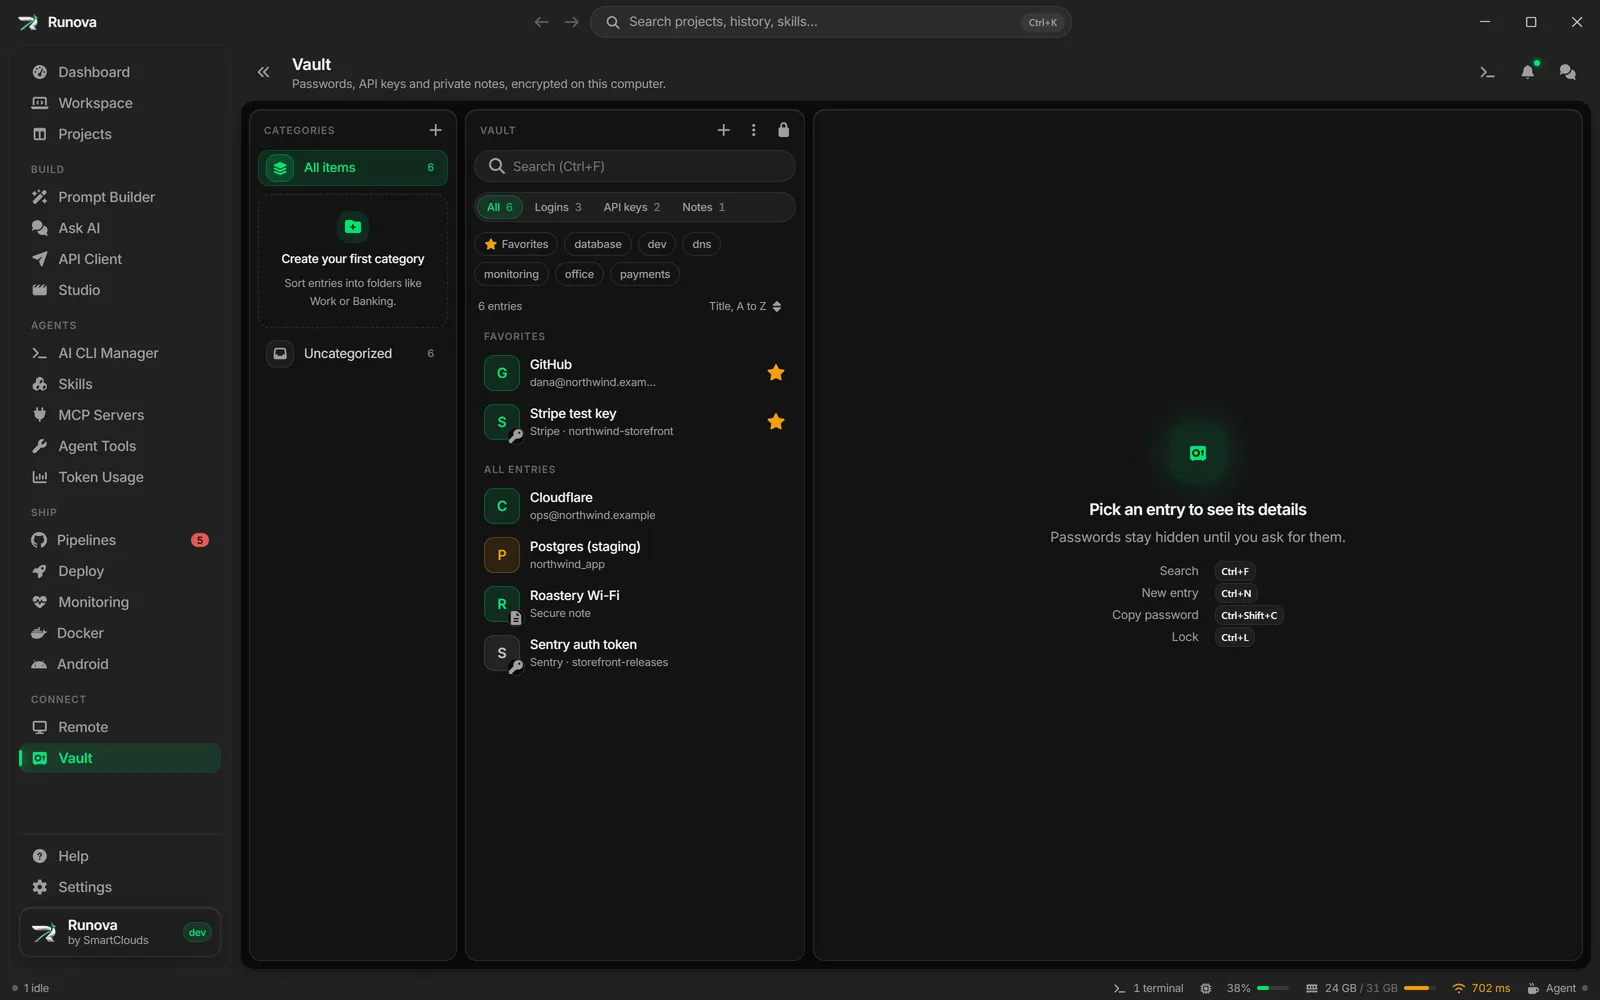
The Vault is a password manager inside Runova. It stores logins, API keys, private notes and custom entries in one encrypted file on your computer. Everything is locked with a single master password that only you know. Passwords stay hidden until you ask to see or copy them, and a copied value is wiped from the clipboard after a short time.
The Vault never sends your data anywhere. It is stored locally, and Runova cannot recover the master password for you.
Where to find it
Click Vault in the sidebar under Connect, or open the command palette and type Vault. While the vault is unlocked, the command palette also lists your entries by title, and choosing one opens it in the Vault. When it is locked, the palette offers Unlock Vault. Settings for the Vault live in Settings, on the Vault tab.
Create your vault
The first time you open the Vault, it shows “Create your vault”.
- Type a Master password (at least 10 characters). A strength meter shows how strong it is. Runova also refuses passwords that are too easy to guess and suggests a longer phrase of unrelated words.
- Type it again under Type it again.
- Tick the box saying you understand Runova cannot recover this password. If you forget it, the vault can only be reset, and everything in it is lost.
- Click Create vault.
Warning: There is no “forgot password” recovery. Pick a master password you will remember, and consider writing it somewhere safe offline.
Unlock and lock
Unlock
When the vault is locked, the page says “Vault is locked”. Type your master password and click Unlock.
- If the password is wrong, the box shakes and says “That password doesn’t match this vault.”
- After a few wrong tries in a row, Runova makes you wait a few seconds between tries (“Too many tries. Try again in Ns.”).
- The lock screen tells you why it locked, if it knows: “Locked after N minutes without activity.”, “Locked when this computer locked or went to sleep.” or “Locked to restore a backup…” (use the master password of the vault in that backup).
- If the vault file is damaged, the message offers to reset it and start a new, empty vault.
The vault is locked each time you open Runova until you unlock it.
Lock
The vault locks in these cases:
- You click the Lock vault (padlock) button in the list header, press
Ctrl+L(Cmd+Lon macOS), or choose Lock Vault in the command palette. - It has been idle too long. The default is 15 minutes. Clicking or typing in Runova counts as activity, just moving the mouse does not.
- Your computer locks or goes to sleep (on by default).
You can change the timers in Settings (see below).
Forgot your master password
Click Forgot your master password? on the lock screen. The dialog “Reset the vault?” explains that without the password nothing in the vault can be opened, by you or by Runova. Resetting sets the current vault file aside in Runova’s data folder and starts an empty vault. Type RESET to confirm, then click Reset vault. A toast says the old file was set aside. You can also reset from Settings, Vault, Reset vault.
The Vault page
When unlocked, the page has a Categories column, a list of entries and the selected entry on the right. On a medium window the categories become a row of pills above the list. On a narrow window, only the list or the entry shows at a time and a back arrow returns to the list.
If the vault is empty, the list says “Your vault is empty” with Add your first entry and Import from CSV.
Categories
Categories work like folders: each entry can sit in one category, or in none. Give each one a name, a color and an icon so you can spot it at a glance. Tags still work alongside them for labels that cut across categories.
- All items shows every entry, Uncategorized the ones in no category, and each category its own entries. The count next to each says how many it holds.
- New category (the plus button, or Create your first category when you have none) opens a dialog with a Name, a Color and an Icon, and a preview of how it will look.
- Hover a category and click its three dots for Edit, Move up, Move down and Delete. You can also drag a category up or down, or press
Alt+UpandAlt+Downwhile it has focus. - Delete asks you to confirm. The entries in it are kept and move to Uncategorized.
- Drag an entry from the list onto a category to move it there, or onto Uncategorized to take it out.
A new entry starts in the category the list is showing. When a category is empty, the list says so and offers Add entry.
The list pane
At the top of the list:
- Search box. Type to find entries by title, website, username, tags and so on. Matching letters in the title are highlighted, and results are ranked by best match. Press
Ctrl+F(Cmd+F) to jump to it. Use the arrow keys to move through results andEnterto open one.Escapeclears the search. - New entry (plus button,
Ctrl+N). - More vault actions (three dots): Import from CSV, Export to CSV and Change master password.
- Lock vault (padlock).
Search understands a few shortcuts. Type tag:work to show only entries with the tag “work”, type:login (also api, note, custom) to filter by type, and is:fav for favorites.
Below the search, once you have entries:
- Type tabs: All, Logins, API keys, Notes and Custom, each with a count. Only types you actually have are shown.
- Favorites chip and tag chips. Click a chip to filter. Click again to remove the filter.
- When the list shows every category, each row names its category with a colored dot.
- A counter (for example “12 entries” or “3 results”) and a Sort menu: Title, A to Z, Recently used, Recently updated or Newest first. While searching, the label says “Best match”.
Favorites are pinned in a Favorites group above All entries when you are browsing.
If nothing matches, the list says what it looked for and offers Create “your search” (start a new entry with that title) and Clear filters.
Each row shows a round icon (the site’s icon or a colored letter), the title, and a line underneath (username or website for logins, service and key ID for API keys, “Secure note”, or the number of fields for custom entries). Hover or select a row to see its quick buttons: Log in for logins that have a website (see One-click login), Copy username and Copy password (or Copy secret for API keys). A star marks favorites. Press Delete with the list focused to delete the selected entry.
Entry types
| Type | What it holds |
|---|---|
| Login | Username or email, password, one or more websites, an optional authenticator key (the setup secret for two-factor codes), notes. |
| API key | Service, Key ID, Secret, a website, an expiry date, notes. |
| Secure note | Free text such as recovery codes or Wi-Fi passwords. |
| Custom | Any number of named fields, each of which can be hidden or shown, plus notes. Good for PINs, license keys or recovery phrases. |
Every entry can also have a Category and Tags, and can be pinned to favorites.
The detail pane
Selecting an entry shows its details. Secrets are hidden behind dots.
- Show (eye icon) reveals a secret for 20 seconds, then hides it again. Hide hides it at once.
- Copy (copy icon) copies a value. A toast says what was copied and counts down to when the clipboard is cleared. It only names the field, never the value.
- Login passwords show how long ago they changed.
- API keys show their expiry date. A date in the past, or within 14 days, is flagged in yellow.
- Websites have an Open button that opens the site in your browser.
- Notes are hidden until you click Show.
- Tags are clickable and filter the list.
- A footer shows when the entry was created, updated and last used.
- The entry’s category shows under the title. Click it to list everything in that category.
- Header buttons: Add to favorites / Remove from favorites (star), Move to category (folder), Duplicate, Delete (asks you to confirm, and cannot be undone), Log in for logins with a website, and Edit.
Add or edit an entry
- Click New entry (or press
Ctrl+N). To edit, select an entry and click Edit (or pressCtrl+E). - When adding, choose the entry type: Login, API key, Secure note or Custom. The type can’t be changed afterwards.
- Enter a Title. This is the only required field.
- Fill in the fields for that type:
- Login: Username or email, Password (with a strength meter and a Generate a password button), Website (use Add another website for more), Sign in automatically (see One-click login), and Add an authenticator key to store a setup key or an
otpauth://link. - API key: Service, Key ID, Secret, Website, Expires.
- Custom: click Add field, give each field a Name and Value, and use the switch to hide or show it in the details. The trash button removes a field.
- Notes (or Note for a secure note), Category (pick one, or New category… to make one on the spot) and Tags (type a tag and press
Enter, or end it with a comma).
- Login: Username or email, Password (with a strength meter and a Generate a password button), Website (use Add another website for more), Sign in automatically (see One-click login), and Add an authenticator key to store a setup key or an
- Optionally turn on Pin to favorites.
- Click Save, or press
Ctrl+Enter.
If you close the dialog with unsaved changes, Runova asks “Discard changes?”.
When you edit an entry and leave a secret unchanged, the saved secret is kept as it is.
Site icons
When you enter a website, Runova tries to fetch the site’s icon when you leave the field. Use site icon fetches it on demand (and tells you if none was found). Remove site icon goes back to the letter tile.
Password generator
Click the dice button in the password box to open the generator.
- A password is shown right away. Generate another makes a new one.
- Length slider (the generator allows 8 to 128 characters, the slider goes up to 64).
- Switches for uppercase letters (
A-Z), lowercase (a-z), digits (0-9) and symbols (!#$). At least one must stay on. - Avoid look-alike characters leaves out characters that are easy to mix up.
- A strength meter for the result.
- Use password puts it in the entry. The generator remembers your settings.
One-click login
A login with a website has a green Log in button. It opens the site and enters the username and password for you. The arrow next to it picks where the site opens, and Runova remembers your choice:
| Where | What happens |
|---|---|
| Runova window | The site opens in a Runova browser window and the username and password are filled in. This is the default. |
| Workspace tab | The site opens in a browser tab of the project you pick, in the Workspace, and is filled in there. |
| Default browser | The site opens in your usual browser. Runova can’t type into it, so the password is copied instead and cleared from the clipboard like any other copy. |
The Runova window and Workspace tabs share one browser profile, so a site you sign in to in one is signed in in the other.
Turn on Sign in automatically on a login to have Runova press the site’s sign-in button after filling. It is off by default, so you can check the page first. Sites that ask for the username and the password on separate pages are followed to the second page.
A toast says how it went: signed in, filled in, or that no login form was found. You can also press Ctrl+Enter on the Vault page, or pick Log in to an entry in the command palette.
Note: Runova only fills a page whose address is on one of the login’s saved websites (or a subdomain of one), and never fills a plain
httppage when the website was saved withhttps. A look-alike address such asgithub.com.example.iogets nothing. The password goes straight from the vault to the page and never passes through the rest of the app.
Import and export
Import from CSV
Use More vault actions, Import from CSV. The dialog “Import passwords” works with exports from Chrome, Edge, Firefox, Bitwarden, 1Password and Runova. For any other CSV you pick which column is which.
- Click Choose CSV file and pick the file.
- Runova shows the file name, the detected layout (or “Unknown layout”) and a preview of what will be imported. For an unknown layout, under Match the columns, set each column to Title, Username, Password, Website, Notes, Tags, Authenticator key, Favorite, Add to notes or Don’t import.
- If some entries already exist but differ, pick what to do: Keep the saved entry, Replace the saved entry or Keep both. Identical entries are skipped automatically.
- Click Import N entries.
- A summary shows how many were added, replaced, skipped and unreadable.
Warning: A CSV file holds your passwords in plain text. Delete it after importing.
Export to CSV
Use More vault actions, Export to CSV. The dialog “Export the vault” asks you to:
- Choose a format: Runova CSV (every field of every entry type, imports back into Runova exactly) or Bitwarden CSV (for moving to Bitwarden or another manager that reads its format). Bitwarden CSV uses each entry’s category as its folder.
- Type your Master password to confirm it is you.
- Click Export and choose where to save the file.
The file contains every password in plain text. Keep it somewhere safe and delete it when you are done. Do not leave it in Downloads or a synced folder.
Settings
Go to Settings, then the Vault tab. Changes save as you click them and apply to an open vault.
| Setting | Options | Default |
|---|---|---|
| Lock after | 1, 5, 15, 30 min, 1 hour, or Never | 15 min |
| Clear copied values after | 10s, 20s, 30s, 1 min, 90s, or Never | 30s |
| Lock when this computer locks or sleeps | On or off | On |
Clearing only happens if the clipboard still holds what the vault copied. If you copied something else in the meantime, it is left alone.
The same tab has Change master password (only when unlocked) and Reset vault.
Change the master password
- Unlock the vault, then open More vault actions, Change master password (or use the button in Settings).
- Enter your Current password, a New password and the new one again.
- Click Change password. A toast confirms. Use the new password the next time you unlock.
The vault is encrypted again with a fresh key. Old copies of the vault file, such as old backups, keep the old password.
Keyboard shortcuts
These work only on the Vault page while it is unlocked. You can change them in Settings, Shortcuts (see Keyboard shortcuts).
| Action | Default |
|---|---|
| Search the vault | Ctrl+F |
| New entry | Ctrl+N |
| Edit entry | Ctrl+E |
| Lock the vault | Ctrl+L |
| Copy password (or API key secret) | Ctrl+Shift+C |
| Copy username | Ctrl+Shift+B |
| Log in to the selected entry | Ctrl+Enter |
On macOS use Cmd instead of Ctrl. When a dialog is open, or when the terminal has focus, these shortcuts step aside.
How it is stored and backed up
- The vault is one file,
vault.json, in Runova’s data folder. Categories are stored inside it with your entries. It is encrypted with AES-256-GCM using a key made from your master password with scrypt, a slow function that makes guessing passwords expensive. Only you can unlock it. - It is not shared with other devices. Runova does not sync it.
- Backups. In Settings, Data, the backup option Include the Vault (stays encrypted with its master password) adds the vault file to the backup. It stays locked with its master password, so the backup needs no extra password for it. When you restore a backup that contains a Vault, Runova asks “Restore the Vault too?”. Restoring replaces this computer’s Vault, which is set aside in the data folder, and the vault locks. Unlock it with the master password the vault had when the backup was made. See Backup and restore.
Using Vault entries elsewhere
The Vault is for storing and copying secrets, and for logging in to websites with one click. Runova does not automatically hand Vault entries to your AI CLIs, terminals or SSH connections. To use one, copy it with the copy button or shortcut and paste it where you need it.
The saved passwords for SSH and Remote Desktop servers, and the secrets in project environments, are protected separately. They use your operating system keychain, plus an optional servers passkey you can set on the Remote page. See Remote.
Tips
- Use the generator for new passwords, and use tags such as “work” or “banking” to keep a big vault tidy.
- Mark the entries you use every day as favorites so they sit on top.
- Set Clear copied values after to a short time if you copy passwords a lot.
- Add an expiry date to API keys so the Vault warns you before they run out.