
Settings
Widgets and the desktop pet
Put token usage and the Build Prompt box on your desktop as floating glass widgets, add a pet that walks your screen and reports usage, and control whether your computer stays awake.
Read about this part of Runova on the Everything else page.
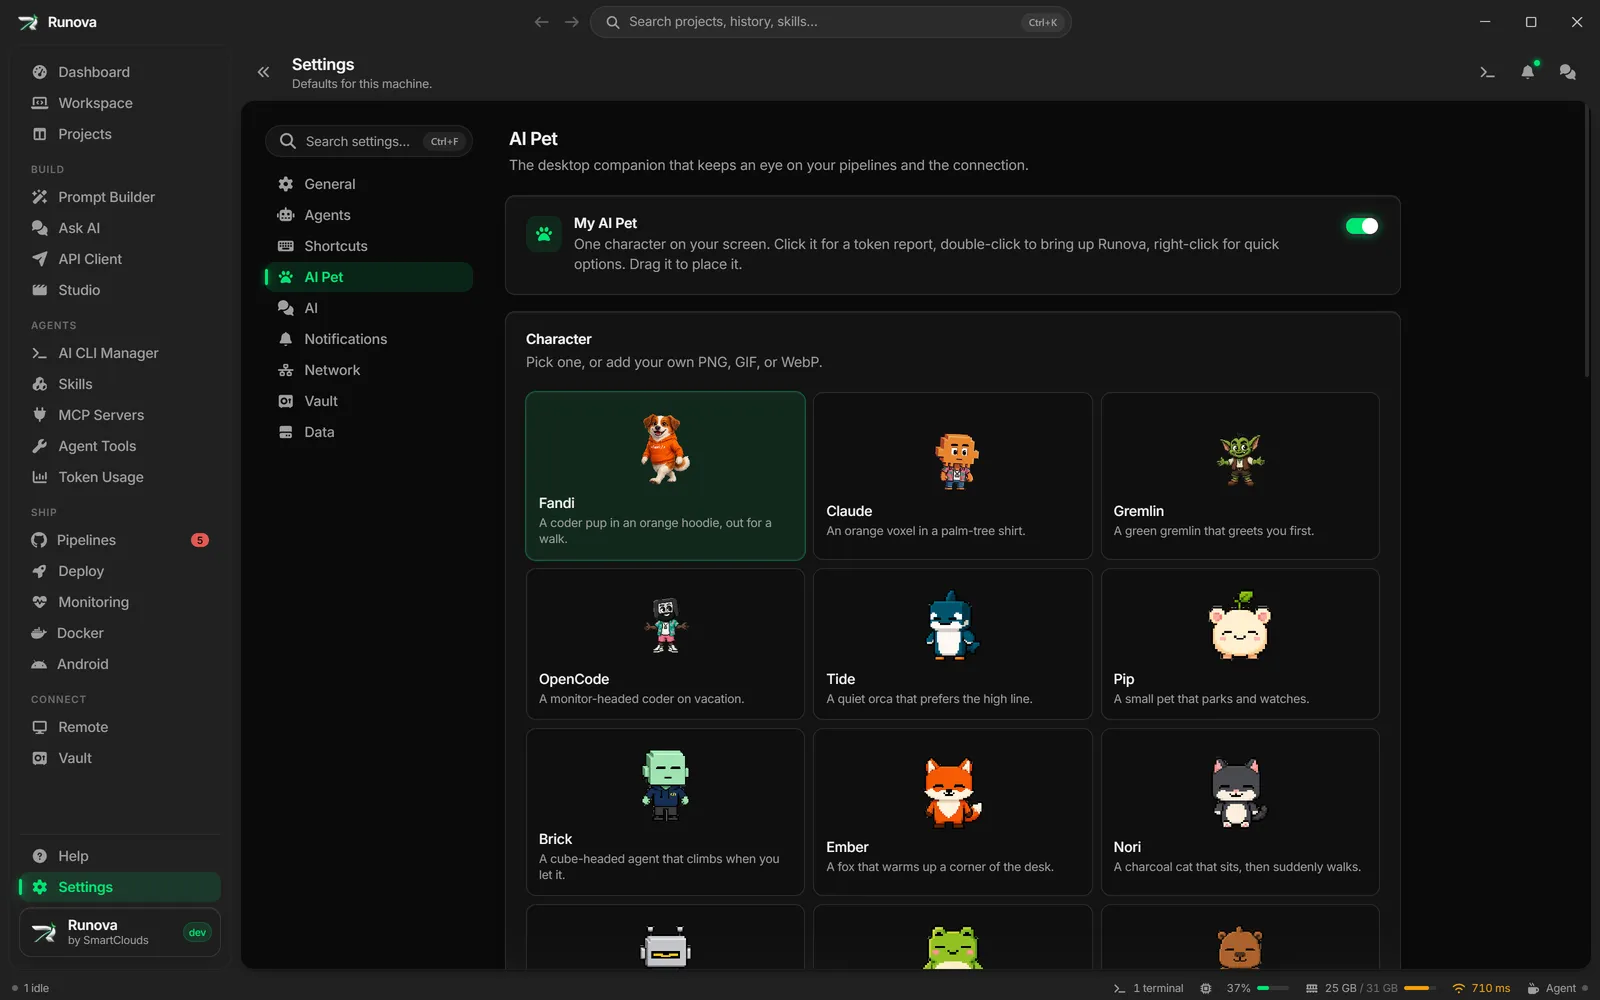
Runova can leave the main window and live on your desktop. Floating glass widgets show your token usage or give you a small Build Prompt box. The AI pet is a character that walks around your screen, tells you about your token usage and speaks up when something happens. This article also covers the Keep computer awake control in the status bar.
Where to find it
- Pet: Settings, then the AI Pet tab (
/settings?tab=companion). - Usage widgets: the Token Usage page. Click the pin button (Add to desktop) on a provider card or on the all-agents chart.
- Build Prompt widget: the pin button in the Build Prompt dialog (Add to desktop).
- Keep computer awake: the status bar at the bottom of the Runova window.
Desktop widgets for token usage
A usage widget is a small frameless window with a frosted glass look that stays on your desktop. It shows one provider’s token usage (or plan limits) or the all-agents chart.
Add a usage widget to the desktop
- Open Token Usage from the main menu.
- On the provider’s card, click the pin button (tooltip Add to desktop). The all-agents chart at the top has its own pin button. If the card can show plan limits, first switch it with the toggle (Show plan limits or Show tokens and cost), because the widget pins whichever view is showing.
- The Add to desktop dialog shows a live preview. Adjust the options below.
- Click Add to desktop. A message says the widget was added.
The options, which are the same in the dialog and in the widget’s own settings:
| Option | What it does |
|---|---|
| Period | Day, Week or Month, the range the headline numbers use. |
| Background blur | How frosted the glass is, from 0% to 100%. |
| Background color | Theme (follows the app theme), Ink, Slate, Navy, Forest, Wine, Sand, Frost, or any custom color from the color picker. |
| Always on top | On, the widget stays above other windows. Off, it sits on the desktop behind other windows and comes back when you show the desktop. |
| Size | S, M or L. |
| Style | Color or Mono. |
Use and move a widget
- Drag the strip along the top of a widget to move it. You can also resize it by its edges. Its position and size are remembered, and widgets come back when Runova starts.
- Hover over a widget to reveal the buttons at the top right. The gear (Widget settings) opens the same options as above, with Remove from desktop at the bottom, and a second button switches between tokens and plan limits when the provider has both.
- The figures refresh every minute. Click the Period chips on the widget to change the range.
- Several widgets can be open at once, including more than one for the same provider (tokens and plan limits side by side).
Build Prompt widget
The Build Prompt widget is a small always-on-top window for turning a request into a good prompt without opening Runova.
- Open the Build Prompt dialog for a project (from the Workspace or the Projects page).
- Click the pin button (Add to desktop) at the top right of the dialog. It is hidden while the dialog is maximized.
- The widget opens on your desktop with the project name in its title: Build Prompt · Project name.
In the widget, type Your request, choose a Type and Target, then click Generate (or Translate to turn the request into English). The result appears under Generated prompt, with Copy and Save draft (the draft is saved to the project). The prompt builder shortcuts work inside it, see Keyboard shortcuts. Close it with the x at the top right. It comes back when Runova starts, until you close it. See Prompt Builder.
The AI pet
Turn the pet on
- Open Settings, AI Pet.
- Turn on Show my AI pet in the My AI Pet card.
The pet appears on your main display, above other windows, and the rest of your desktop stays clickable around it. Turn the switch off to remove it.
Pick a character and name it
The Character card lists the built-in pets: Claude, Gremlin, OpenCode, Tide (the default), Pip, Brick, Ember, Nori, Bolt, Moss, Cocoa and Hex. Click one to switch.
To use your own picture:
- Click Add your pet and choose a PNG, GIF or WebP file (up to 8 MB). An animated GIF or WebP gives you an animated pet.
- The pet is named after the file and selected right away. Runova keeps its own copy, so you can move or delete the original.
- To remove one, click the trash button on its tile and confirm. This deletes Runova’s copy only, and if it was the active pet the default comes back.
Under the characters, Name gives your pet a name of your own (up to 24 characters). It appears on the stats card, in the right-click menu and on anything the pet says. Leave it empty to keep the character’s name. Flip walking direction fixes a character that walks backwards, and is saved for that character only.
What you can do with the pet
| Action | What happens |
|---|---|
| Click it | The pet hops and a small card opens next to it with Tokens, System and Network tabs. Click again, or Close, to dismiss it. |
| Double-click it | Brings up Runova. If the pet is still showing a failed pipeline, it opens that run instead. |
| Drag it | Places it anywhere on the screen. |
| Right-click it | Opens its menu. |
The three tabs of the card:
- Tokens: today’s token count and cost, 7-day and 30-day totals, a small chart and your top three agents. If no sources are connected it points you to Token Usage.
- System: CPU, memory, GPU and disk activity.
- Network: download and upload speed with a small chart, plus whether your ping targets answer and how fast. The targets come from Settings, Network, Network ping targets.
The right-click menu has Open Runova (or Open the failed run), Stop moving / Start moving again, Hide for 15 min, 30 min, 1 hour or 3 hours, and Turn the pet off. While it is hidden, Settings, AI Pet says until when and offers Show now.
Motion, speed and size
- Motion: Wander the screen (off keeps it still), Can climb to the top (a rope drops, it climbs, walks the top edge and comes back down), Come down with a parachute (floats down instead of rappelling) and 3D rope and parachute (shaded gear for a pet you uploaded as a 3D render). The last two need climbing on.
- Action speed: separate sliders for Walking, Climbing, Rappelling and Parachute, from 40% to 200% (100% is the usual pace).
- Size: Display size from 50% to 160%, and Click area from 40% to 100%. Turn the click area down when your picture has empty space around the character, so clicks and the card follow the smaller area.
What the pet says
The Alerts card has four switches, all of which need the pet to be on:
- Tell me when a pipeline fails and Tell me when a pipeline passes, for GitHub Actions runs you watch. A bubble for a failed run opens that run in Pipelines when you click it. In Settings, Notifications, Pipeline failures, you can send the click to the project’s Workspace instead, or turn it off. The failure switch appears there too.
- Tell me when internet quality changes, when the connection drops, comes back, or clearly gets better or worse.
- Tell me when a CLI needs input or finishes, for Workspace terminals you are not looking at.
A speech bubble disappears on its own after a few seconds, or when you click it. The pet can also speak a project’s Desktop companion hook, see Notifications and Telegram.
Keep computer awake
The status bar at the bottom of the window has a Keep computer awake control, shown as a mug with the current mode and a dot that is filled while the computer is being held awake. Click it to choose:
- On: keep this computer awake continuously.
- Agent (the default): stay awake while an agent or a command is running.
- Off: allow normal sleep.
In Agent mode the panel says what is holding the computer awake, such as an agent at work, a command in a terminal, an SSH session or file transfers. The screen can still turn off, only sleep is held back. This also keeps the app from being slowed down while it is in the background.
Tips
- If a widget or the pet seems to be hidden behind another window, turn Always on top on for a widget, or toggle the pet off and on. The pet puts itself back on top of other windows every few seconds on its own.
- Use Hide for when you are presenting. The pet returns by itself.
- Widgets are separate windows. They do not appear in the taskbar, so use the gear on the widget to change or remove it.